> For the complete documentation index, see [llms.txt](https://docs.uptiq.ai/llms.txt). Markdown versions of documentation pages are available by appending `.md` to page URLs; this page is available as [Markdown](https://docs.uptiq.ai/task-guides/integrate-an-agent.md).

# Integrate an agent

Every way to put an agent to work: attach it to a Qore app, embed a chat widget, call the Agent API, or build your own chat UI.

This guide is organized by task. Find what you want to do in the list below, then follow the steps.

| Task                                            | Go to                                                         |
| ----------------------------------------------- | ------------------------------------------------------------- |
| Add an existing agent to an app I built in Qore | [Attach to a Qore app](#attach-an-agent-to-a-qore-app)        |
| Build a new agent for my Qore app               | [Build one for the app](#build-a-new-agent-for-the-app)       |
| Ask the app builder to add an agent             | [Ask the builder](#ask-the-app-builder-to-add-an-agent)       |
| Choose how to run the agent in my own app       | [Choose an integration](#choose-an-integration)               |
| Open the integration options                    | [Integrate Agent](#open-integrate-agent)                      |
| Create the keys an integration needs            | [Keys](#create-the-keys)                                      |
| Allow the domains the widget runs on            | [Allowed Domains](#allow-your-domains)                        |
| Drop a chat widget onto my website              | [Embedded Chat](#embed-a-chat-widget)                         |
| Use the widget without React, or full screen    | [Widget variants](#use-the-html-web-component-or-full-screen) |
| Tell the widget who the user is                 | [Pass the user](#pass-the-signed-in-user)                     |
| Call the agent from my backend                  | [Agent API](#call-the-agent-from-my-backend)                  |
| Generate an API key and secret                  | [API key and secret](#generate-an-api-key-and-secret)         |
| Choose the client, mode, and dialect            | [Code sample](#choose-the-client-mode-and-dialect)            |
| Get the agent's answer                          | [Get the result](#get-the-result)                             |
| Send a document with a request                  | [Send a document](#send-a-document)                           |
| Pass variables, a user ID, or a business ID     | [Pass variables](#pass-variables-a-user-id-or-a-business-id)  |
| Get updates by webhook                          | [Webhooks](#get-updates-by-webhook)                           |
| Stop a running execution                        | [Abort](#stop-a-running-execution)                            |
| List the agent's conversations                  | [Conversations](#list-the-agent-conversations)                |
| Understand an error response                    | [Errors](#understand-an-error-response)                       |
| Download the setup as a Markdown file           | [Download as MD](#download-the-setup-as-markdown)             |
| Build my own chat UI in the browser             | [TypeScript SDK](#build-my-own-chat-ui)                       |
| Send the signed-in user's identity              | [Send the token](#send-the-signed-in-user-token)              |
| Pass the caller's identity to an MCP server     | [$auth.token](#pass-the-caller-identity-to-an-mcp-server)     |
| Check the integration works                     | [Verify](#verify-the-integration)                             |

{% hint style="info" %}
You need a built and tested agent. If you don't have one yet, see [Create an agent](/task-guides/create-an-agent.md).
{% endhint %}

***

## <i class="fa-puzzle-piece">:puzzle-piece:</i> Add an agent to a Qore app

### Attach an agent to a Qore app

{% stepper %}
{% step %}

#### Open the app's Agents tab

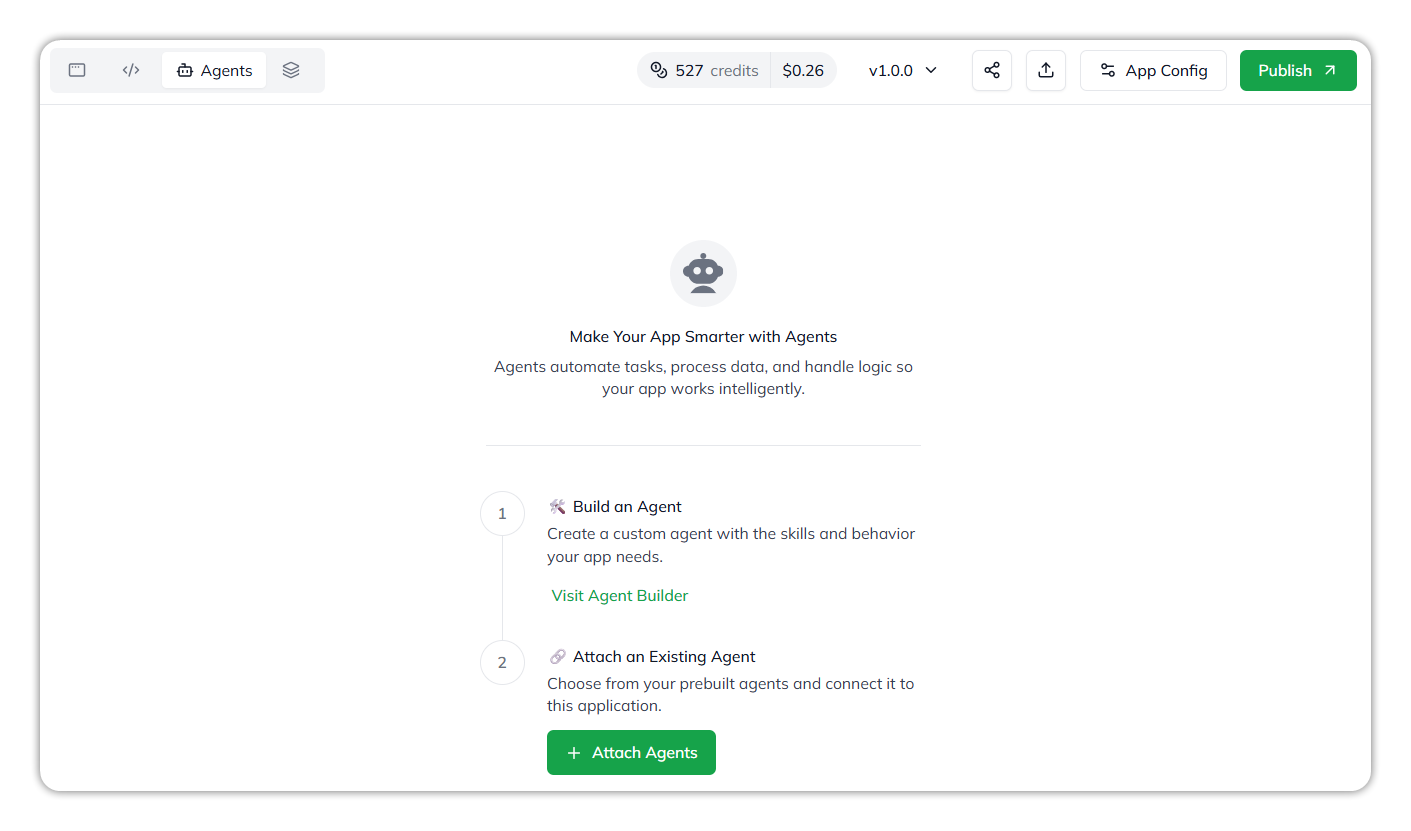
Open the app in **App Builder**, then select the **Agents** tab in the top bar. It reads **Make Your App Smarter with Agents**.

<figure><img src="https://1326225582-files.gitbook.io/~/files/v0/b/gitbook-x-prod.appspot.com/o/spaces%2F0qmgQjJ5aArDTj2ACFHG%2Fuploads%2Fgit-blob-66af7db4518160a109ba9195576533a18aa153ff%2Fqore_app-builder_how-to-agents-tab_rounded_shadow.png?alt=media" alt="The Agents tab: Make Your App Smarter with Agents, with step 1 Build an Agent (Visit Agent Builder) and step 2 Attach an Existing Agent (Attach Agents)"><figcaption><p>The app's Agents tab.</p></figcaption></figure>
{% endstep %}

{% step %}

#### Open Attach Agent(s)

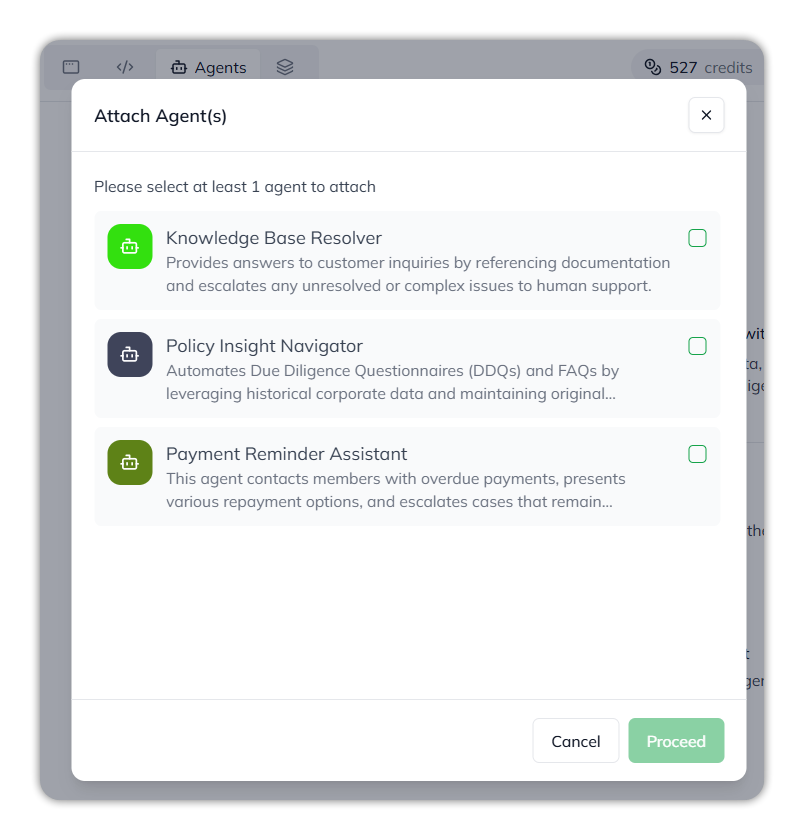
Under **Attach an Existing Agent**, select **+ Attach Agents**. **Attach Agent(s)** lists your agents, each with its name and description.
{% endstep %}

{% step %}

#### Select the agents

Tick each agent you want. Select at least one; **Proceed** stays unavailable until you do.

<figure><img src="https://1326225582-files.gitbook.io/~/files/v0/b/gitbook-x-prod.appspot.com/o/spaces%2F0qmgQjJ5aArDTj2ACFHG%2Fuploads%2Fgit-blob-c585de0008ecd6c184250b152066f14fd6d0edbe%2Fqore_app-builder_how-to-attach-agents_rounded_shadow.png?alt=media" alt="The Attach Agent(s) dialog: Please select at least 1 agent to attach, three agents with checkboxes, and Cancel and Proceed buttons"><figcaption><p>Attach Agent(s).</p></figcaption></figure>
{% endstep %}

{% step %}

#### Proceed

Select **Proceed**, or **Cancel** to close without attaching.
{% endstep %}
{% endstepper %}

{% hint style="warning" %}
You can't attach agents while the app is still generating. If you see *Cannot attach agents while application generation is in progress*, wait for the build to finish, or **Skip** the pending build step, then try again.
{% endhint %}

### Build a new agent for the app

On the app's **Agents** tab, under **Build an Agent**, select **Visit Agent Builder**. Build the agent there, then come back and attach it. See [Create an agent](/task-guides/create-an-agent.md).

### Ask the app builder to add an agent

In the app's build conversation, under **Upgrade your app**, select **Add an AI Agent** (*Connect intelligence to your app*).

***

## <i class="fa-arrow-up-right-from-square">:arrow-up-right-from-square:</i> Run the agent in your own app

### Choose an integration

| If you want to…                                          | Use                                              | Credential                 |
| -------------------------------------------------------- | ------------------------------------------------ | -------------------------- |
| Drop a chat onto a web page, with no UI to build         | **Embedded Chat**                                | Widget key, allowed domain |
| Call the agent from a backend, service, or scheduled job | **Agent API** with the **raw (HTTP)** client     | API key and secret         |
| Build your own chat UI in the browser                    | **Agent API** with the **TypeScript SDK** client | Widget key, allowed domain |

### Open Integrate Agent

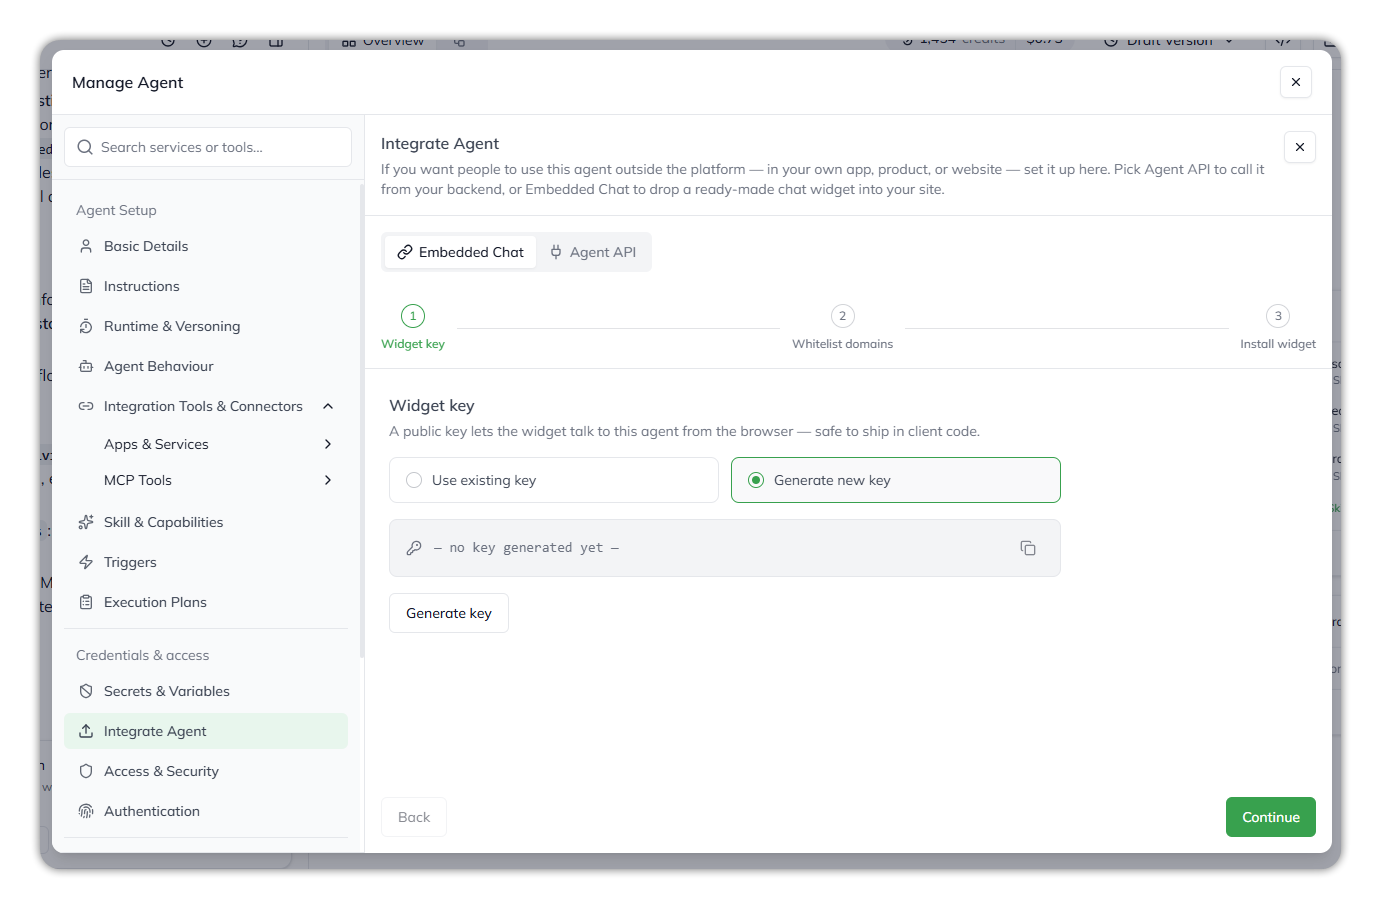
In the agent's builder, select **Integrate Agent** (`</>`) in the canvas header. It opens as a side panel with two tabs: **Embedded Chat** and **Agent API**.

{% hint style="info" %}
Versions are per agent. Use the SDK version and executor version that your own agent's panel shows. In the samples on this page, `<BASE_URL>` stands for your organization's Qore API host, and `1.4` for the executor version.
{% endhint %}

### Create the keys

Open **Agent Config** › **Access & Security**, select **+ Add Key**, name it, choose the type, and select **Generate Key**:

* **Widget Key** — for Embedded Chat and the TypeScript SDK. Safe to ship in browser code.
* **API Key** — a key and secret pair for server-to-server calls. Copy the secret straight away; it's shown only once.

The Embedded Chat and Agent API tabs can also create keys for you. See [Create an agent › Create an access key](/task-guides/create-an-agent.md#create-an-access-key).

### Allow your domains

In **Access & Security**, under **Allowed Domains**, select **+ Add New Domain**, enter each origin the widget runs on, and select **Save**. With the list empty, the widget runs nowhere outside the platform. Enter each domain exactly as the browser sends it, such as `https://app.example.com`.

***

## <i class="fa-message">:message:</i> Embedded Chat

### Embed a chat widget

{% stepper %}
{% step %}

#### Widget key

On the **Embedded Chat** tab, choose **Use existing key** or **Generate new key**, then select **Continue**.

<figure><img src="https://1326225582-files.gitbook.io/~/files/v0/b/gitbook-x-prod.appspot.com/o/spaces%2F0qmgQjJ5aArDTj2ACFHG%2Fuploads%2Fgit-blob-75c5226d4f2af344c407ea985f812e367cda8852%2Fqore_agent-builder_manage-agent-integrate-agent-embedded-chat_rounded_shadow.png?alt=media" alt="The Integrate Agent panel on the Embedded Chat tab, at step 1 Widget key, with Use existing key and Generate new key options"><figcaption><p>Embedded Chat, step 1.</p></figcaption></figure>
{% endstep %}

{% step %}

#### Whitelist domains

Add each domain your widget will run on, such as `app.yourdomain.com`, then select **Continue**. The domains go on the agent's **Allowed Domains** list.
{% endstep %}

{% step %}

#### Install the widget

Install the React SDK, import its stylesheet, and mount the widget:

{% code title="Install" %}

```bash
npm install @uptiqai/widgets-sdk@<version>
```

{% endcode %}

{% code title="Mount the widget" %}

```tsx
import { ChatWidget } from '@uptiqai/widgets-sdk';
import '@uptiqai/widgets-sdk/dist/style.css';

export default function App() {
  return (
    <ChatWidget
      config={{
        serverUrl: '<BASE_URL>',
        agentId: '<agent-id>',
        widgetKey: '<your-widget-key>',
        agentExecutorVersion: '1.4',
      }}
      user={{ uid: 'user_123', firstName: 'John', email: 'john@example.com' }}
    />
  );
}
```

{% endcode %}

Use the SDK version the panel shows: it's the one released with the agent's executor version.
{% endstep %}
{% endstepper %}

The widget has a chat popover or full-screen view, a conversation sidebar, new chats, message history that persists across sessions, and theming.

### Use the HTML web component or full screen

The widget also comes as a framework-agnostic HTML web component, and each form has a full-screen variant. Both share the same `config`, `user`, `theme`, and `instanceId`. Full screen adds `hideTrigger` (or `hide-trigger` in HTML), so you can open it from your own button. See [Integrate Agent › Widget variants](/console/agent-builder/deploy/agent-integration.md#reference-widget-variants).

### Pass the signed-in user

Set `user` to the person signed in to your app: `uid`, `firstName`, and `email` are required, and `lastName` is optional.

{% hint style="warning" %}
`user` must come from your own authentication system. Never fill it from query parameters or other input a visitor can change.
{% endhint %}

***

## <i class="fa-code">:code:</i> Agent API

### Call the agent from my backend

The Agent API's raw HTTP client triggers the agent with no UI. Send a `POST` to the trigger endpoint with the API key and secret:

{% code title="Trigger the agent" overflow="wrap" %}

```bash
curl -X POST "<BASE_URL>/agent-executor/1.4/agents/:agentId/trigger" \
  -H "x-api-key: YOUR_AGENT_API_KEY" \
  -H "x-api-key-secret: YOUR_AGENT_API_KEY_SECRET" \
  -H "Content-Type: application/json" \
  -d '{"message": "Summarize the latest sales report"}'
```

{% endcode %}

The request body needs `message` for a new execution (or `resumeData` to resume a paused one). Optional fields include `payload`, `documents`, `executionId`, `executionMode` (`async`, the default, or `sync`), `responseFormat` (`Markdown` or `Json`), `webhooks`, and `token`.

{% hint style="info" %}
The trigger endpoint isn't idempotent: each call starts a new execution unless you pass an existing `executionId`.
{% endhint %}

### Generate an API key and secret

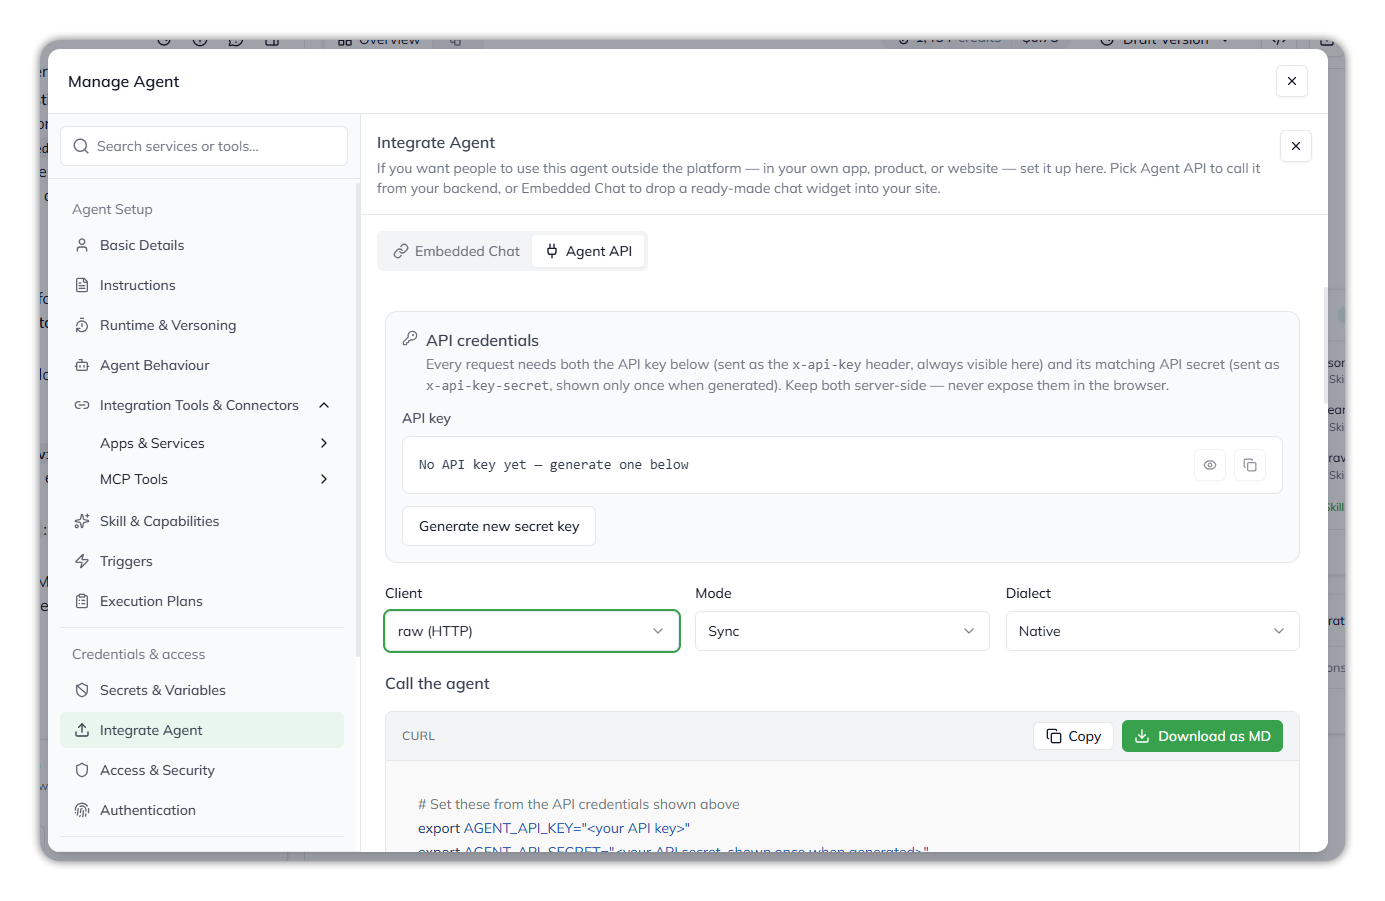
On the **Agent API** tab, select **Generate new secret key**. It creates a new key and secret and shows the secret once; copy it straight away. Generating doesn't deactivate any existing key. Keep both values server-side.

<figure><img src="https://1326225582-files.gitbook.io/~/files/v0/b/gitbook-x-prod.appspot.com/o/spaces%2F0qmgQjJ5aArDTj2ACFHG%2Fuploads%2Fgit-blob-a499d7cffd683816349fb10209983ae1475a10a3%2Fqore_agent-builder_manage-agent-integrate-agent-api_rounded_shadow.png?alt=media" alt="The Agent API tab of Integrate Agent, with the API credentials panel reading No API key yet, the Generate new secret key button, and the Client, Mode and Dialect selectors"><figcaption><p>The Agent API tab.</p></figcaption></figure>

### Choose the client, mode, and dialect

The **Agent API** tab builds one code sample from three selectors. Select **Copy** to copy it.

| Selector    | Options                                                                   |
| ----------- | ------------------------------------------------------------------------- |
| **Client**  | `raw (HTTP)`, `TypeScript SDK`, and `Python SDK` (marked **Coming soon**) |
| **Mode**    | `Sync`, `Async`, and `Realtime`                                           |
| **Dialect** | `Native` (Qore's own request shape) and `OpenAI`                          |

### Get the result

* **Async** (the default) — the trigger returns `{ "executionId": "exec_123" }`, an acknowledgement, not an answer. Check the execution's queue status, or receive a [webhook](#get-updates-by-webhook).
* **Sync** — the call waits until the agent finishes, and returns the answer in `result.content`. Use it only when you must wait for the result.

Check an execution with `GET /agent-executor/1.4/agents/:agentId/executions/:executionId/queue-status`. Messages sent to the same `executionId` run one at a time: one shows `Executing`, the rest `Pending`.

### Send a document

{% stepper %}
{% step %}

#### Get a signed upload URL

`POST /agent-executor/1.4/agents/:agentId/uploads/signed-urls`, with `{ "count": 1 }`. The response gives an `id` and a `url` for each file.
{% endstep %}

{% step %}

#### Upload the file

`PUT` the file to the returned `url`.
{% endstep %}

{% step %}

#### Attach it to the trigger

Add it to `documents` in the trigger request, with its `id`, and preferably its `fileName` and `mimeType`.
{% endstep %}
{% endstepper %}

The older `documents/presigned-url` endpoint is deprecated.

### Pass variables, a user ID, or a business ID

Add these to the trigger request:

* `uid` — the calling user's ID in your system.
* `variables` — key/value pairs the agent's instructions can reference. Every key must already be declared in the agent's variables; an undeclared key is rejected.
* `businessId` — attributes the run to a business or tenant of your own.

### Get updates by webhook

Add webhook URLs to `webhooks` in the trigger request to receive updates when an execution completes or needs input. Webhooks need executor version 1.2 or later.

Each webhook carries an `X-Webhook-Signature` header: an RSA-SHA256 signature of the raw JSON body. Verify it against the public key shown on the agent's **Agent API** screen.

### Stop a running execution

`POST /agent-executor/1.4/agents/:agentId/executions/:executionId/abort`. The agent stops and emits a final `done` event. You can also cancel a message that's still `Pending`.

### List the agent conversations

`GET /agent-executor/1.4/agents/:agentId/conversations` returns titles and metadata, not transcripts. Add `?initiatedBy=user_123` to filter to one user. You can also fetch one conversation's transcript by its `executionId`.

### Understand an error response

| Status | Meaning         | Example                                                          |
| ------ | --------------- | ---------------------------------------------------------------- |
| `400`  | Invalid request | `{ "error": "Message or resume data is required" }`              |
| `401`  | Bad credentials | `{ "error": "Invalid or missing agent API key" }`                |
| `403`  | Forbidden       | `{ "message": "You're not authorized to perform this action." }` |
| `500`  | Server error    | `{ "message": "Something went wrong. Please try again later." }` |

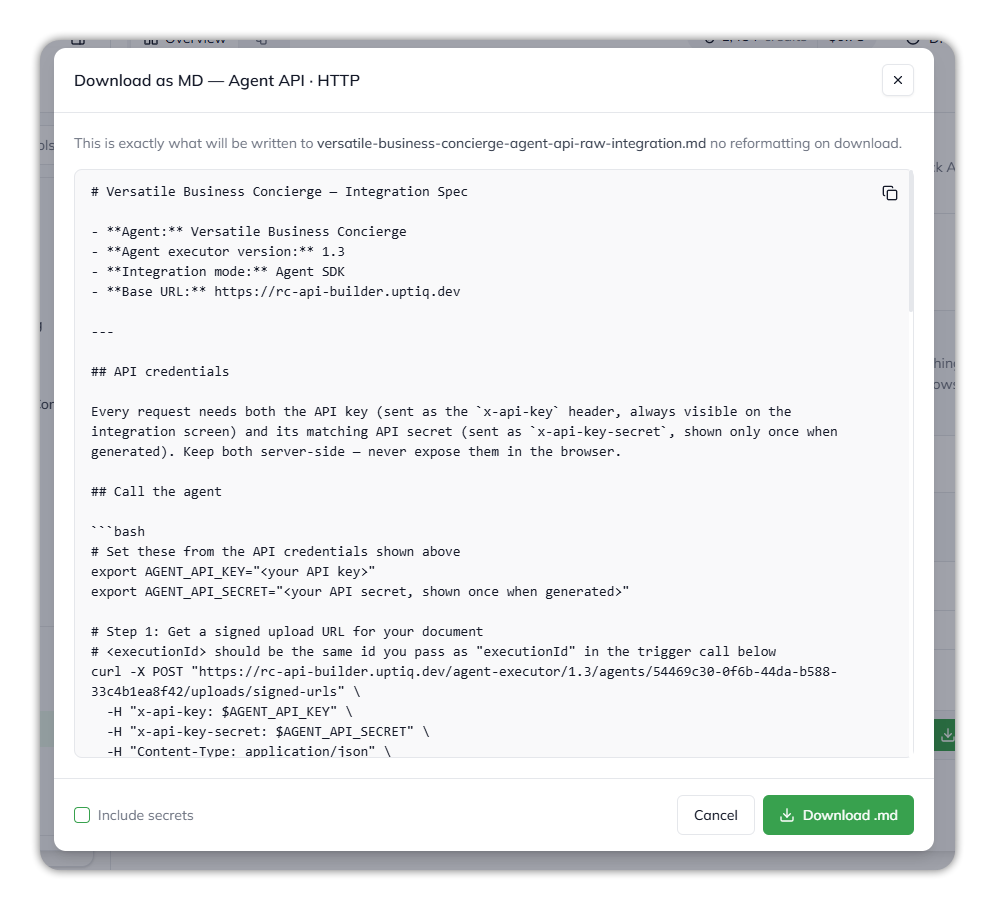
### Download the setup as Markdown

Select **Download as MD** on the **Agent API** tab, or on Embedded Chat's **Install widget** step. A preview shows the file: the agent's name, executor version and base URL, the credentials guidance, and the sample you chose.

On the **Agent API** tab, **Include secrets** writes the agent's API key and secret into the file, so it works as-is.

<figure><img src="https://1326225582-files.gitbook.io/~/files/v0/b/gitbook-x-prod.appspot.com/o/spaces%2F0qmgQjJ5aArDTj2ACFHG%2Fuploads%2Fgit-blob-4cdbb671de8d9b99be0bb90011270a9999de598e%2Fqore_agent-builder_manage-agent-integrate-agent-download-md_rounded_shadow.png?alt=media" alt="The Download as MD dialog for Agent API over HTTP, previewing the integration spec Markdown, with the Include secrets checkbox and the Download .md button"><figcaption><p>Download as MD.</p></figcaption></figure>

{% hint style="warning" %}
A file downloaded with **Include secrets** is a credential. Anyone who has it can call the agent. If it leaks, deactivate the key in **Access & Security**.
{% endhint %}

For every endpoint and field, see [Integrate Agent › Agent API](/console/agent-builder/deploy/agent-integration.md#agent-api).

***

## <i class="fa-window-restore">:window-restore:</i> Your own chat UI

### Build my own chat UI

Choose the **TypeScript SDK** client on the **Agent API** tab. The headless SDK handles the connection to the agent while you build the interface. It uses the widget key, and your domain must be on **Allowed Domains**.

{% code title="Create an instance" %}

```ts
import { createHeadlessAgentInstance } from '@uptiqai/widgets-sdk';

const instance = createHeadlessAgentInstance({
  config: { serverUrl: '<BASE_URL>', agentId: '<agent-id>', widgetKey: '<your-widget-key>', agentExecutorVersion: '1.4' },
  user: { uid: 'user-123', firstName: 'Jane', lastName: 'User', email: 'jane@example.com' },
  instanceId: 'my-chat-instance',
});
```

{% endcode %}

`config`, `user`, and `instanceId` are required; `authToken` is optional. See [Integrate Agent › TypeScript SDK client](/console/agent-builder/deploy/agent-integration.md#typescript-sdk-client).

***

## <i class="fa-fingerprint">:fingerprint:</i> Identity

### Send the signed-in user token

When the agent has [Authentication](/task-guides/create-an-agent.md#verify-who-is-calling-the-agent) turned on, send the signed-in user's identity token with each request:

* **Agent API** — add `token` beside `message` in the trigger body.
* **Embedded Chat** — pass `authToken` in React, or `auth-token` in HTML.
* **TypeScript SDK** — pass `authToken` when you create the instance. A headless instance also has `setAuthToken()` for refreshed tokens.

| Authentication | Token                       | Result                                               |
| -------------- | --------------------------- | ---------------------------------------------------- |
| Off            | Any, or none                | The run proceeds; the token is ignored.              |
| On             | None                        | The run proceeds, with no authenticated caller.      |
| On             | Valid                       | The run proceeds, and `$auth.token` holds the token. |
| On             | Invalid, or for another app | Rejected with `AGENT_AUTHENTICATION_FAILED`.         |
| On             | Expired Microsoft Entra ID  | Rejected with `TOKEN_EXPIRED`.                       |

{% hint style="warning" %}
Send tokens only from your app's authenticated session. Never accept them from URLs, form fields, or other input a visitor controls.
{% endhint %}

### Pass the caller identity to an MCP server

In an MCP connection's configuration, reference `$auth.token` where the server expects a user credential. Qore replaces it with the verified token during the run, so the server can apply the caller's permissions. `$auth.token` works only in MCP connection configurations; with no token, it resolves empty. See [Authentication](/console/agent-builder/deploy/authentication-1.md).

***

## <i class="fa-wrench">:wrench:</i> Check and fix

### Verify the integration

* **A Qore app** — preview the app and confirm the agent responds and uses its knowledge and skills.
* **Your own app** — send a request from your surface and confirm the agent answers. It responds only where your keys and domains allow.
* **Runs** — find each run in **Control Center** › **Observe** › **Runs & Traces**.

***

## <i class="fa-triangle-exclamation">:triangle-exclamation:</i> Common issues

* **"Cannot attach agents while application generation is in progress."** Let the app's build finish, or **Skip** the pending step, then attach.
* **Proceed is greyed out in Attach Agent(s).** Tick at least one agent.
* **The widget doesn't appear.** Import the stylesheet, provide both `config` and `user`, and check the widget key is correct and active.
* **"Unauthorized" errors from the widget.** The page's domain isn't on **Allowed Domains** exactly as the browser sends it, including protocol, subdomain, and port.
* **API calls return `401`.** Check the `x-api-key` and `x-api-key-secret` values. If you lost the secret, generate a new pair.
* **A request with variables is rejected.** Declare every variable key on the agent first.
* **No webhook arrives.** Webhooks need executor version 1.2 or later.
* **Requests with a token are rejected.** Check the provider details in **Authentication**, and that the token was issued for the configured application or client.

***

## <i class="fa-link">:link:</i> Related pages

* [Integrate Agent](/console/agent-builder/deploy/agent-integration.md), [Access & Security](/console/agent-builder/deploy/authentication.md), and [Authentication](/console/agent-builder/deploy/authentication-1.md)
* Build the agent first: [Create an agent](/task-guides/create-an-agent.md)
* Build the host app: [Create an app](/task-guides/create-an-app.md)

***

{% columns %}
{% column width="83.33333333333334%" %}

<p align="right"><em>Maintained by</em> <mark style="color:green;">Abhishek Paul</mark><br><code>AI-assisted, human-approved</code></p>
{% endcolumn %}

{% column width="16.666666666666664%" %}

<div align="left"><img src="https://1326225582-files.gitbook.io/~/files/v0/b/gitbook-x-prod.appspot.com/o/spaces%2F0qmgQjJ5aArDTj2ACFHG%2Fuploads%2Fgit-blob-d034645b4f8f8ee661985f5306b60ded3289653c%2Fmaintainer-abhishek-paul.png?alt=media" alt="" width="60"></div>
{% endcolumn %}
{% endcolumns %}


---

# Agent Instructions
This documentation is published with GitBook. GitBook is the documentation platform designed so that both humans and AI agents can read, navigate, and reason over technical content effectively. Learn more at gitbook.com.

## Querying This Documentation
If you need additional information that is not directly available in this page, you can query the documentation dynamically by asking a question.

Perform an HTTP GET request on the current page URL with the `ask` query parameter, and the optional `goal` query parameter:

```
GET https://docs.uptiq.ai/task-guides/integrate-an-agent.md?ask=<question>&goal=<endgoal>
```

`ask` is the immediate question: it should be specific, self-contained, and written in natural language.
`goal` is optional and describes the broader end goal you are ultimately trying to accomplish on behalf of the user. GitBook uses it to tailor the answer towards what is most useful for that goal.

The response will contain a direct answer to the question and relevant excerpts and sources from the documentation.

Use this mechanism when the answer is not explicitly present in the current page, you need clarification or additional context, or you want to retrieve related documentation sections.