> For the complete documentation index, see [llms.txt](https://docs.uptiq.ai/llms.txt). Markdown versions of documentation pages are available by appending `.md` to page URLs; this page is available as [Markdown](https://docs.uptiq.ai/task-guides/create-an-app.md).
# Create an app
Every App Builder task, from your first prompt to publishing and managing your apps.
This guide is organized by task. Find what you want to do in the list below, then follow the steps.
| Task | Go to |
| ----------------------------------------------------- | ---------------------------------------------------------------- |
| Create an app by describing it in a chat prompt | [Create an app from a prompt](#create-an-app-from-a-chat-prompt) |
| Start from a ready-made template | [Start from a template](#start-from-a-template) |
| Choose between a web app, a website, and a mobile app | [Choose the app type](#choose-what-kind-of-app-to-build) |
| Choose the model that builds my app | [Choose the model](#choose-the-model-that-builds-my-app) |
| Find the mode control | [Find the mode control](#find-the-mode-control) |
| Plan the app before any code is written | [Plan first](#plan-an-app-before-building-it) |
| Change a plan before building | [Revise a plan](#change-the-plan) |
| See the reasoning behind a plan | [See the reasoning](#see-the-reasoning-behind-the-plan) |
| Start building from a plan | [Build from a plan](#start-building-from-the-plan) |
| Build straight away | [Build straight away](#build-straight-away) |
| Plan a change to an existing app | [Plan a workspace change](#plan-a-change-to-an-existing-app) |
| Reshape a template with a plan | [Plan a template](#start-from-a-template-and-reshape-it) |
| Get feedback on a plan | [Share a plan](#get-feedback-on-a-plan) |
| Attach a file or import an app package with my prompt | [Attach a file](#attach-a-file-or-an-app-package-to-my-prompt) |
| Set my app's visual style and logos | [Set design and branding](#set-the-design-and-branding) |
| Bring in an app I already have | [Import an app](#import-an-app-i-already-have) |
| Build the app from my own IDE | [Build from your IDE](#build-the-app-from-my-own-ide) |
| Change the app by chatting | [Change the app](#change-the-app-by-chatting) |
| Answer a question the build is waiting on | [Answer the build](#answer-a-question-the-build-is-waiting-on) |
| Stop the build agent while it's working | [Stop the agent](#stop-the-build-agent) |
| Fix an error in the preview | [Fix a preview error](#fix-an-error-in-the-preview) |
| See the running app | [Preview the app](#preview-the-app) |
| View or edit the app code | [Edit the code](#view-or-edit-the-app-code) |
| Add an agent to my app | [Add an agent](#add-an-agent-to-my-app) |
| Share the app with someone | [Share the app](#share-the-app) |
| See how many credits the app has used | [Check credits](#see-how-many-credits-the-app-has-used) |
| Go back to an earlier version | [Use versions](#go-back-to-an-earlier-version) |
| Change the app's settings | [App Config](#change-the-app-settings) |
| Rename the app or change its description | [Rename the app](#rename-the-app) |
| Serve the app from my own domain | [Connect a domain](#connect-my-own-domain) |
| Store API keys and credentials for the app | [Environment variables](#add-environment-variables) |
| Inspect runtime behavior in the preview | [Developer tools](#turn-on-developer-tools) |
| Get notified when a build completes | [Build notifications](#turn-on-build-notifications) |
| Export the app as a package | [Export the app](#export-the-app) |
| Publish the app | [Publish the app](#publish-the-app) |
| Connect a database so the app can publish | [Connect a database](#connect-a-database-before-publishing) |
| Fix a publish that failed | [Fix a failed publish](#fix-a-failed-publish) |
| See how the app is put together | [Data Flow](#see-how-the-app-is-put-together) |
| Look at the app's database | [DB Explorer](#look-at-the-app-database) |
| Check the app's test results | [Testing](#check-the-test-results) |
| Find and fix security issues | [Security](#find-and-fix-security-issues) |
| See how a published app is used | [Analytics](#see-how-a-published-app-is-used) |
| Find one of my apps | [Find an app](#find-one-of-my-apps) |
| Open an app to keep working on it | [Open an app](#open-an-app-to-keep-working-on-it) |
| Delete a draft app | [Delete an app](#delete-a-draft-app) |
{% hint style="info" %}
You need a Qore account and a project to build in.
{% endhint %}
***
## :window-maximize: Start a new app
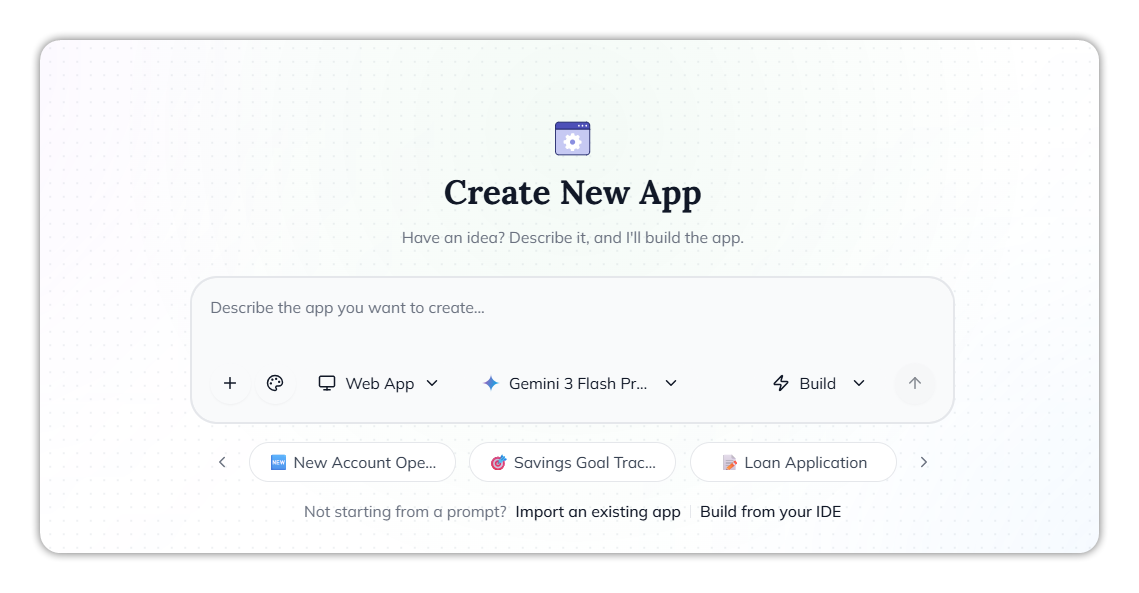
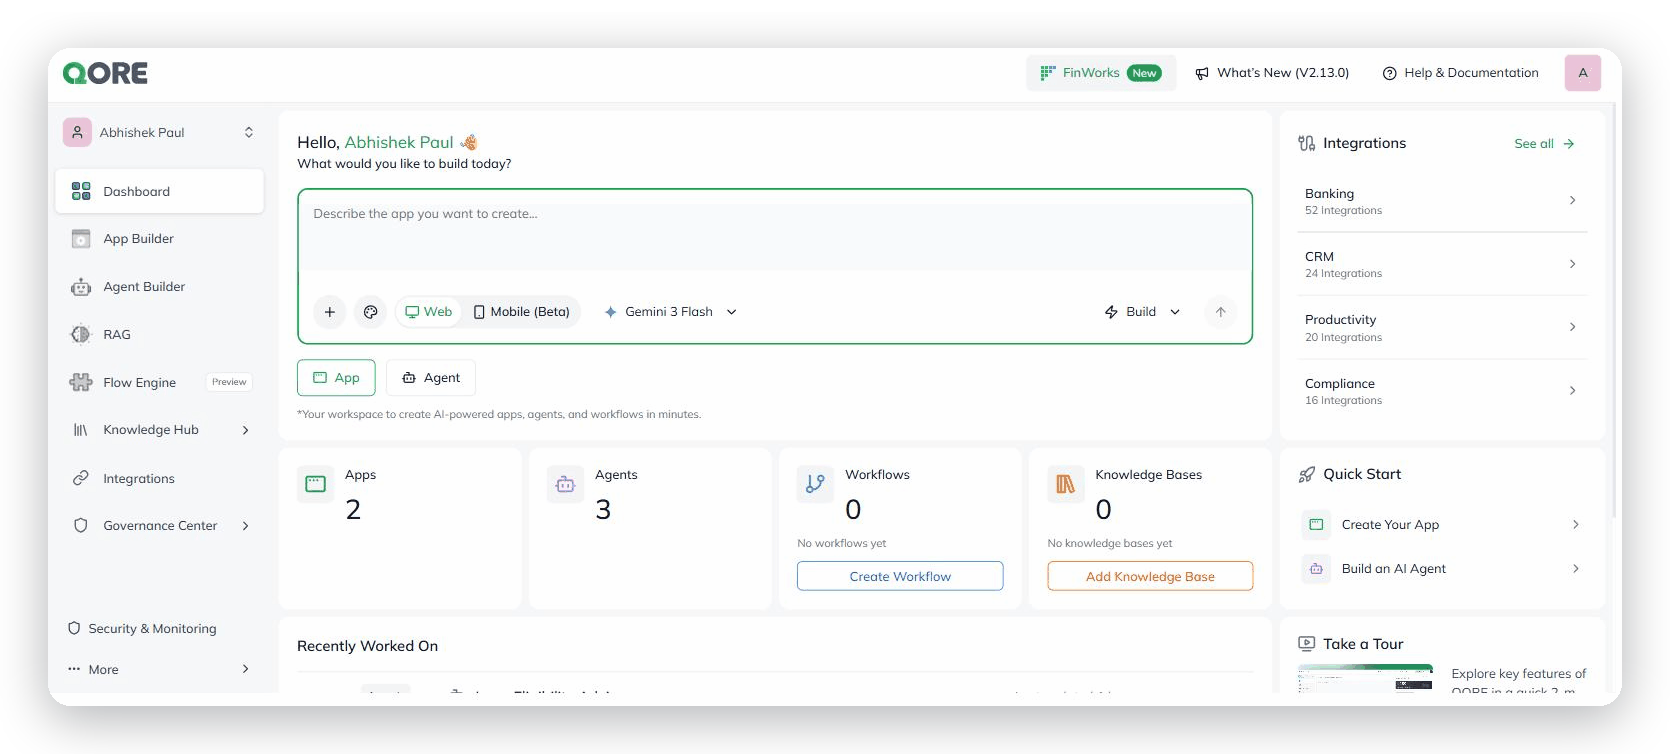
You start every new app from **Create New App** in App Builder. The prompt box holds all the controls you need before the first build.
Create New App.
The controls along the bottom of the prompt box, from left to right:
The prompt box controls.
| Control | What it does |
| ------------- | -------------------------------------------------------------------------- |
| **+** | Attach a file or import an app package. |
| Palette icon | Opens **Design and Branding Preferences**. |
| **Web App** ⌄ | Chooses the app type: **Web App**, **Website**, or **Mobile (Beta)**. |
| Model ⌄ | Chooses the model that builds the app, such as **Gemini 3 Flash Preview**. |
| **Build** ⌄ | Chooses the mode: **Build Mode** or **Plan Mode**. |
| Send arrow | Submits your prompt. |
### Create an app from a chat prompt
{% stepper %}
{% step %}
#### Describe the app
In **Describe the app you want to create…**, write what you want to build. For example: *"Create a Web app for Loan Lead Capture with an email input and submit button."*
{% endstep %}
{% step %}
#### Set your options
Before you submit, set the app type, the model, and the mode with the controls in the prompt box. Each is covered in its own section below.
{% endstep %}
{% step %}
#### Submit the prompt
Select the send arrow, or press Enter.
{% endstep %}
{% step %}
#### Wait for the environment to spin up
The platform shows **"Spinning up Application Environment"**. It creates and names the app, such as *Loan Lead Capture Pro*, then opens it in the app workspace.
{% endstep %}
{% step %}
#### Watch it build
The left panel streams the build. It shows **Application initialized ✓**, then the components and steps. If the build stops to ask you something, see [Answer a question the build is waiting on](#answer-a-question-the-build-is-waiting-on).
{% endstep %}
{% endstepper %}
### Start from a template
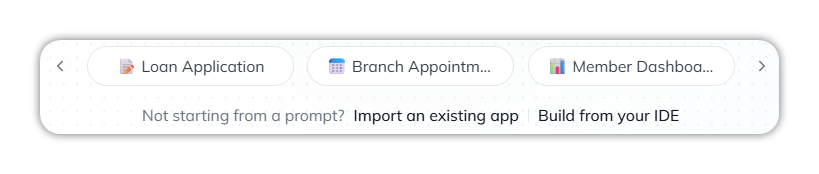
Template cards sit below the prompt box, for example **Loan Application**. Use the **‹** and **›** arrows to scroll through them. Select a card instead of writing a prompt, and the platform drafts the requirements for you.
Template cards, and the other ways to start.
### Choose what kind of app to build
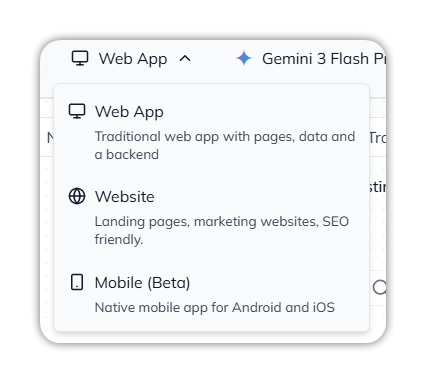
Open the app type menu (it reads **Web App** by default) and choose one:
* **Web App** — Traditional web app with pages, data and a backend.
* **Website** — Landing pages, marketing websites, SEO friendly.
* **Mobile (Beta)** — Native mobile app for Android and iOS.
The app type menu.
Choose the type before you submit the prompt.
### Choose the model that builds my app
Open the model menu, which shows the current model, such as **Gemini 3 Flash Preview**, and select a model. When the list holds more than six models, type part of a name in **Search models** to narrow it. The current model is ticked.
For each model's provider logo, see [Importing apps](/console/app-builder/creating-and-importing-apps.md#create-a-new-app-from-a-prompt).
### Plan the app before building it
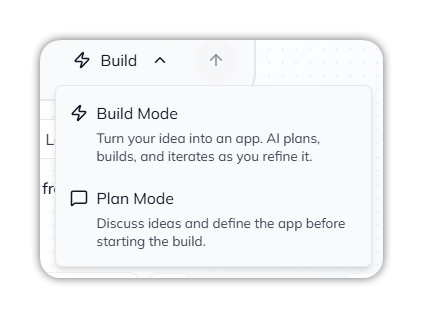
Open the mode menu (it reads **Build** by default) and select **Plan Mode**. Prompts then return a plan to review instead of building.
The mode menu.
For detailed planning and building tasks, see [Plan and Build modes](#plan-and-build-modes).
### Attach a file or an app package to my prompt
Select **+** in the prompt box, then choose:
* **Attach File** — add a document or image, such as a requirements document or a screenshot, for the builder to work from.
* **Import App Package** — bring in a packaged app to build on.
The + menu.
### Set the design and branding
{% stepper %}
{% step %}
#### Open Design and Branding Preferences
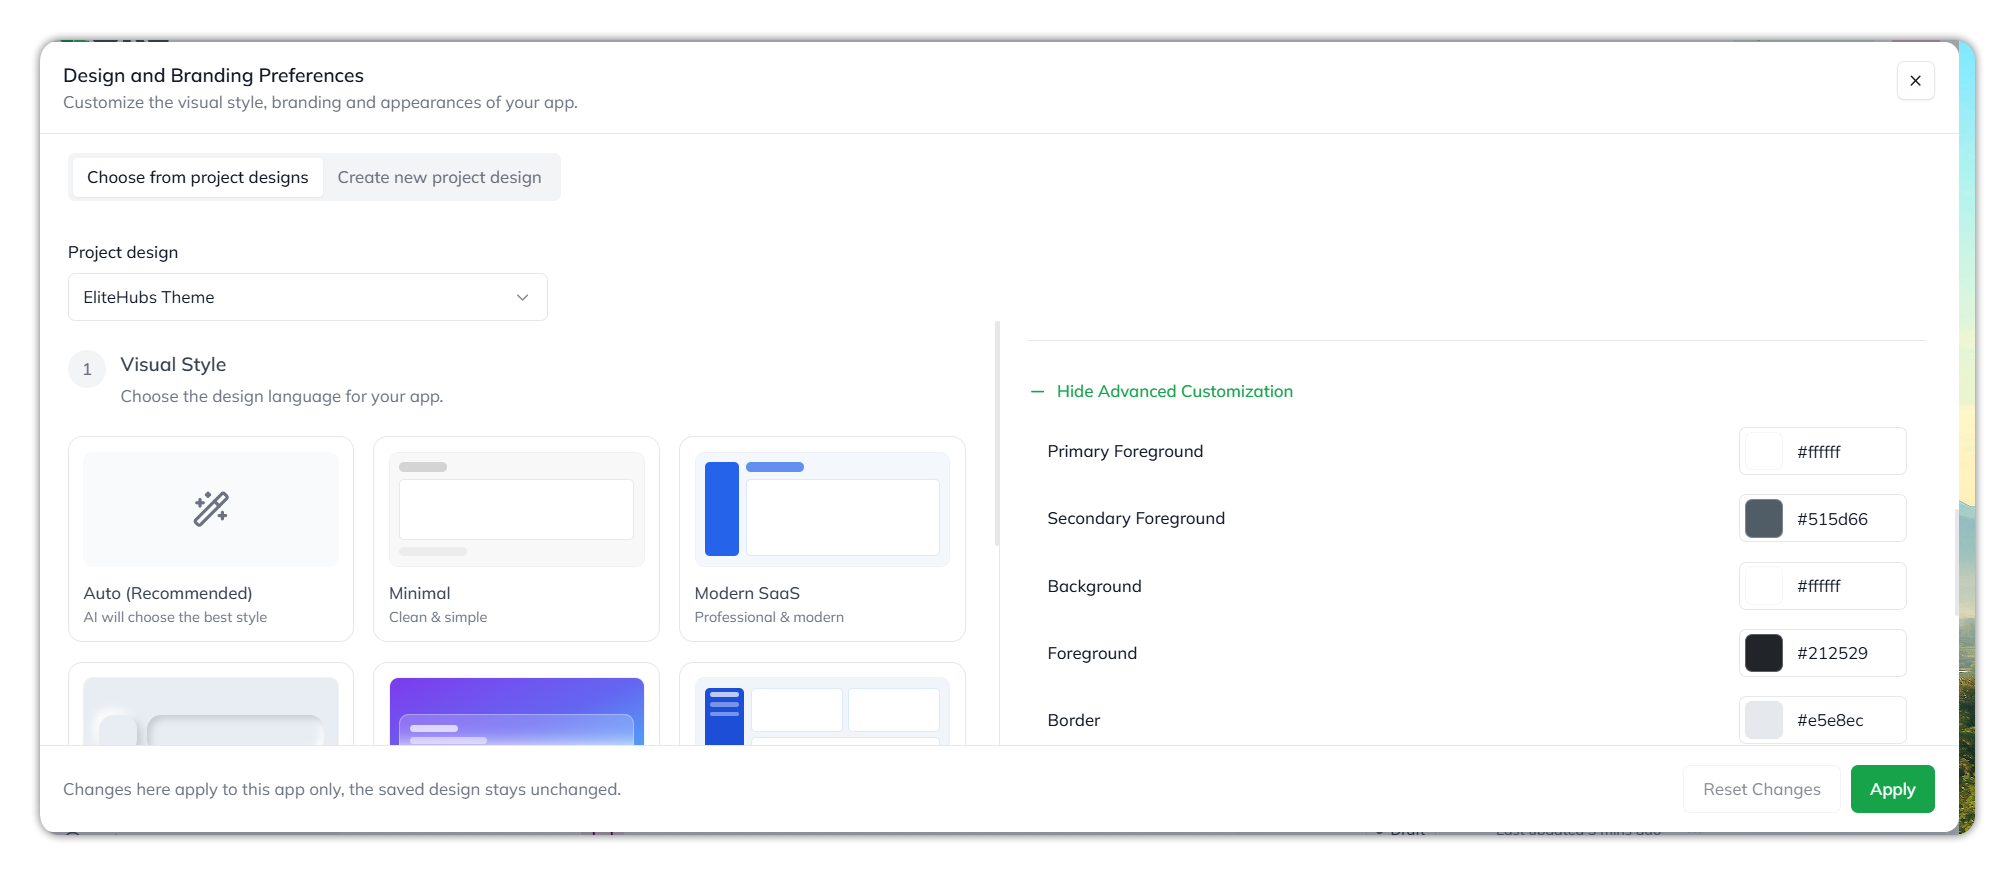
Select the palette icon in the prompt box. The **Design and Branding Preferences** dialog opens: *Customize the visual style, branding and appearances of your app.*
{% endstep %}
{% step %}
#### Choose a design
Choose one of two tabs:
* **Choose from project designs** — pick a saved design from **Project design**, such as **Calm Neutral**.
* **Create new project design** — make a new one.
{% endstep %}
{% step %}
#### Pick a visual style
Under **1 Visual Style** (*Choose the design language for your app*), select a style card. **Auto (Recommended)** lets the AI choose the best style. Others include **Minimal** (Clean & simple) and **Modern SaaS** (Professional & modern). The selected card shows a tick.
{% endstep %}
{% step %}
#### Upload your logos
Under **2 Brand Logos**, select **Upload** for each logo you have:
* **Full Logo** — main logo displayed in headers and branding areas.
* **Small Logo** — square or compact logo for smaller spaces.
* **Favicon** — the browser tab icon.
{% endstep %}
{% step %}
#### Apply
To set individual colours, expand **Advanced Customization** and set **Primary Foreground**, **Secondary Foreground**, **Background**, **Foreground**, **Border**, **Input**, **Muted**, **Muted Foreground**, **Accent**, **Accent Foreground**, **Sidebar**, and **Sidebar Foreground**, each as a swatch or a hex value. **Create new project design** has the same fields.
Advanced Customization.
Then select **Apply**. To undo what you changed in the dialog, select **Reset Changes**.
{% endstep %}
{% endstepper %}
Design and Branding Preferences.
{% hint style="info" %}
Changes here apply to this app only. The saved project design stays unchanged.
{% endhint %}
For project designs, see [Design systems](/console/design-systems.md).
### Import an app I already have
Below the template cards, select **Import an existing app**. Then either:
* Select **Click to upload or drag and drop** and choose a ZIP file up to 500 MB.
* Select **GitHub** to import a repository, or **GitLab** to import a project.
Import an existing app.
{% hint style="info" %}
A Platform package is restored as-is. Anything else — a repository, or an app exported from Lovable, v0, Bolt, or Figma Make — is converted into a Platform app.
{% endhint %}
For the GitHub and GitLab steps, see [Importing apps](/console/app-builder/creating-and-importing-apps.md#import-an-existing-app).
### Build the app from my own IDE
{% stepper %}
{% step %}
#### Open Build from your IDE
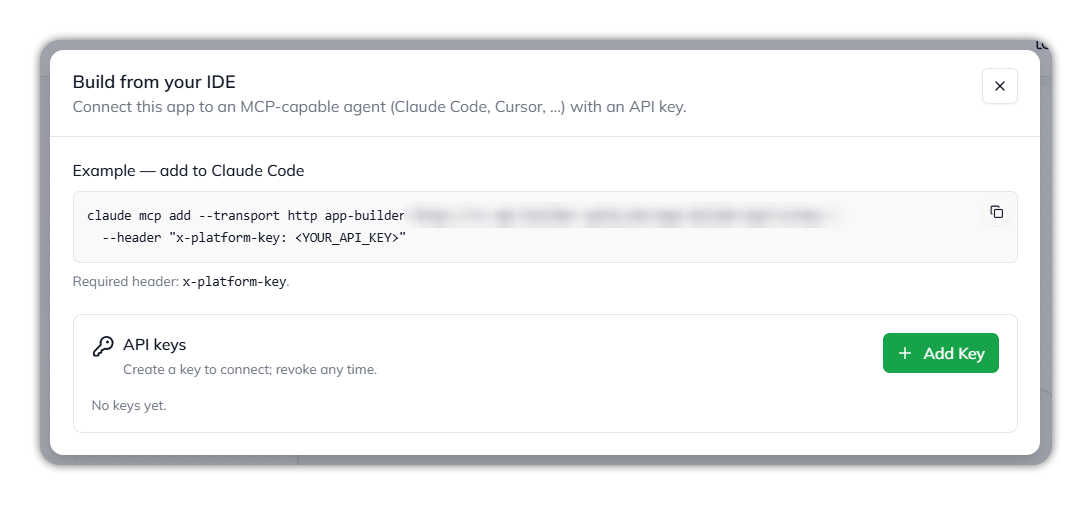
Below the template cards, select **Build from your IDE**. The dialog connects the app to an MCP-capable agent, such as Claude Code or Cursor, with an API key.
{% endstep %}
{% step %}
#### Create an API key
Under **API keys**, select **+ Add Key**. Until you create one, the list reads *No keys yet.* You can revoke a key at any time.
{% endstep %}
{% step %}
#### Add the server to your coding agent
Copy the example command, and replace `` with your key. Every request needs the `x-platform-key` header.
{% endstep %}
{% endstepper %}
Build from your IDE.
For the full command and key management, see [Importing apps](/console/app-builder/creating-and-importing-apps.md#build-from-your-ide).
***
## :list-check: Plan and Build modes
Use **Plan Mode** to define an app or change before building. Use **Build Mode** to generate or update the app.
**Build Mode** is the default. Select **Plan Mode** when you want to agree on an approach first.
### Find the mode control
The mode control is inside the prompt box. It sits at the bottom-right, beside the send arrow.
It shows **⚡ Build ⌄** in Build Mode and **Plan** in Plan Mode. Select it to choose **Build Mode** or **Plan Mode**.
### Plan an app before building it
{% stepper %}
{% step %}
#### Open the mode menu
On **Create New App**, select **⚡ Build ⌄** in the prompt box.
{% endstep %}
{% step %}
#### Select Plan Mode
Select **Plan Mode**. The control now reads **Plan**.
{% endstep %}
{% step %}
#### Describe the app
In **Describe the app you want to create…**, describe the app and send it. Set the app type and model first if needed.
{% endstep %}
{% step %}
#### Review the plan
The workspace returns a plan to review and refine. No code is built.
{% endstep %}
{% endstepper %}
### Change the plan
Chat with the planner to revise the plan. Use **Revise plan** to add features or change the logic.
For example, ask it to add a masked payment-method column. You can explore different data models without overwriting a working build.
### See the reasoning behind the plan
Open the **Thought** dropdown on the planner's reply to see its reasoning.
### Start building from the plan
When the plan looks right, select **Start building**.
You can also select **Build Mode** in the mode menu, then send a prompt.
### Build straight away
Leave the mode control on **Build**, describe the app, and send it. The build starts with that prompt.
### Plan a change to an existing app
Open the app from **My Apps**. In the workspace, select **Plan Mode**, then describe the change.
Switch back to **Build Mode** to build it.
### Start from a template and reshape it
Select a template card below the prompt box, such as **Loan Application**. Then use **Plan Mode** to remove features, add features, or rebrand it.
### Get feedback on a plan
**Publish** is unavailable in Plan Mode. To invite reviewers, select the share icon in the workspace top bar.
Enter their address in **Email ID**, then select **Send Invite**.
{% hint style="warning" %}
**Sharing grants access at the account level.** An invite adds the person as an account collaborator. They can open, edit, and publish apps across that account.
{% endhint %}
***
## :code: Work on your app
Each app opens in the app workspace. The build conversation is on the left. The top bar holds everything else:
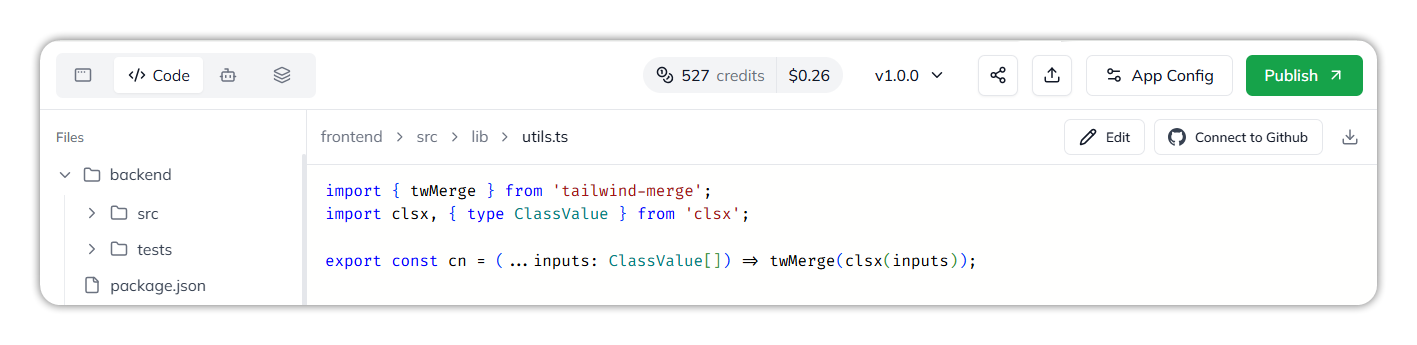
The workspace top bar, with the Code tab open.
| Top bar item | What it does |
| ---------------- | -------------------------------------------------------------------------------------------------------------------- |
| Tabs | Switch between **Preview**, **Code**, **Agents**, and **More**. The tabs show as icons; the open tab shows its name. |
| Credits meter | Shows the credits the app has used, and their cost. |
| Version selector | Lists the app's versions, such as **v1.0.0**. |
| Share icon | Opens **Share Application**. |
| Export icon | Exports the app as a package, sent to you by email. |
| **App Config** | Opens the app's settings. |
| **Publish** | Opens the publish panel. |
### Change the app by chatting
Type the change in **"Describe the changes you want…"** in the build conversation, and send it. Qore plans the change, waits for your approval, builds it, and confirms when **Live preview is ready**.
You can also choose a suggested next step instead of typing, such as **Add an AI Agent** under **Upgrade your app**. Each turn shows its work time and token usage.
### Stop the build agent
While the build agent works, the conversation shows **Working…** and lists each step it takes. Select **Stop**, just above the message box.
The build agent at work, with Stop.
### Fix an error in the preview
When the preview hits an error, a red bar at the bottom of the build conversation shows it, for example `UNHANDLED_REJECTION`. Select **Fix with AI** on the bar. The build agent fixes the app and rebuilds the preview.
A preview error, with Fix with AI.
### Answer a question the build is waiting on
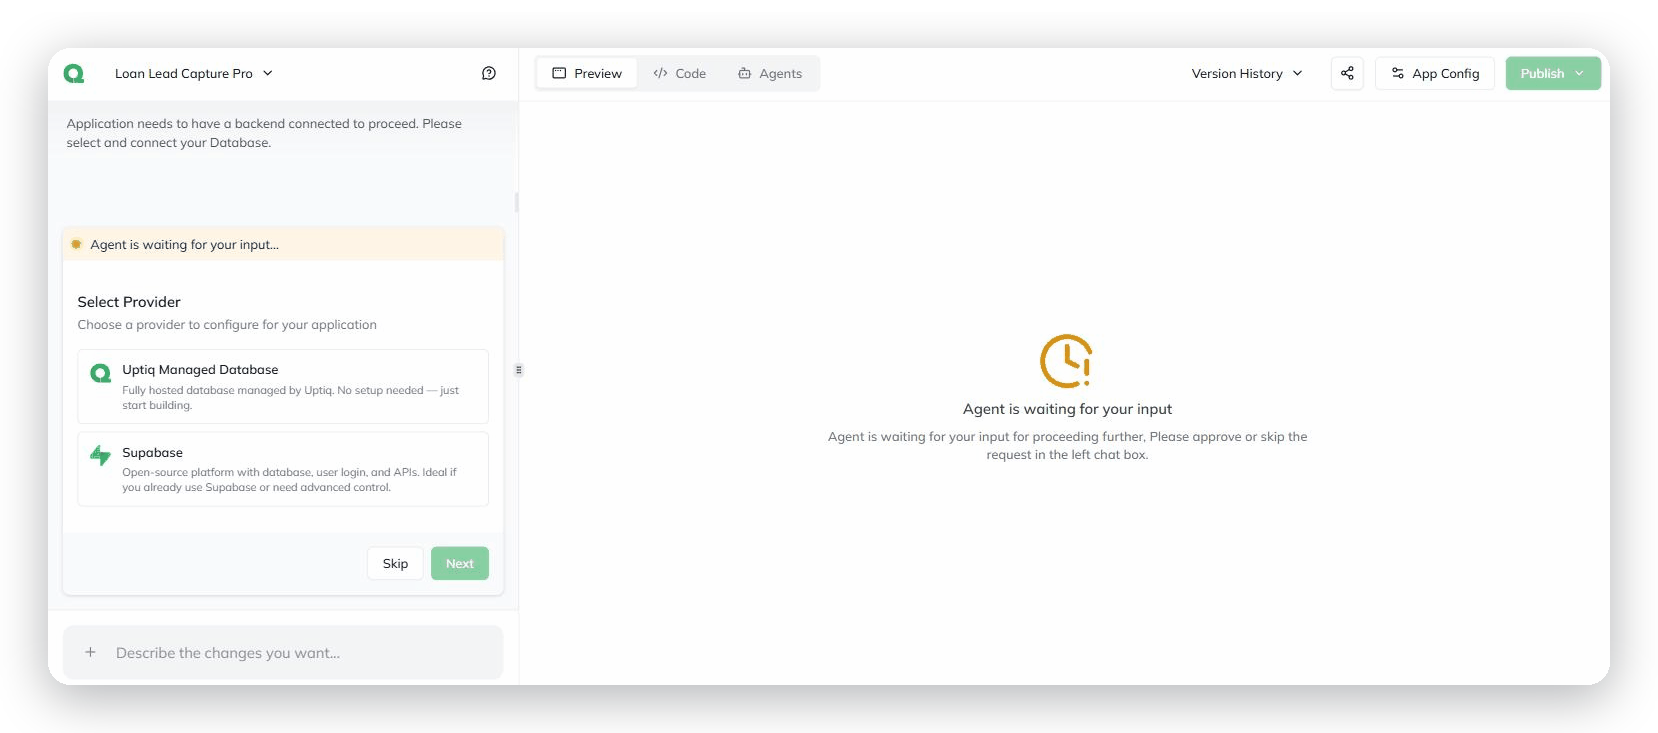
A build can pause for a decision. The left panel shows the question. For example, **Select Provider** offers *Uptiq Managed Database* \[Recommended] or *Supabase* for the database. Make a choice, or select **Skip**, to continue.
The build waiting at Select Provider.
### Preview the app
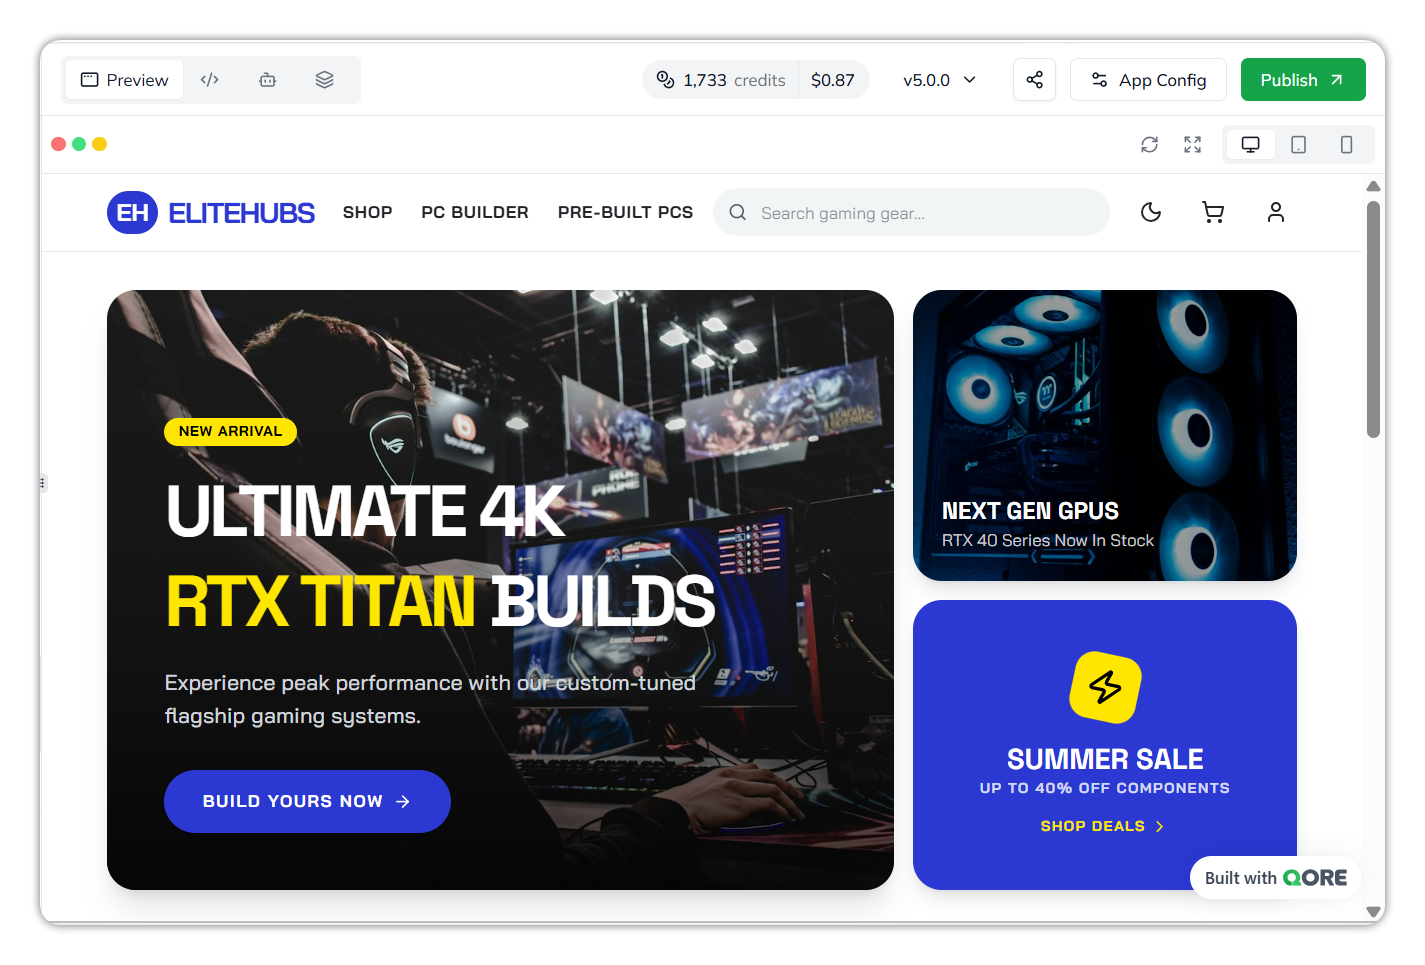
Select the **Preview** tab to see the running app. The toolbar above it has:
* a reload icon
* a full-screen icon
* desktop, tablet, and mobile icons, to check each layout
The Preview tab.
### View or edit the app code
{% stepper %}
{% step %}
#### Open the Code tab
Select the **Code** tab (the `` icon). The **Files** tree lists the app's folders and files, such as `backend`, `src`, `tests`, and `package.json`.
{% endstep %}
{% step %}
#### Open a file
Expand a folder and select a file. Its path shows above the code, for example `frontend › src › lib › utils.ts`.
{% endstep %}
{% step %}
#### Edit the file
Select **Edit** and make your changes.
{% endstep %}
{% step %}
#### Save
Select **Save**. Saving an edit creates a new version.
{% endstep %}
{% endstepper %}
Beside **Edit**:
* **Connect to Github** connects the app's code to a GitHub repository.
* The download icon downloads the open file.
{% hint style="info" %}
You can also change the code by describing the change in the build conversation.
{% endhint %}
### Add an agent to my app
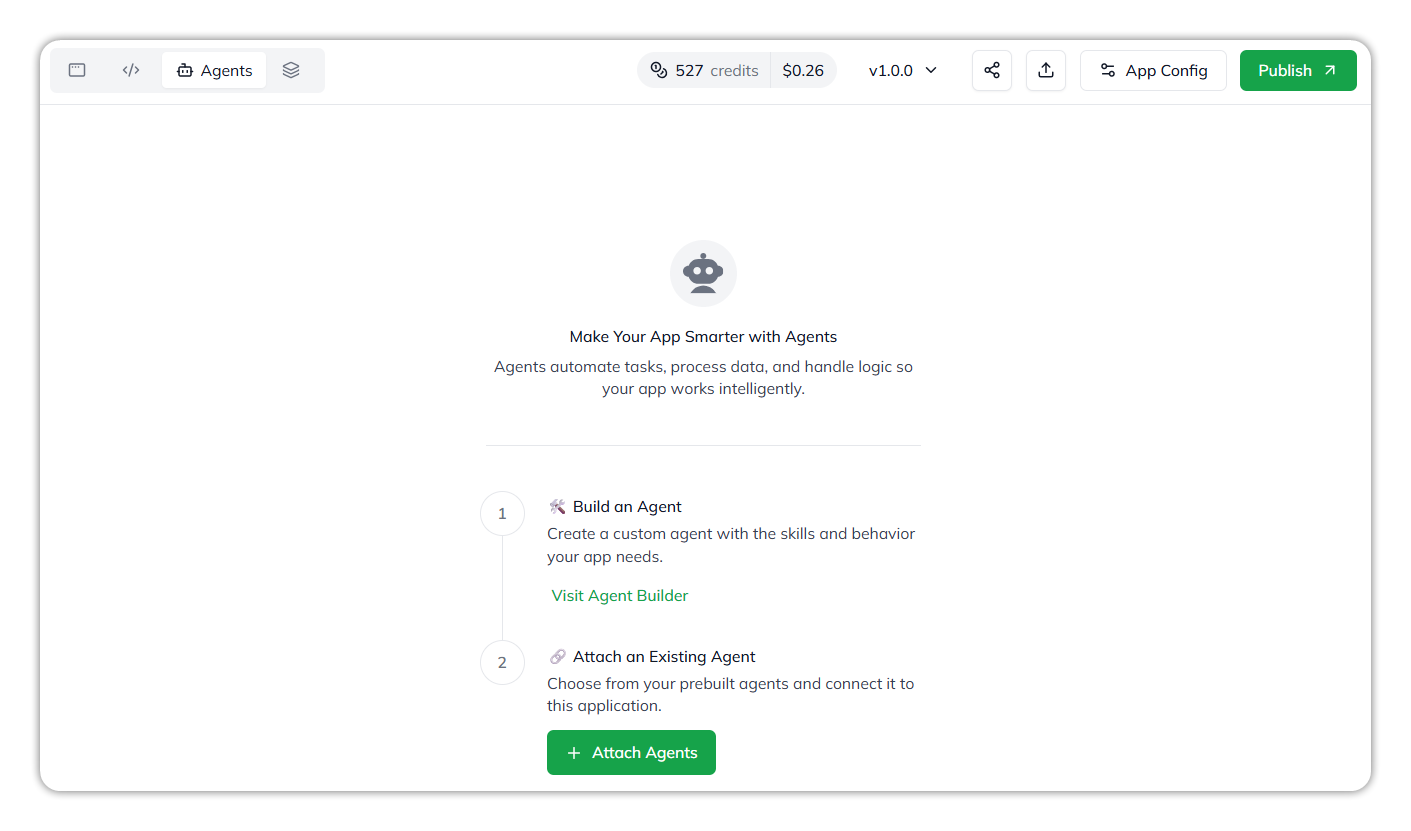
Select the **Agents** tab. The page reads **Make Your App Smarter with Agents** and offers two options:
1. **Build an Agent** — select **Visit Agent Builder** to create a custom agent with the skills and behavior your app needs.
2. **Attach an Existing Agent** — select **+ Attach Agents** to connect one of your prebuilt agents.
The Agents tab.
To attach an agent:
{% stepper %}
{% step %}
#### Open Attach Agent(s)
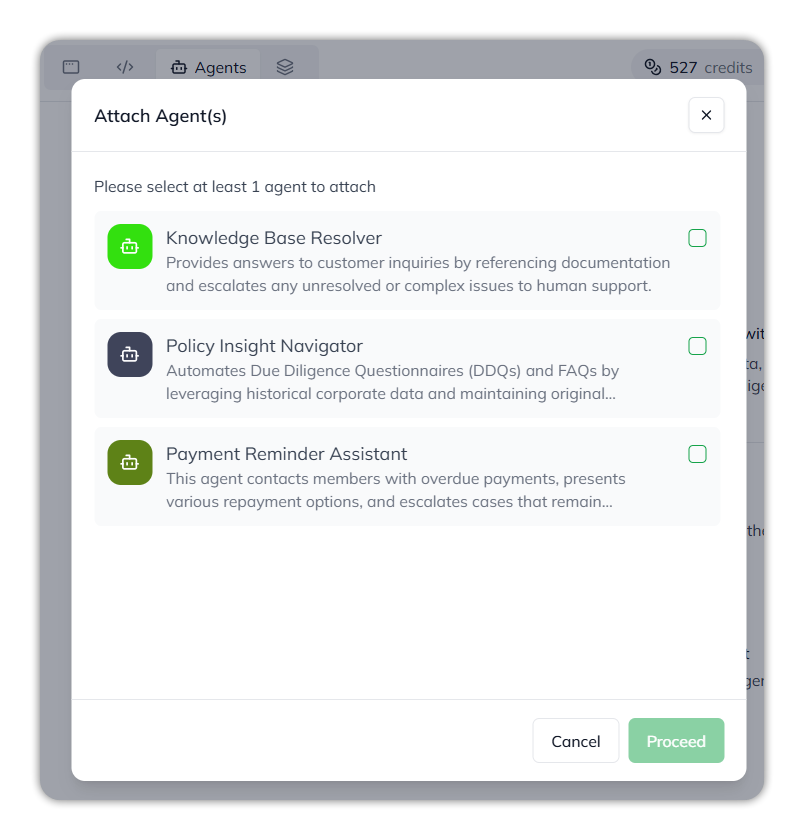
Select **+ Attach Agents**. The **Attach Agent(s)** dialog lists your agents, each with its name and description.
{% endstep %}
{% step %}
#### Select the agents
Tick the box beside each agent you want. Select at least one; **Proceed** stays unavailable until you do.
{% endstep %}
{% step %}
#### Proceed
Select **Proceed**. To close without attaching, select **Cancel**.
{% endstep %}
{% endstepper %}
The Attach Agent(s) dialog.
For the full flow, see [Integrate an agent](/task-guides/integrate-an-agent.md). To build one first, see [Create an agent](/task-guides/create-an-agent.md).
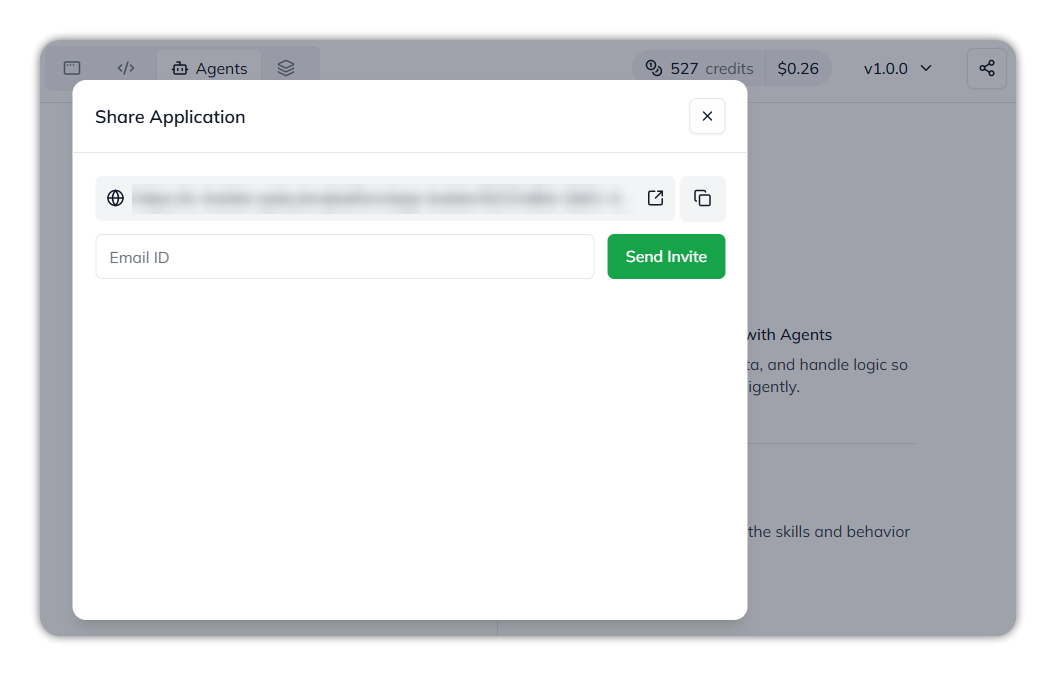
### Share the app
Select the share icon in the top bar. The **Share Application** dialog opens.
* **Copy the link** — the app's link is at the top. Select the copy icon to copy it, or the open icon to open it in a new tab.
* **Invite someone** — type their address in **Email ID**, then select **Send Invite**.
Share Application.
{% hint style="warning" %}
**Sharing grants access at the account level.** An invite adds the person to the account as a collaborator, which lets them open, edit, and publish apps across that account — not only this one. See [Plan › Collaboration](/console/app-builder/plan.md#collaboration).
{% endhint %}
### See how many credits the app has used
Read the credits meter in the top bar. It shows the credits used, such as **527 credits**, and their cost, such as **$0.26**. The figure goes up as you build.
For account-wide usage and limits, see [Billing](/control-center/cost-control.md).
### Go back to an earlier version
Open the version selector (for example **v2.0.0**). It lists every version newest first, each with the time it was made and a summary of the request that made it. **Latest** marks the newest.
The version selector.
{% stepper %}
{% step %}
#### Select the version
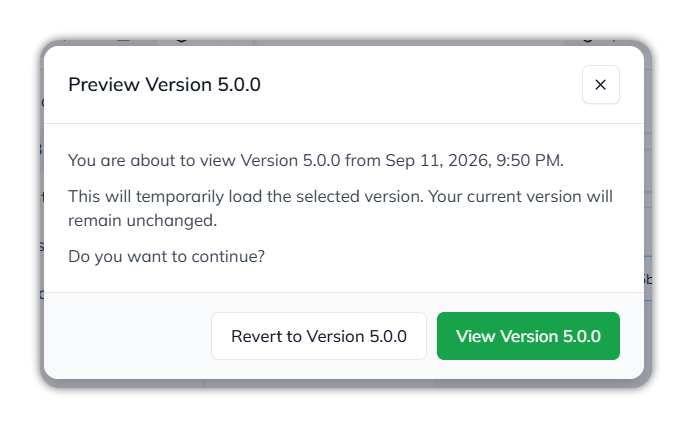
Select a version in the selector. **Preview Version** opens. It explains that viewing temporarily loads the selected version, and your current version remains unchanged.
Preview Version.
{% endstep %}
{% step %}
#### View it, or revert to it
* **View Version** — load it temporarily to look around.
* **Revert to Version** — revert the app to it.
{% endstep %}
{% step %}
#### Return, or revert, while viewing
While you view it, a bar reads **Viewing Version** with its number. Select **Back to Latest** to return to the newest version, or **Revert to Version** to revert to it.
Viewing an older version.
{% endstep %}
{% endstepper %}
### Change the app settings
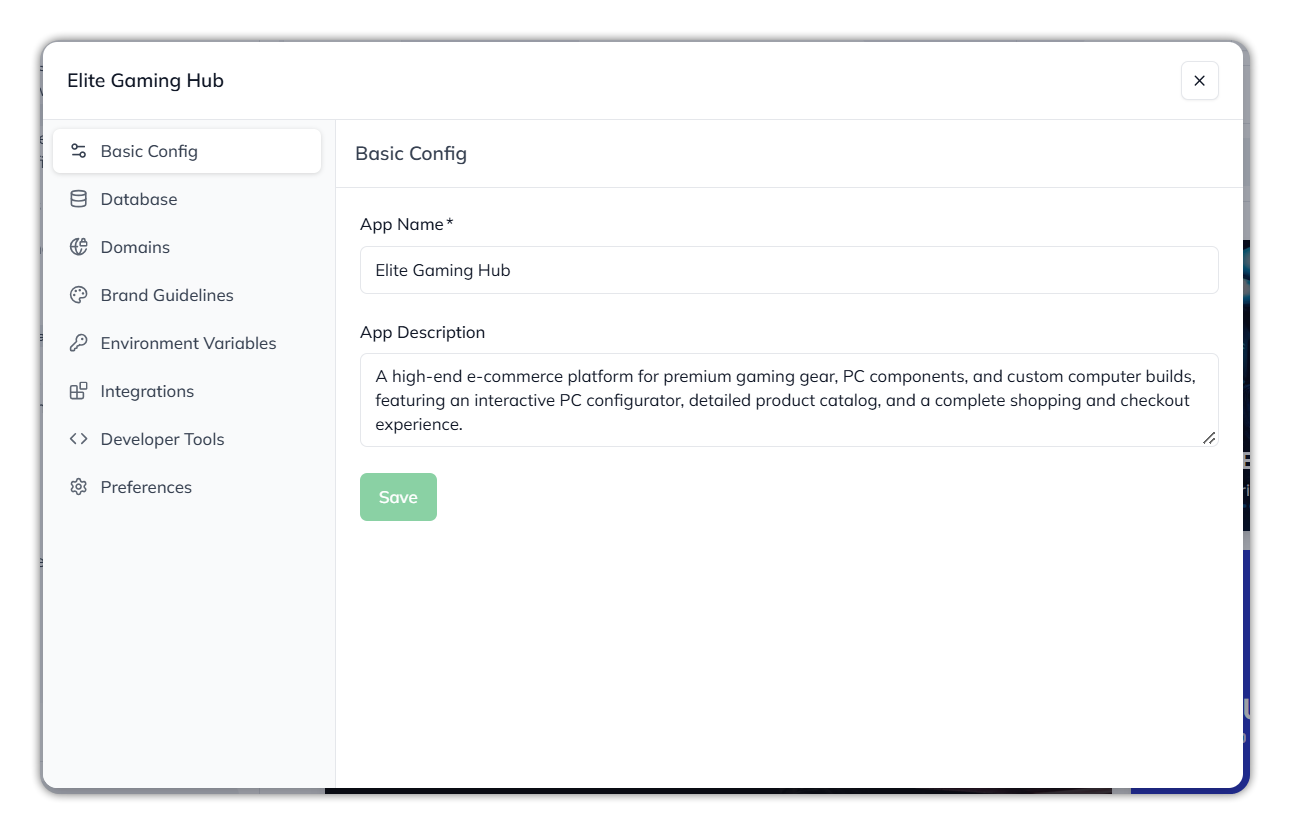
Select **App Config** in the top bar. It opens on **Basic Config**, with a list of sections on the left: **Basic Config**, **Database**, **Domains**, **Brand Guidelines**, **Environment Variables**, **Integrations**, **Developer Tools**, and **Preferences**.
App Config.
For every section, see [App Config](/console/app-builder/build/app-config.md).
### Rename the app
In **App Config**, open **Basic Config**. Change **App Name** (required) or **App Description**, then select **Save**.
### Connect my own domain
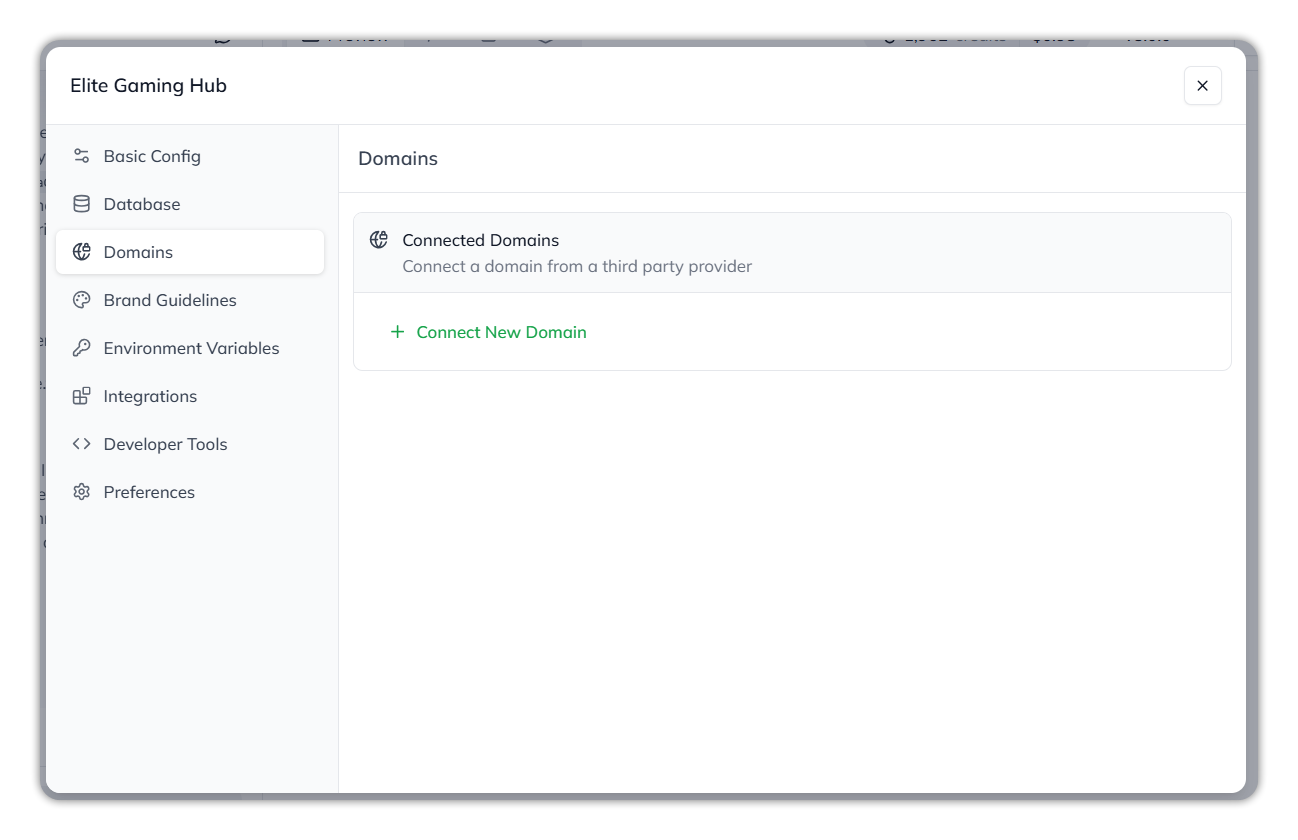
In **App Config**, open **Domains**. Under **Connected Domains** (*Connect a domain from a third party provider*), select **+ Connect New Domain**.
Domains.
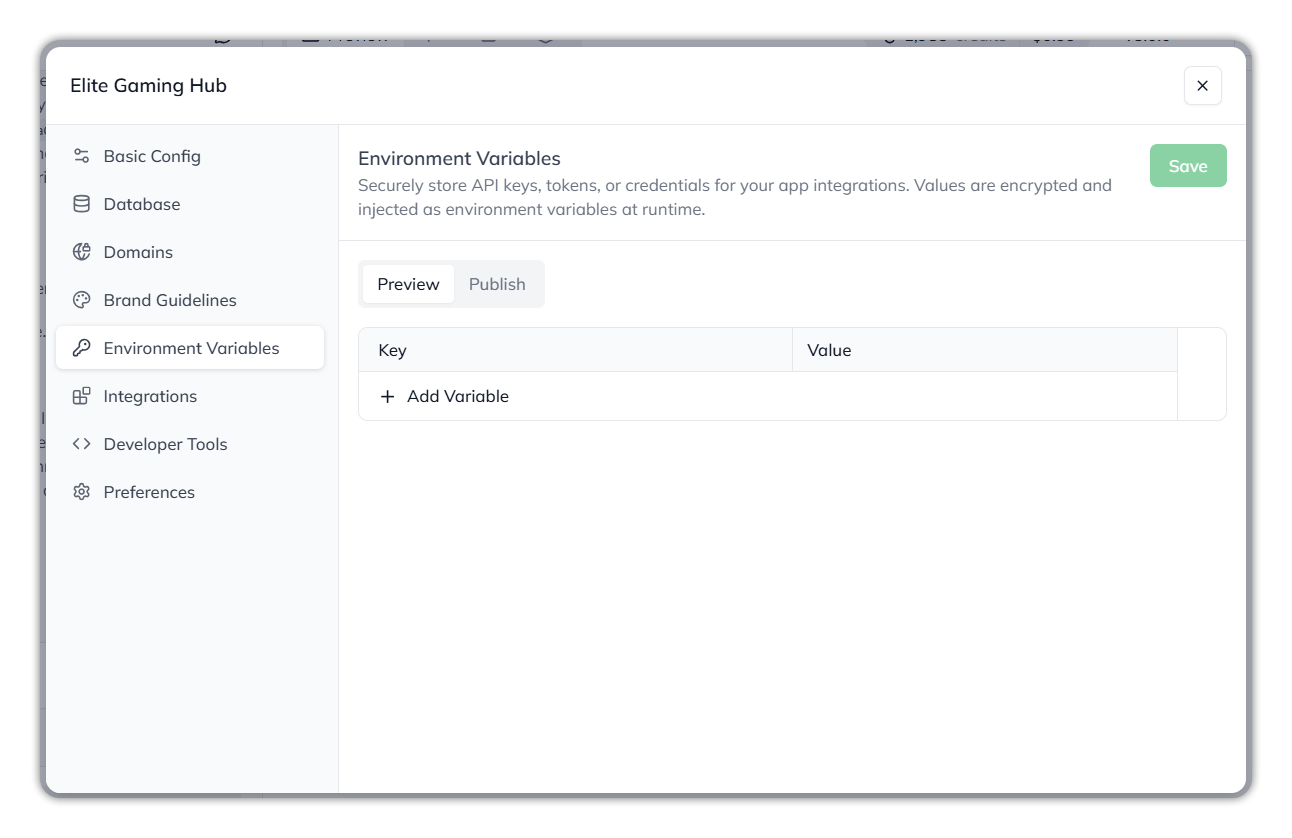
### Add environment variables
In **App Config**, open **Environment Variables**. Values are encrypted and injected as environment variables at runtime.
{% stepper %}
{% step %}
#### Choose Preview or Publish
Select the **Preview** or **Publish** tab. Each holds its own values.
{% endstep %}
{% step %}
#### Add the variable
Select **+ Add Variable**, then enter the **Key** and **Value**.
{% endstep %}
{% step %}
#### Save
Select **Save**.
{% endstep %}
{% endstepper %}
Environment Variables.
### Turn on developer tools
In **App Config**, open **Developer Tools**. Turn on **Enable Developer Tools** (*Enable developer tools for inspecting runtime behavior in the app preview*), then select **Save**.
### Turn on build notifications
In **App Config**, open **Preferences**. Turn on **Build Notifications** (*Get notified when your app build is completed*), then select **Save**.
To change an existing app's look, open **Brand Guidelines**. It has the same **Design and Branding Preferences** as the prompt box, plus a **Current app design** tab.
### Export the app
Select the export icon in the top bar, beside the share icon. **Export App Package** bundles the complete app — frontend, backend, AI agent logic, database schema, and cloud storage configuration — into one package.
Tick **Include chat history in package** if you want the build conversation included, then select **Export Package**. Qore shows *Export started. You will receive an email when it is ready.*
Export App Package.
You need the **Export App** capability. See [App Workspace › Export](/console/app-builder/app-workspace.md#export).
### Publish the app
{% hint style="warning" %}
Configure the database first. Without a database, the app can't be published. See [Connect a database](#connect-a-database-before-publishing).
{% endhint %}
{% stepper %}
{% step %}
#### Confirm
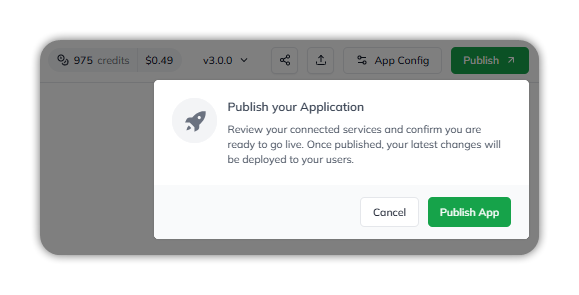
Select **Publish** in the top bar. In **Publish your Application**, select **Publish App**.
Publish your Application.
{% endstep %}
{% step %}
#### Choose where each service runs
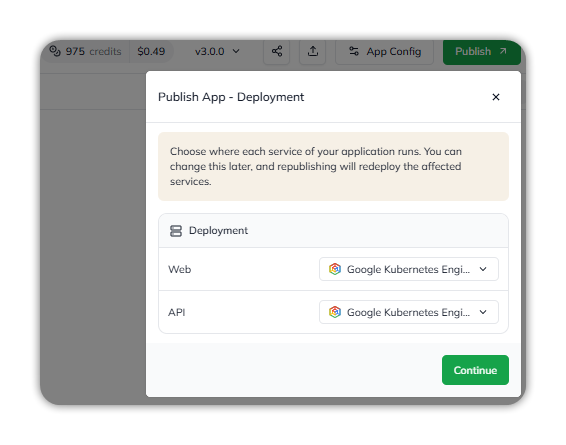
In **Publish App - Deployment**, choose where **Web** and **API** each run, such as **Google Kubernetes Engine**. Select **Continue**. You can change this later; republishing redeploys the affected services.
Publish App - Deployment.
{% endstep %}
{% step %}
#### Complete the checklist
The **Publish Checklist** shows **Database** (**Required**), **External Services Used**, and **Environment Variables**. If the database reads **Not Configured**, connect it first. See [Connect a database](#connect-a-database-before-publishing).
The publish checklist, ready to publish.
{% endstep %}
{% step %}
#### Publish
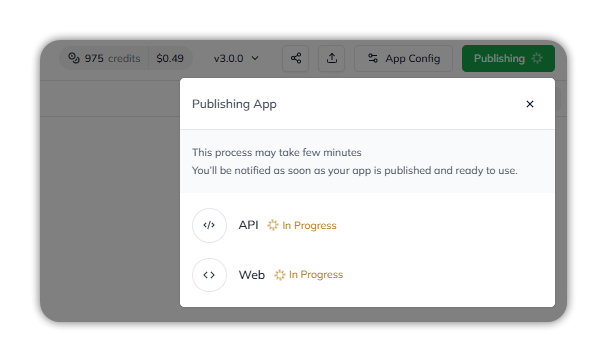
Select **Publish**. **Publishing App** shows **API** and **Web** as **In Progress**. It may take a few minutes. You're notified when the app is published and ready to use.
Publishing App.
{% endstep %}
{% endstepper %}
If the app has been published before, **Publish** opens a panel with the live URL, and you select **Publish Changes** after the checklist.
{% hint style="warning" %}
**Publish** is unavailable in Plan Mode.
{% endhint %}
For details, see [Deploy](/console/app-builder/deploy.md).
### Connect a database before publishing
{% stepper %}
{% step %}
#### Open Manage Database
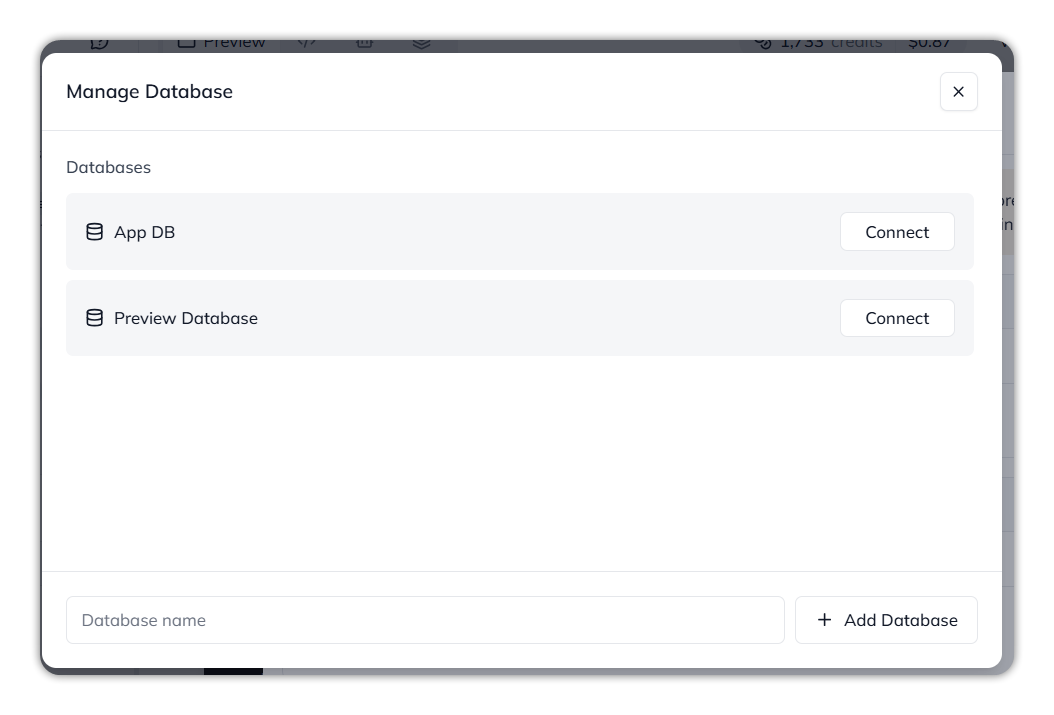
In the **Publish Checklist**, select **Connect** beside the database. **Manage Database** lists the databases, such as **App DB** and **Preview Database**. To add one, type a **Database name** and select **+ Add Database**.
Manage Database.
{% endstep %}
{% step %}
#### Choose a database
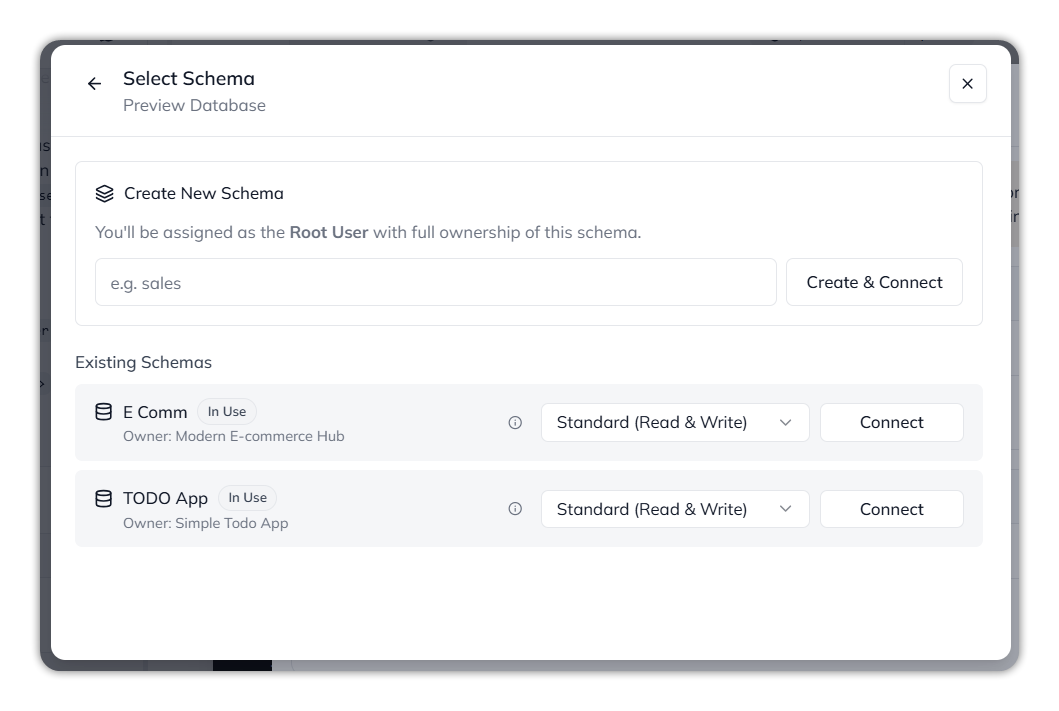
Select **Connect** beside a database. **Select Schema** opens.
{% endstep %}
{% step %}
#### Create or connect a schema
* **Create New Schema** — type a name, such as *sales*, and select **Create & Connect**. You're assigned as the **Root User**, with full ownership.
* **Existing Schemas** — choose **Standard (Read & Write)** or **Read Only**, then select **Connect**.
Select Schema.
{% endstep %}
{% endstepper %}
Back in the checklist, the database reads **Configured**, with **Manage**.
### Fix a failed publish
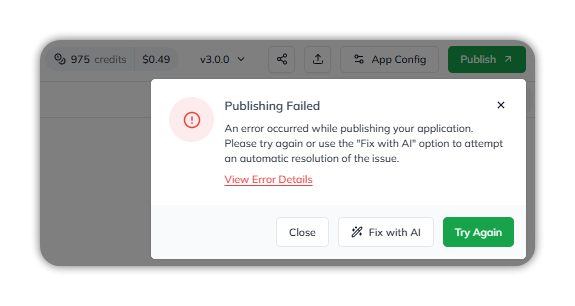
**Publishing Failed** offers three actions:
* **Try Again** — retry the publish.
* **Fix with AI** — the build agent works on the failure in the build conversation. It shows **Working…** and each step, and ends with a summary and **Live preview is ready**.
* **Close** — dismiss the dialog.
Select **View Error Details** to read the deploy log.
Publishing Failed.
***
## :clipboard-check: Check your app
Select the **More** tab to open the app's inspection tools: **Analytics**, **DB Explorer**, **Data Flow**, **Testing**, and **Security**. Each reflects the selected version.
### See how the app is put together
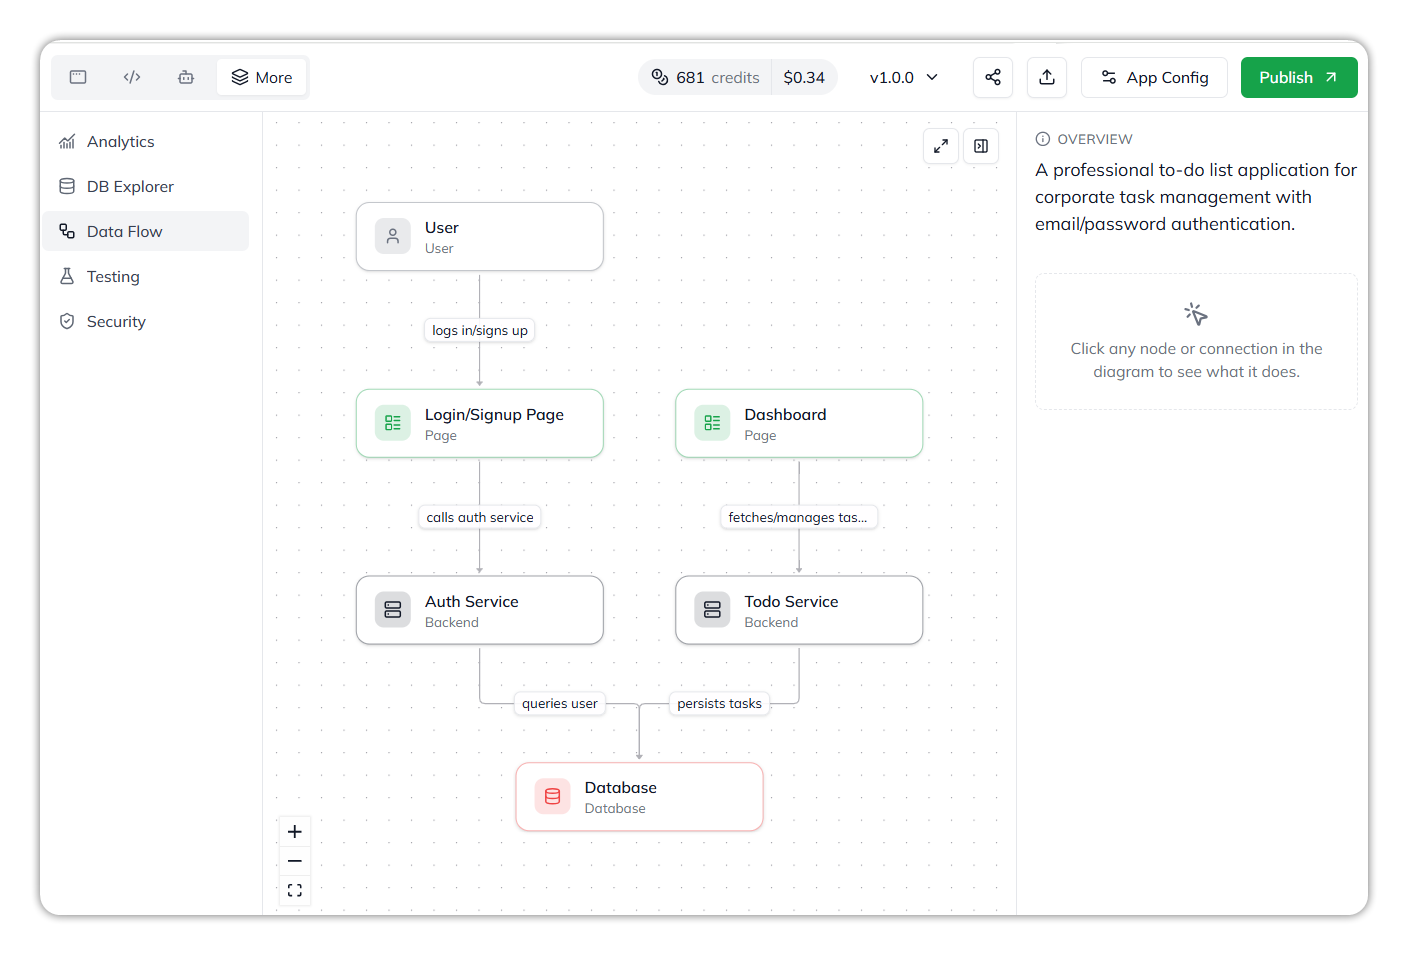
Select **More** › **Data Flow**. The diagram shows the app's parts — such as **User**, **Page**, **Backend**, and **Database** — and labels each connection with what it does, such as *logs in/signs up* or *persists tasks*.
* **Overview**, on the right, describes the app in plain language.
* Select any node or connection to see what it does.
* Use the zoom controls at the bottom-left to zoom in and out.
Data Flow.
See [Data Flow](/console/app-builder/build/data-flow.md).
### Look at the app database
Select **More** › **DB Explorer**.
* **Schema** — choose the schema to view.
* **Studio** — choose **Visualizer** to see the tables as a diagram, **Console** to see the queries that ran, or **SQL** to run your own.
* **Tables** — lists the tables in the schema, such as `Otp`, `Todo`, `User`, and `UserIdentity`.
In the Visualizer, each column shows its name and type. The legend marks **Primary Key**, **Nullable**, and **Foreign Key**.
DB Explorer, in the Visualizer.
{% hint style="warning" %}
The **SQL** editor runs real queries against the app's database. Confirm which database you're on before you run anything that changes data.
{% endhint %}
See [DB Explorer](/console/app-builder/build/db-explorer.md).
### Check the test results
Select **More** › **Testing**. Each version is listed with its result and case counts. Select **View Report** for the full report. See [Testing](/console/app-builder/testing.md).
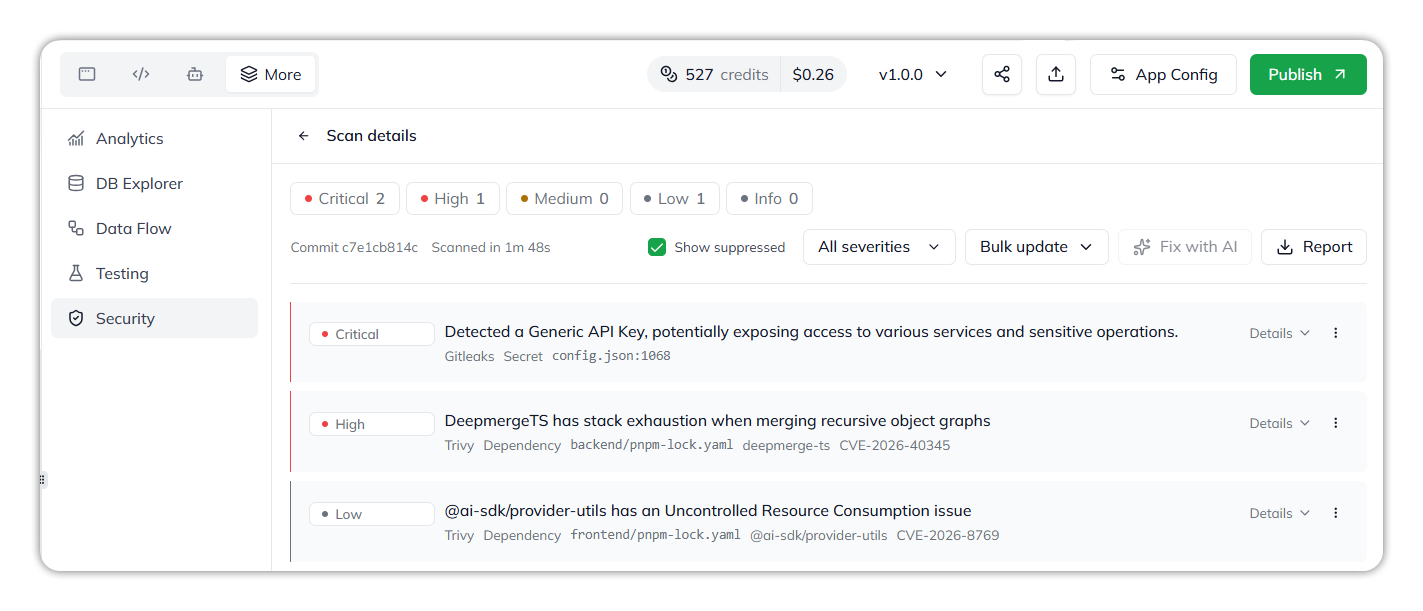
### Find and fix security issues
{% stepper %}
{% step %}
#### Open Security
Select **More** › **Security**. Each version is listed with its scan status, the commit it scanned, and its findings by severity.
{% endstep %}
{% step %}
#### Open a scan
Select a version to open **Scan details**. The top row counts findings by **Critical**, **High**, **Medium**, **Low**, and **Info**.
{% endstep %}
{% step %}
#### Review the findings
Each finding shows its severity, a title, the scanner, the file it was found in, and the advisory id. Select **Details** on a finding to read more.
To narrow the list:
* **All severities** — show one severity.
* **Show suppressed** — include suppressed findings.
{% endstep %}
{% step %}
#### Fix the findings
Select **Fix with AI** to have the build agent fix the findings. While it works, the button is greyed out. The fix arrives as a new version. For example, version 2.0.0 reads *Fix the actionable security issues detected by security scan…*.
Use **Bulk update** to change several findings at once, and **Report** to download the scan report.
{% endstep %}
{% endstepper %}
Scan details.
{% hint style="warning" %}
**Fix with AI** changes the app, not just the report. Review the change, then check the tests and the scan for the new version.
{% endhint %}
See [Security Scans](/console/app-builder/security-scans.md).
### See how a published app is used
Select **More** › **Analytics**. See [Analytics](/console/app-builder/analytics.md).
***
## :folder-gear: Manage your apps
**My Apps**, below the prompt on Create New App, lists your apps. Each row shows the app's name, description, status (**Draft** or **Published**), and when it was last updated.
My Apps.
### Find one of my apps
* Type part of the name in **Search apps…**.
* Select **All**, **Published**, or **Draft** to filter by status.
* Use the list and grid icons to switch how the apps are laid out.
### Open an app to keep working on it
Select the app in **My Apps**. It opens in the app workspace.
### Delete a draft app
{% stepper %}
{% step %}
#### Find the app
Find the app in **My Apps**. Select **Draft** to show only draft apps.
{% endstep %}
{% step %}
#### Open its menu
Select **•••** at the end of the app's row.
{% endstep %}
{% step %}
#### Delete it
Select **Delete App**. The app is deleted.
{% endstep %}
{% endstepper %}
The app's ••• menu.
The same menu has **Export App**, which opens the same **Export App Package** dialog as the workspace. See [Export the app](#export-the-app).
***
## :triangle-exclamation: Common issues
* **My app started building before I finished planning.** Build Mode builds on every prompt. Switch to Plan Mode first.
* **The build seems stuck.** Check the left chat for an **"Agent is waiting for your input"** step, such as choosing a provider. Make a choice, or select **Skip**.
* **"This request ran too long and was stopped."** A single request can run for up to 45 minutes. Qore saves the work done so far. Send a follow-up to continue, or split the request into smaller steps.
* **The generated layout isn't right.** Send a follow-up prompt in "Describe the changes you want…".
* **Proceed is greyed out in Attach Agent(s).** Tick at least one agent.
* **Fix with AI is greyed out in Security.** Fix with AI is already working. Wait for it to finish.
* **The checklist shows the database as Not Configured.** Without a database, the app can't be published. Select **Connect** to connect it.
***
## :link: Related pages
* [App Builder](/console/app-builder.md) and [App Workspace](/console/app-builder/app-workspace.md)
* Add an external service: [How to connect an integration](/task-guides/how-to-connect-an-integration.md)
* Add intelligence: [How to create an agent](/task-guides/create-an-agent.md) and [integrate it into this app](/task-guides/integrate-an-agent.md)
***
{% columns %}
{% column width="83.33333333333334%" %}
Maintained by Abhishek Paul AI-assisted, human-approved
{% endcolumn %}
{% endcolumns %}
---
# Agent Instructions
This documentation is published with GitBook. GitBook is the documentation platform designed so that both humans and AI agents can read, navigate, and reason over technical content effectively. Learn more at gitbook.com.
## Querying This Documentation
If you need additional information that is not directly available in this page, you can query the documentation dynamically by asking a question.
Perform an HTTP GET request on the current page URL with the `ask` query parameter, and the optional `goal` query parameter:
```
GET https://docs.uptiq.ai/task-guides/create-an-app.md?ask=&goal=
```
`ask` is the immediate question: it should be specific, self-contained, and written in natural language.
`goal` is optional and describes the broader end goal you are ultimately trying to accomplish on behalf of the user. GitBook uses it to tailor the answer towards what is most useful for that goal.
The response will contain a direct answer to the question and relevant excerpts and sources from the documentation.
Use this mechanism when the answer is not explicitly present in the current page, you need clarification or additional context, or you want to retrieve related documentation sections.