> For the complete documentation index, see [llms.txt](https://docs.uptiq.ai/llms.txt). Markdown versions of documentation pages are available by appending `.md` to page URLs; this page is available as [Markdown](https://docs.uptiq.ai/task-guides/create-an-agent.md).
# Create an agent
Every Agent Builder task, from your first prompt to configuring, testing, securing, shipping, monitoring, and managing your agents.
This guide is organized by task. Find what you want to do in the list below, then follow the steps.
| Task | Go to |
| ------------------------------------------------------ | ------------------------------------------------------------------------ |
| Create an agent by describing it in a chat prompt | [Create an agent from a prompt](#create-an-agent-from-a-chat-prompt) |
| Start from a ready-made template | [Start from a template](#start-from-a-template) |
| Attach files to my first prompt | [Attach files to the prompt](#attach-files-to-the-prompt) |
| Bring in an agent I already have | [Import an agent](#import-an-agent-i-already-have) |
| Build agents from my own IDE | [Build from your IDE](#build-agents-from-my-own-ide) |
| Change the agent by chatting | [Change the agent](#change-the-agent-by-chatting) |
| Attach a file to the builder chat | [Attach a file](#attach-a-file-to-the-builder-chat) |
| See how full the chat context is | [Context usage](#see-how-full-the-chat-context-is) |
| Keep building in a chat from an older version | [Migrate a chat](#continue-a-chat-made-in-an-older-version) |
| Start a new chat or open an earlier one | [Chat history](#start-a-new-chat-or-open-an-earlier-one) |
| Rename the agent | [Rename the agent](#rename-the-agent) |
| Ask for help with the agent | [Raise a request](#ask-for-help-with-the-agent) |
| See how the agent is wired | [Overview tab](#see-how-the-agent-is-wired) |
| See the steps the agent will follow | [Flow tab](#see-the-steps-the-agent-will-follow) |
| Open the agent's settings | [Agent Config](#open-agent-config) |
| Change the avatar, name, description, or output format | [Basic Details](#edit-the-agent-details) |
| Write or improve the agent's instructions | [Instructions](#write-or-improve-the-instructions) |
| Set how independently the agent works | [Autonomy](#set-how-independently-the-agent-works) |
| Set how deeply the agent thinks | [Agent Capability](#set-how-deeply-the-agent-thinks) |
| Trade response speed against quality | [Response Mode](#trade-speed-against-quality) |
| Choose the models the agent uses | [Models](#choose-the-models) |
| Keep long conversations within the context window | [Auto-compaction](#keep-long-conversations-within-the-context-window) |
| Detect malicious prompts | [Prompt Sanitization](#detect-malicious-prompts) |
| Give the agent an action it can take | [Add a skill](#add-a-skill) |
| Turn built-in skills on or off | [Built-in skills](#turn-built-in-skills-on-or-off) |
| Call an API or run code | [Skill Library](#call-an-api-or-run-code) |
| Connect an MCP server | [MCP server](#connect-an-mcp-server) |
| Connect an MCP server with client credentials | [MCP with M2M](#connect-an-mcp-server-with-client-credentials) |
| Connect an MCP server that signs people in with OAuth | [MCP with OAuth](#connect-an-mcp-server-that-signs-people-in-with-oauth) |
| Fill the MCP connection form from a config file | [Import Config File](#fill-the-mcp-connection-form-from-a-config-file) |
| Choose whether an MCP tool asks before it runs | [Supervision mode](#choose-whether-a-tool-asks-before-it-runs) |
| Change which MCP tools the agent can use | [Manage tools](#change-which-mcp-tools-the-agent-can-use) |
| Edit an MCP connection | [Edit MCP](#edit-an-mcp-connection) |
| Disconnect or remove an MCP server | [Disconnect or remove](#disconnect-or-remove-an-mcp-server) |
| Finish an MCP connection after import | [Initialize](#finish-an-mcp-connection-after-import) |
| Connect a SaaS product | [Add an integration](#add-an-integration) |
| Add my own procedure as a skill | [Custom skill](#add-a-custom-skill) |
| Turn a multi-step process into a skill | [Add a flow](#add-a-flow-as-a-skill) |
| Hand part of the job to another agent | [Add an agent](#add-another-agent-as-a-skill) |
| Give the agent documents to read | [Add knowledge](#add-knowledge) |
| Build or attach knowledge from the chat | [Knowledge from the chat](#build-or-attach-knowledge-from-the-chat) |
| Attach existing knowledge or a governed graph | [Existing knowledge](#attach-existing-knowledge-or-a-governed-graph) |
| Remove knowledge from the agent | [Detach knowledge](#detach-knowledge) |
| Make the agent run on an event | [Add a trigger](#add-a-trigger) |
| Change or remove a trigger | [Edit a trigger](#change-or-remove-a-trigger) |
| Store API keys and credentials | [Secrets](#store-a-secret) |
| Store reusable values | [Variables](#store-a-variable) |
| Review the agent's reusable plans | [Checklists](#review-the-agent-reusable-plans) |
| See how many credits the agent has used | [Check credits](#see-how-many-credits-the-agent-has-used) |
| Try the agent | [Try the agent](#try-the-agent) |
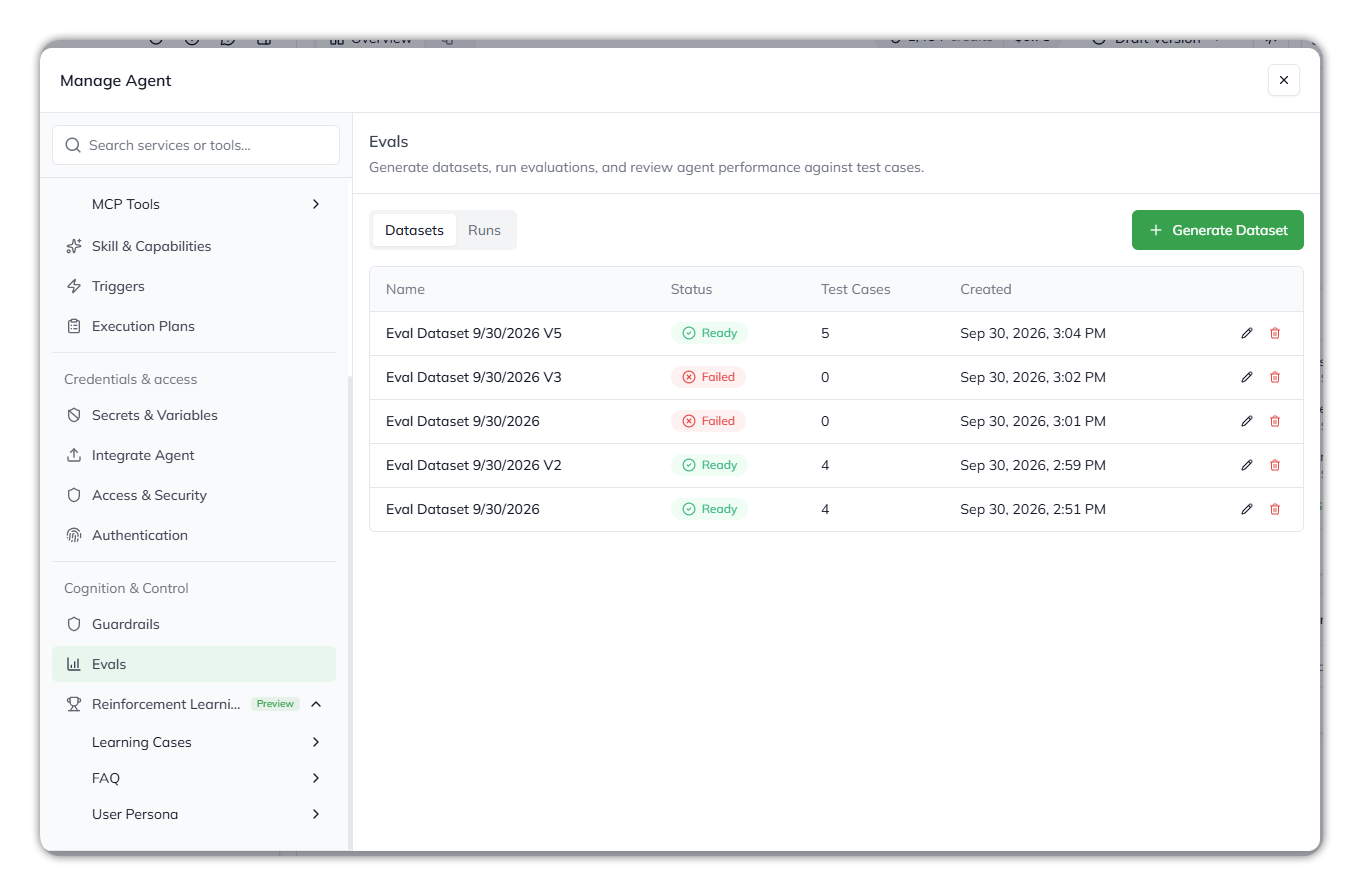
| Build a test dataset | [Eval dataset](#build-a-test-dataset) |
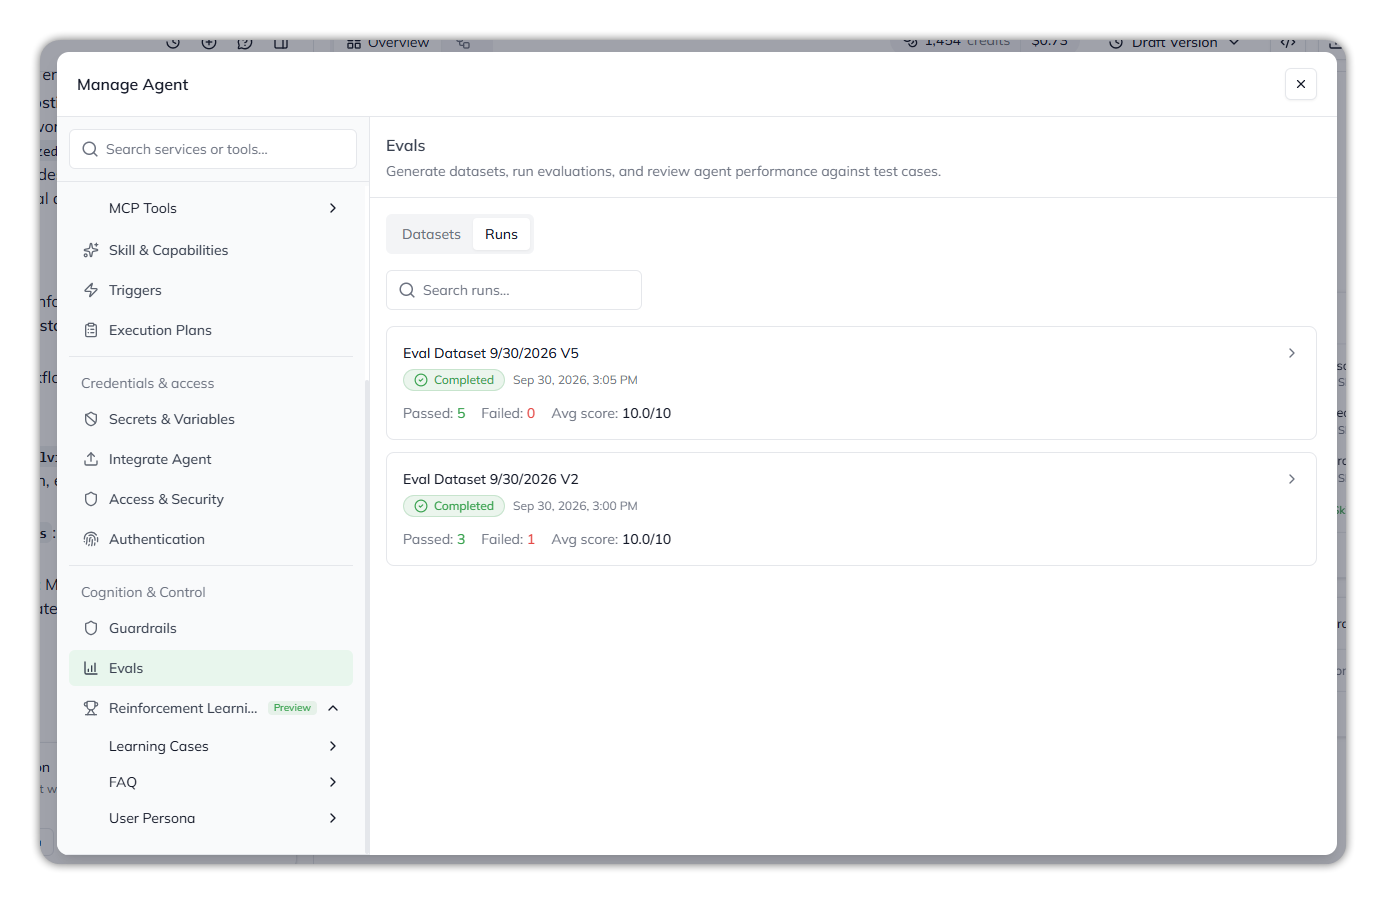
| Run an evaluation and read the scores | [Run an eval](#run-an-evaluation) |
| Apply the suggested fixes from an eval | [Apply suggestions](#apply-suggested-changes) |
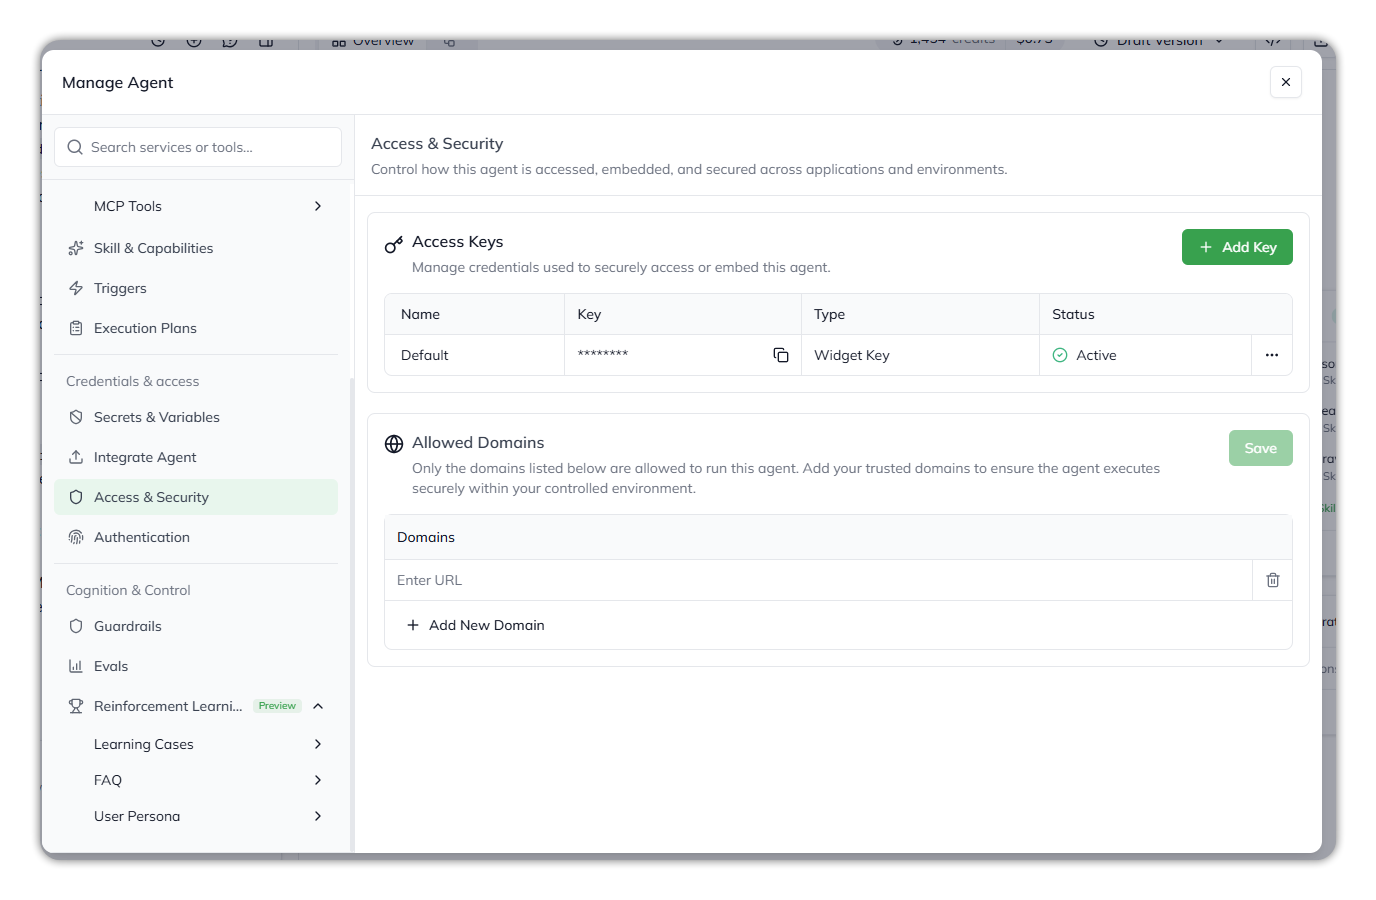
| Create a widget key or API key | [Access keys](#create-an-access-key) |
| Rename or deactivate a key | [Manage keys](#rename-or-deactivate-a-key) |
| Limit where the chat widget can run | [Allowed Domains](#limit-where-the-widget-can-run) |
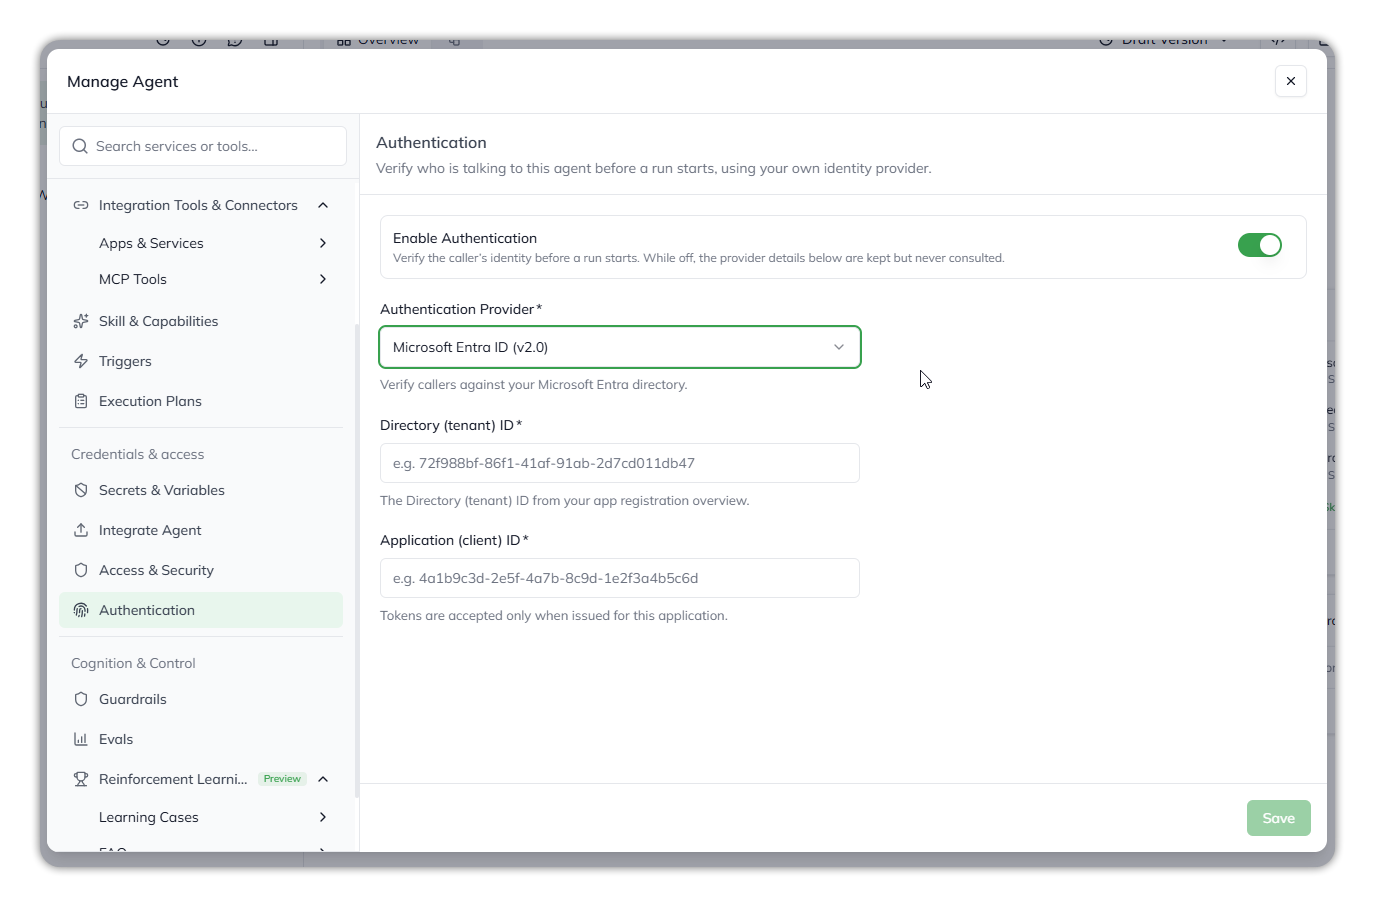
| Verify who is calling the agent | [Authentication](#verify-who-is-calling-the-agent) |
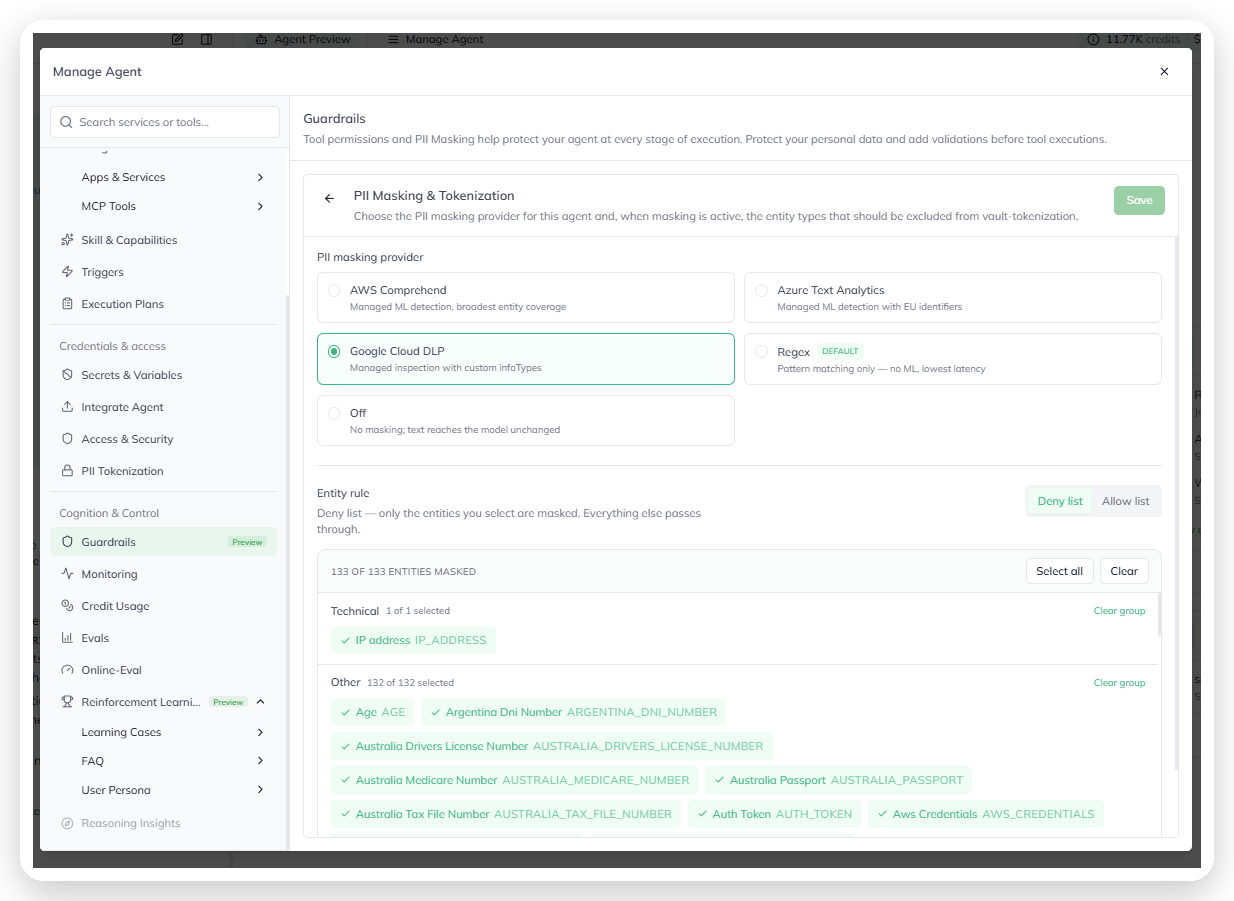
| Mask personal data before it reaches the model | [PII masking](#mask-personal-data) |
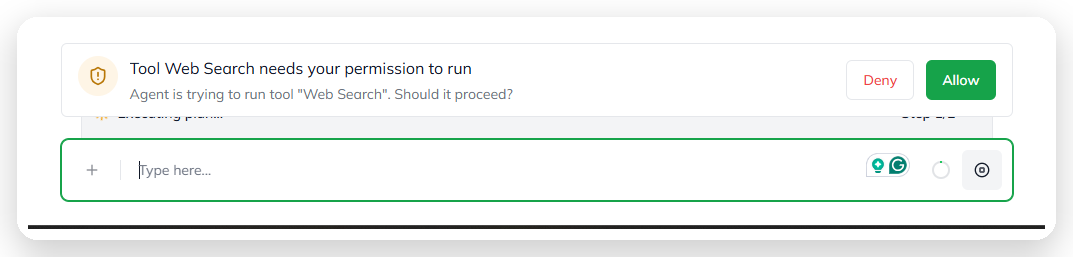
| Ask for approval before a skill runs | [Tool approval](#require-approval-before-a-skill-runs) |
| See which models the organization allows | [Model policy](#see-which-models-are-allowed) |
| Save a version of the agent | [Versions](#save-or-switch-versions) |
| Download a saved version | [Download a version](#download-a-saved-version) |
| Choose which executor version runs the agent | [Executor version](#choose-the-executor-version) |
| Run the agent in my own app | [Integrate the agent](#run-the-agent-in-my-own-app) |
| Export the agent as a package | [Export the agent](#export-the-agent) |
| Inspect the agent's runs | [Runs & Traces](#inspect-the-agent-runs) |
| Score live conversations | [Online-Eval](#score-live-conversations) |
| Turn on persona or FAQ memory | [Memory](#turn-on-persona-or-faq-memory) |
| Find one of my agents | [Find an agent](#find-one-of-my-agents) |
| Delete an agent | [Delete an agent](#delete-an-agent) |
{% hint style="info" %}
You need a Qore account with access to **Agent Builder**, and a project to build in.
{% endhint %}
***
## :robot: Start a new agent
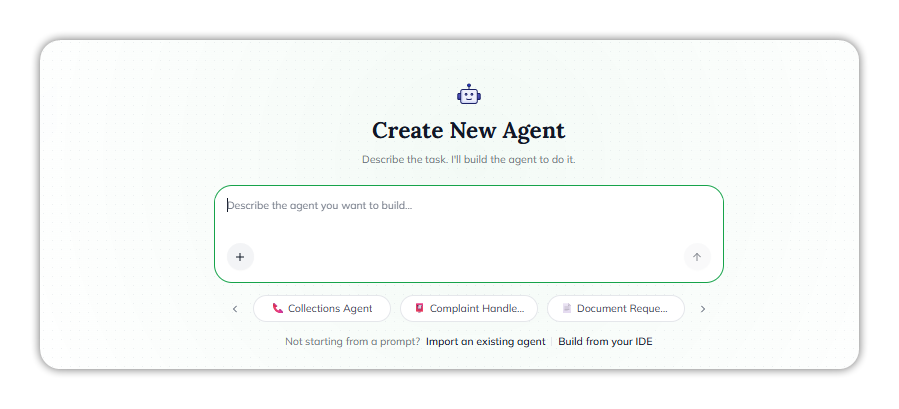
You start every new agent from **Create New Agent** in **Agents**: *Describe the task. I'll build the agent to do it.*
Create New Agent.
### Create an agent from a chat prompt
{% stepper %}
{% step %}
#### Describe the agent
In **Describe the agent you want to build…**, write what the agent should do. For example: *"Create an agent that answers questions about loan eligibility using our policy documents."*
{% endstep %}
{% step %}
#### Submit the prompt
Select the send arrow.
{% endstep %}
{% step %}
#### Review the drafted plan
The platform creates and names the agent, such as *Loan Eligibility Advisor*. It drafts a **plan** with *What it does*, *Who it serves*, *Workflow*, and the runtime flow, and pre-selects tools. Refine the plan in the **Type here…** box.
{% endstep %}
{% step %}
#### Build the agent
When the plan looks right, select **Build Agent**. The platform builds the agent and opens the builder: the chat on the left, the canvas on the right.
When the build finishes, the chat summarizes what it set up, and says you can test the agent in the **Agent Playground** or evaluate it under **Evals**. Each reply shows the credits it used.
{% endstep %}
{% endstepper %}
### Start from a template
Template chips sit below the prompt box, such as **Collections Agent**. Use the **‹** and **›** arrows to scroll through them, then select one.
### Attach files to the prompt
Select **+** in the prompt box to attach files to your description.
### Import an agent I already have
{% stepper %}
{% step %}
#### Open Import an existing agent
Below the template chips, select **Import an existing agent**. The dialog brings in an agent package exported from Platform.
{% endstep %}
{% step %}
#### Choose the package
Select **Click to upload or drag and drop** and choose a ZIP file up to 50 MB.
{% endstep %}
{% step %}
#### Continue
Select **Next**.
{% endstep %}
{% endstepper %}
Import an existing agent.
An import restores the agent's knowledge into the project and replaces any knowledge the agent already had there. Governed graphs aren't imported. See [Export Agent › Knowledge in the package](/console/agent-builder/deploy/export-agent.md#knowledge-in-the-package).
### Build agents from my own IDE
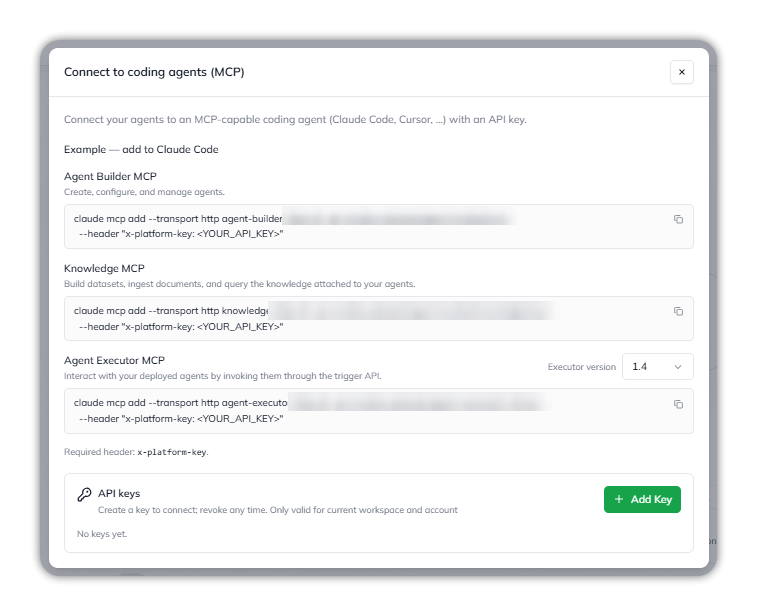
Below the template chips, select **Build from your IDE**. **Connect to coding agents (MCP)** connects your agents to an MCP-capable coding agent, such as Claude Code or Cursor, with an API key. It lists three MCP servers, each with an example command for Claude Code:
| Server | What it does |
| ---------------------- | ------------------------------------------------------------------------------------------------------------------------------ |
| **Agent Builder MCP** | Create, configure, and manage agents. |
| **Knowledge MCP** | Build datasets, ingest documents, and query the knowledge attached to your agents. |
| **Agent Executor MCP** | Interact with your deployed agents by invoking them through the trigger API. Choose the **Executor version**, such as **1.4**. |
{% stepper %}
{% step %}
#### Create an API key
Under **API keys**, select **+ Add Key**. A key is valid only for the current workspace and account, and you can revoke it at any time. Until you create one, the list reads *No keys yet.*
{% endstep %}
{% step %}
#### Add a server to your coding agent
Copy the server's example command, and replace `` with your key. Every request needs the `x-platform-key` header.
{% endstep %}
{% endstepper %}
Connect to coding agents (MCP).
***
## :pen-ruler: Work in the builder
Each agent opens in the builder. The chat is on the left, and the canvas is on the right.
The chat header holds the agent name and four icons: chat history, new chat, **Need Help? Report the Issue** (**?**), and **Toggle Panel**.
The canvas header holds everything else:
The canvas header.
| Header item | What it does |
| ---------------------- | ------------------------------------------------------------ |
| **Overview**, **Flow** | Switch between the agent's two views. |
| Credits meter | Shows the credits the agent has used, and their cost. |
| Version selector | Shows the version you're viewing, such as **Draft Version**. |
| `` | **Integrate Agent**: run the agent in your own app. |
| Export icon | **Export Agent**: export the agent as a package. |
| **Agent Config** | Opens the agent's settings. |
| **Try Agent** | Opens the Agent Playground in a new tab. |
On a saved version with no unsaved changes, a **Download Agent Version** icon also appears.
### Change the agent by chatting
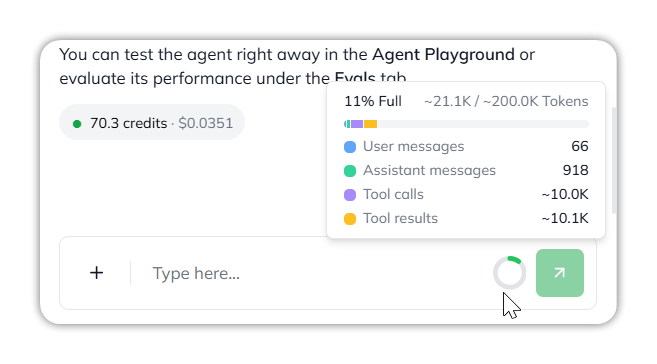
Type the change in **Type here…** in the builder chat, and send it. Each reply shows the credits it used, such as *70.3 credits · $0.0351*.
### Attach a file to the builder chat
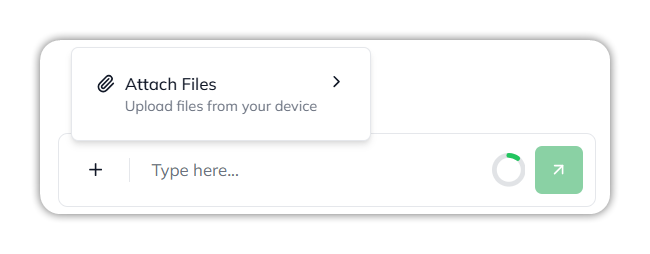
Select **+** beside **Type here…**, then **Attach Files** (*Upload files from your device*).
Attach Files.
### See how full the chat context is
The ring beside the send arrow shows how much of the chat's context is used. Hover over it for the breakdown: how full it is, such as *11% Full*, the tokens used out of the total, such as *\~21.1K / \~200.0K Tokens*, and the tokens taken by **User messages**, **Assistant messages**, **Tool calls**, and **Tool results**.
Context usage.
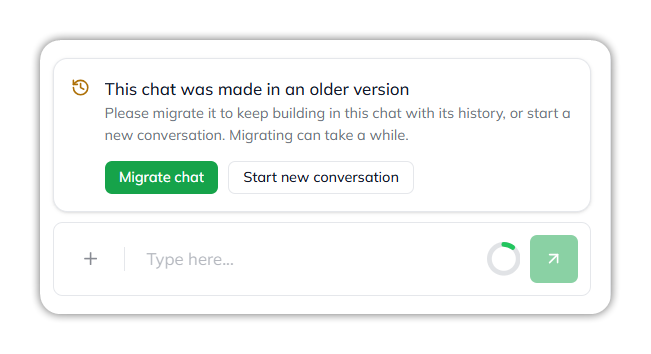
### Continue a chat made in an older version
A chat made in an older version shows *This chat was made in an older version.* Choose one:
* **Migrate chat** — keep building in this chat with its history. Migrating can take a while.
* **Start new conversation** — start a fresh chat.
A chat from an older version.
### Start a new chat or open an earlier one
In the chat header, select the new chat icon to start a fresh conversation with the builder, or the chat history icon to open a past one. To hide or show the chat, select **Toggle Panel**.
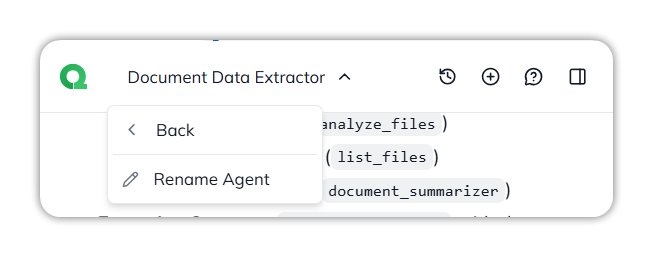
### Rename the agent
Select the agent name at the top of the chat, then **Rename Agent**. The same menu has **Back**. You can also rename it in **Agent Config** › **Basic Details**.
The agent name menu.
### Ask for help with the agent
Select **?** in the chat header. **Need Help? Raise a Request** opens with the agent filled in.
* **Title** — required, up to 200 characters.
* **What do you need help with?** — required, up to 2,000 characters.
* **Attachment** — optional. **Upload** up to five PNG or JPEG screenshots, each up to 10 MB.
Select **Submit Request**. Qore confirms with *Issue reported successfully. Thank you for your feedback!*
Need Help? Raise a Request.
### See how the agent is wired
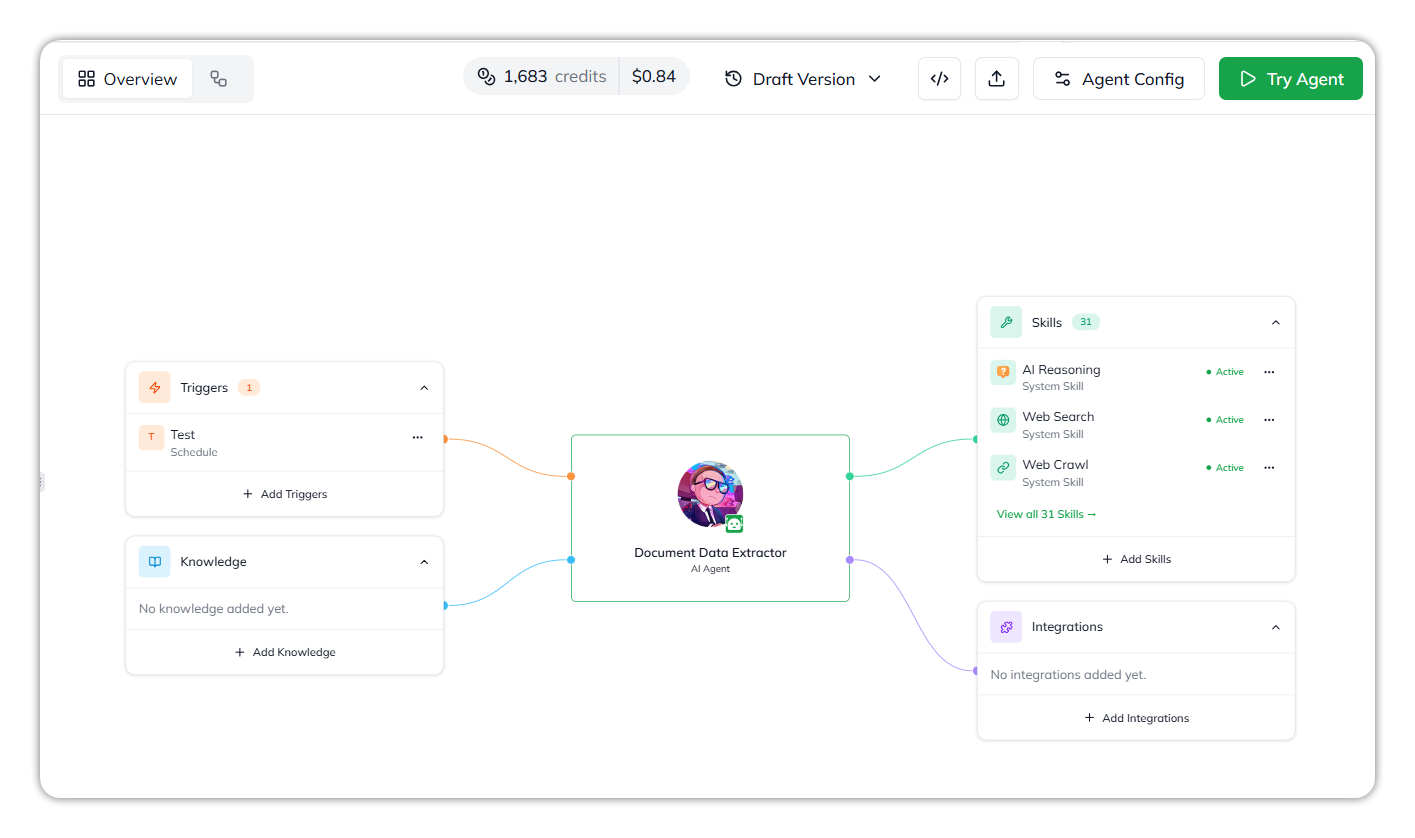
Select **Overview**. The agent sits in the center, with four cards around it:
* **Triggers** — what starts the agent. **+ Add Triggers**.
* **Knowledge** — what the agent can read. **+ Add Knowledge**.
* **Skills** — the actions the agent can take, each with its type, such as **System Skill**, and its status, such as **Active**. **View all** lists every skill. **+ Add Skills**.
* **Integrations** — the connected services. **+ Add Integrations**.
An empty card reads, for example, *No knowledge added yet.* Each card's count shows how many items it holds.
The Overview tab.
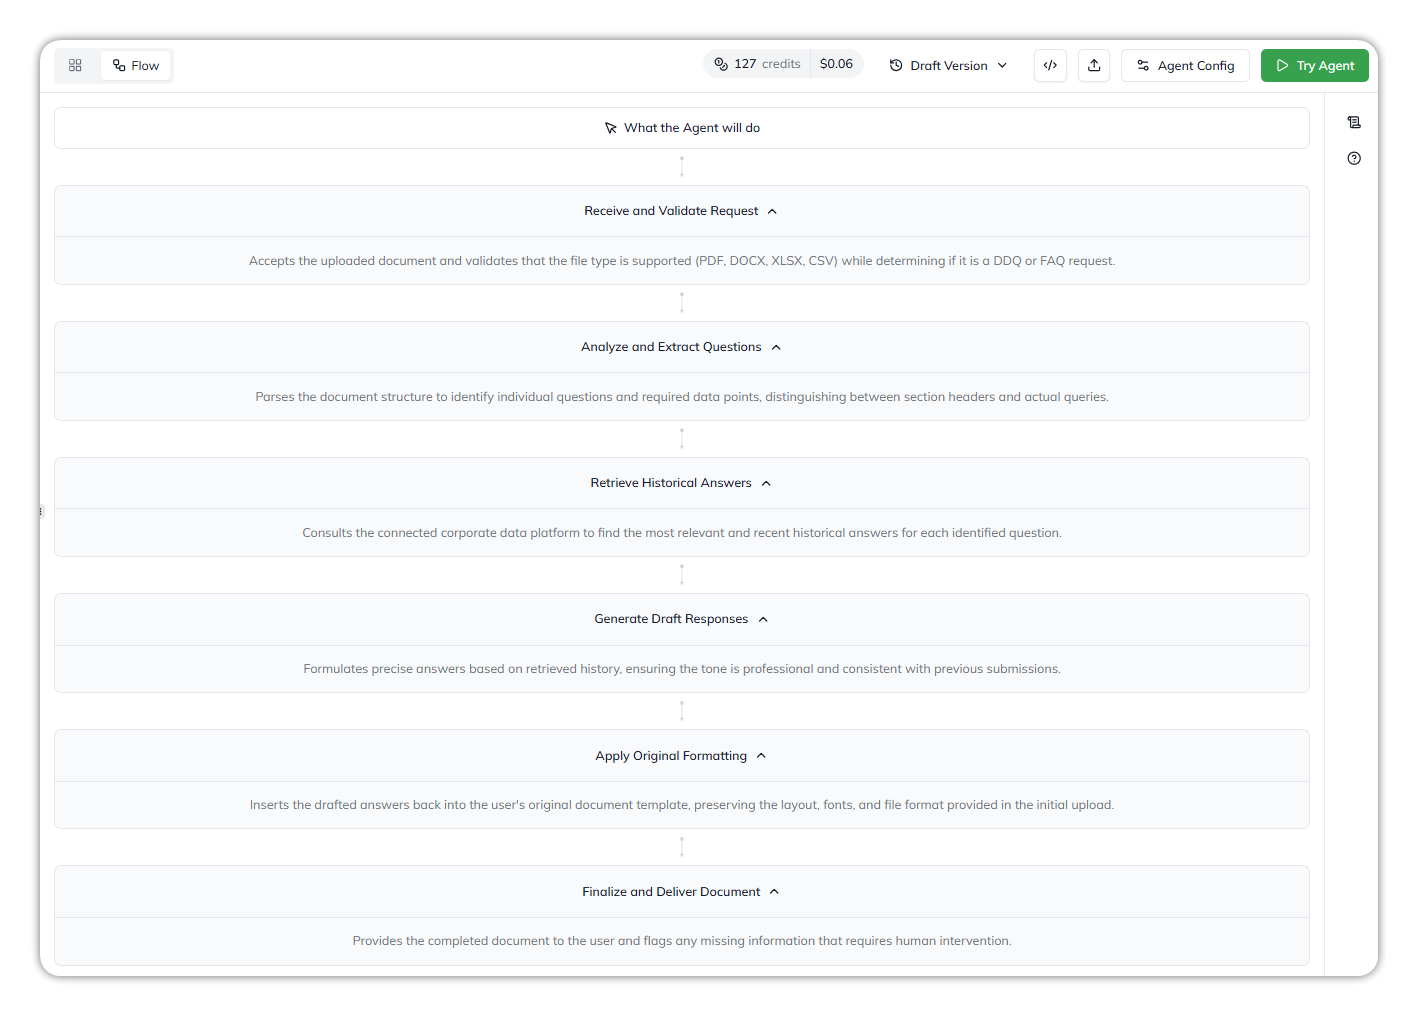
### See the steps the agent will follow
Select **Flow**. It lists the steps the agent may follow at runtime, under *What the Agent will do*. With no checklist yet, it shows **No Plan Found**.
The Flow tab.
***
## :sliders: Shape how the agent behaves
### Open Agent Config
Select **Agent Config** in the canvas header. It opens on **Basic Details**, with every section in the left navigation. Each section has its own **Save**, which activates when you change something. Saved changes go to the draft.
### Edit the agent details
In **Agent Config** › **Basic Details**:
* **Agent Avatar** — **Upload** an image, or **Remove** it to use the default icon.
* **Agent Name** — required.
* **Agent Description** — what the agent does.
* **Agent Output Format** — **Markdown** (the default) or **Json**.
Select **Save**.
### Write or improve the instructions
In **Agent Config** › **Instructions**, write what the agent does and how. Three buttons sit above the editor:
* **Upload from file** — import instructions from a file.
* **Improve with AI** — review the instructions and suggest or apply improvements.
* **Best Practices to give instructions** — open a side panel with the recommended structure: Objective / Goal, Inputs Required, Process / Steps, Outputs / Deliverables, Constraints / Rules, and the optional Tone / Interaction Style and Additional Instructions.
Select **Save**.
{% hint style="warning" %}
Never paste API keys, passwords, or tokens into the instructions. Store them as [secrets](#store-a-secret) and reference them as `$secret.{name}`.
{% endhint %}
### Set how independently the agent works
In **Agent Config** › **Agent Behaviour**, move the **Autonomy** slider to **Low**, **Med** (the default), or **High**. Higher autonomy commits to multi-step plans on its own; lower autonomy confirms more steps first.
### Set how deeply the agent thinks
In **Agent Behaviour**, choose **Agent Capability**:
* **Auto** (the default) — the platform decides based on the input.
* **Intelligent Planner**.
* **Next Best Step** — hides the **Planning Model** field.
* **Fast** — strips persona, FAQ, CoT validation, and learning cases for lower latency. Only on executor versions that support it.
While **Response Mode** is **Flash**, Agent Capability can't be changed.
### Trade speed against quality
In **Agent Behaviour**, choose **Response Mode**: **Advanced** (the default, higher quality, slower), **Balanced**, or **Flash**. The model fields appear only in **Advanced**.
### Choose the models
With **Response Mode** on **Advanced**, under **Advanced Controls**:
* **Model Family** — filter the model lists to one provider family. Agents can use **Google** and **OpenAI**.
* **Planning Model** — the model that decides what to do, and in what order.
* **Execution Model** — the model that carries out the tasks.
A model the AI Gateway can't serve is greyed out. A model the executor version doesn't support is marked **Not Supported**, and the page can't be saved until you choose another. Select **Save**.
### Keep long conversations within the context window
In **Agent Behaviour**, turn on **Auto-compaction** to summarize the conversation as it nears the context window. Set **Compaction threshold** from **50%** to **95%**. It appears only on executor versions that support it.
### Detect malicious prompts
In **Agent Behaviour**, turn on **Prompt Sanitization**. On an executor version that doesn't support it, the toggle is marked **Not Supported**.
For every behavior setting, see [Agent Behavior](/console/agent-builder/build/agent-behavior.md).
***
## :screwdriver-wrench: Give the agent skills
### Add a skill
{% stepper %}
{% step %}
#### Open Add Skill to Agent
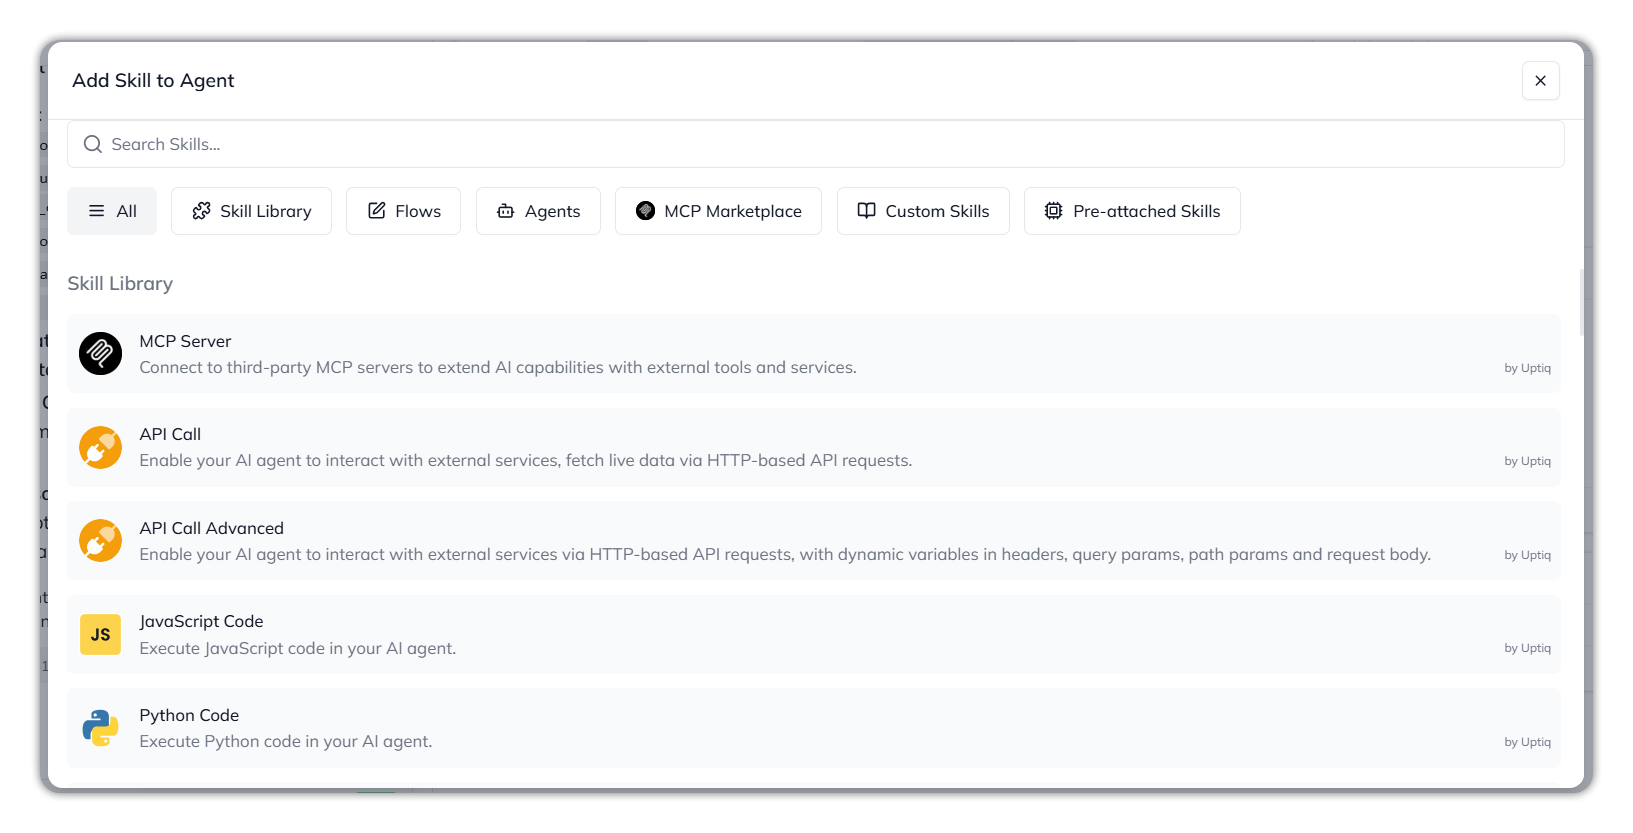
On the **Skills** card, select **+ Add Skills**.
{% endstep %}
{% step %}
#### Choose a tab
| Tab | Holds |
| ----------------------- | ------------------------------------------------------------------------------------------------------------------------------------------ |
| **All** | Every skill from every tab. |
| **Skill Library** | Skills by Uptiq that you configure, such as **MCP Server**, **API Call**, **API Call Advanced**, **JavaScript Code**, and **Python Code**. |
| **Flows** | Flows you can add as a skill. |
| **Agents** | Other agents in the project. |
| **MCP Marketplace** | MCP servers from the catalog. |
| **Custom Skills** | Skills you upload, as a folder with a `SKILL.md` file. |
| **Pre-attached Skills** | The built-in skills, each with **Enable**. |
| {% endstep %} | |
{% step %}
#### Find the skill
Type in **Search Skills…**. The search covers the selected tab.
{% endstep %}
{% step %}
#### Configure and save
Select the skill to open its form. Fill it in, then save. The planner can now choose it when a request needs it.
{% endstep %}
{% endstepper %}
Add Skill to Agent.
### Turn built-in skills on or off
In **Agent Config** › **Skill & Capabilities**, the **Pre-attached Skills** page has two lists:
* **Active Skills** — the skills the agent can use now, each with an **Actions** menu.
* **Skills you can add** — select **Enable** to make one active.
Every agent has the same 26 built-in skills, such as **Show Message**, **AI Reasoning**, **Web Search**, **Knowledge Search**, and **View Uploaded Files**. Skills from other sources appear on the canvas's **Skills** card instead.
### Call an API or run code
In **Add Skill to Agent**, select **Skill Library**, then a skill:
| Skill | What you configure |
| ------------------------------------ | ------------------------------------------------------------------------------------------------------------------------------- |
| **API Call** | URL, method, authorization, headers, query parameters, and input and output schemas. **API Call Advanced** adds a request body. |
| **JavaScript Code**, **Python Code** | Name, description, timeout, code, and input and output schemas. |
| **Web Crawler** | A Firecrawl MCP connection. Add your Firecrawl API key, or a `$secret` reference to it, to the pre-filled URL. |
Reference stored values as `$secret.{name}` and `$agent.{name}` in any field. See [Skill Library](/platform-resources/skill-library.md).
### Connect an MCP server
Start from one of:
* **The catalog** — in **Add Skill to Agent**, select **MCP Marketplace**, or open **Agent Config** › **Integration Tools & Connectors** › **MCP Tools**. Servers are grouped by category, such as **Tavily**, **Firecrawl**, and **Alpha Vantage API**. Select a server.
* **Your own server** — select **Skill Library** › **MCP Server**.
Both open **Create MCP Connection**:
{% stepper %}
{% step %}
#### Enter the connection
Check **Connection Name** and **Remote MCP Server URL**, and fill in any field the server needs, such as **Api Key**. For a key, enter a `$secret.` reference rather than the key itself: catalog keys are saved in the server URL, which [Connectors](/control-center/govern/connectors.md) shows in full. Open **Advanced Settings** if the server needs OAuth details or headers. Select **Next**.
{% endstep %}
{% step %}
#### Authorize, if asked
If **Waiting for Authorization** appears, sign in to the server in the pop-up and grant the permissions. The dialog continues by itself. If the pop-up was blocked, select **Connect to Authorize**.
{% endstep %}
{% step %}
#### Choose the tools
In **Tools and Settings**, turn off any tool the agent shouldn't use, and set each tool's supervision mode. Then select **Create Connection**.
{% endstep %}
{% endstepper %}
The enabled tools become available to the agent. See [MCP Tools](/console/agent-builder/build/mcp-tools.md#connecting-an-mcp-server).
{% hint style="warning" %}
**Core Banking Sandbox API** returns simulated data. Use it to build and test, not to reach a real core banking system.
{% endhint %}
### Connect an MCP server that signs people in with OAuth
1. In **Create MCP Connection**, expand **Advanced Settings**.
2. Copy the URL under **Register this Redirect URL**, and add it as an allowed redirect URI in the OAuth app on your MCP server.
3. Enter the **OAuth Client ID** and **OAuth Client Secret** from that OAuth app. You can leave them empty if the server supports dynamic client registration; Qore then registers itself.
4. Select **Next**, then sign in when **Waiting for Authorization** appears.
See [Advanced Settings](/console/agent-builder/build/mcp-tools.md#advanced-settings).
### Connect an MCP server with client credentials
For a server that issues a client ID and secret instead of a sign-in page:
{% stepper %}
{% step %}
#### Open the connection form
Select the server in the catalog, or choose **Skill Library** › **MCP Server**. Enter the server's name and URL.
{% endstep %}
{% step %}
#### Turn on M2M
Expand **Advanced Settings** and select **Authenticate M2M (OAuth client credentials)**.
{% endstep %}
{% step %}
#### Enter the credentials
Enter the **Token URL** (required), the **Scope** (if your provider needs one), and the **OAuth Client ID** and **OAuth Client Secret** (both required).
{% endstep %}
{% step %}
#### Choose the tools
Select **Next**. There's no sign-in step: the agent requests its own token each time it connects. Choose the tools, then select **Create Connection**.
{% endstep %}
{% endstepper %}
The client secret isn't shown again after saving, so re-enter it when you edit the connection. See [MCP Tools](/console/agent-builder/build/mcp-tools.md#connect-with-client-credentials).
### Fill the MCP connection form from a config file
In **Create MCP Connection**, select **Import Config File** and choose a JSON file with an `mcpServers` object, the format MCP clients use. Qore fills the name, URL, headers, and client ID and secret from the first server in the file. See [Import Config File](/console/agent-builder/build/mcp-tools.md#import-config-file).
### Choose whether a tool asks before it runs
Each MCP tool has a supervision mode: **Always Ask Permissions**, the default, or **Allow Unsupervised**. Set it in **Tools and Settings** when you create the connection, or later:
1. Open the MCP connection, then select **Manage Tools**.
2. Change the mode beside the tool. The menu beside **Enable All** sets every tool at once.
3. Select **Save Changes**.
### Change which MCP tools the agent can use
1. Open the MCP connection, then select **Manage Tools**.
2. Turn tools on or off with their switches, or with **Enable All**. Select the pencil beside a description to rewrite it.
3. To fetch the server's current tool list, select **Refresh tools**.
4. Select **Save Changes**.
### Edit an MCP connection
Open the MCP connection and select the pencil. **Create MCP Connection** opens with the saved name, URL, client ID, headers and M2M settings. Re-enter the client secret if the connection uses one.
### Disconnect or remove an MCP server
Open the MCP connection:
* **Disconnect** turns the connection off. It asks first, because disconnecting stops all ongoing sessions using the server. **Connect** turns it back on.
* **Remove** permanently removes the MCP server from the agent, after a confirmation.
### Finish an MCP connection after import
An agent imported from a package exported without **Include MCP configuration** has MCP connections without credentials. Each one shows **Initialize** instead of **Connect**.
Open the connection, select **Initialize**, enter the credentials in **Create MCP Connection**, and continue through the steps.
### Add an integration
On the **Integrations** card, select **+ Add Integrations**, or open **Agent Config** › **Integration Tools & Connectors** › **Apps & Services**. Search with **Search integrations…**, hover the service's row, and select **Connect**. Then follow the service's sign-in or credentials form. See [Connect an integration](/task-guides/how-to-connect-an-integration.md).
### Add a custom skill
In **Add Skill to Agent**, select **Custom Skills**, then upload a folder with a `SKILL.md` file and up to 10 supporting files. See [Custom skills](/platform-resources/skill-library/custom-skills.md).
### Add a flow as a skill
In **Add Skill to Agent**, select the **Flows** tab, then the flow. Every flow is a skill with the same name and description. With no flows yet, the tab reads *No skills found*; select **+ Create Flow** to make one. See [Create a flow](/task-guides/create-a-flow.md#create-a-flow-from-an-agent).
### Add another agent as a skill
In **Add Skill to Agent**, select the **Agents** tab, then the agent. It attaches straight away, with no form or confirmation, and appears on the **Skills** card as an **Agent** skill. It's chosen by its description, so make sure the description says what it's for.
***
## :book: Give the agent knowledge
### Add knowledge
{% stepper %}
{% step %}
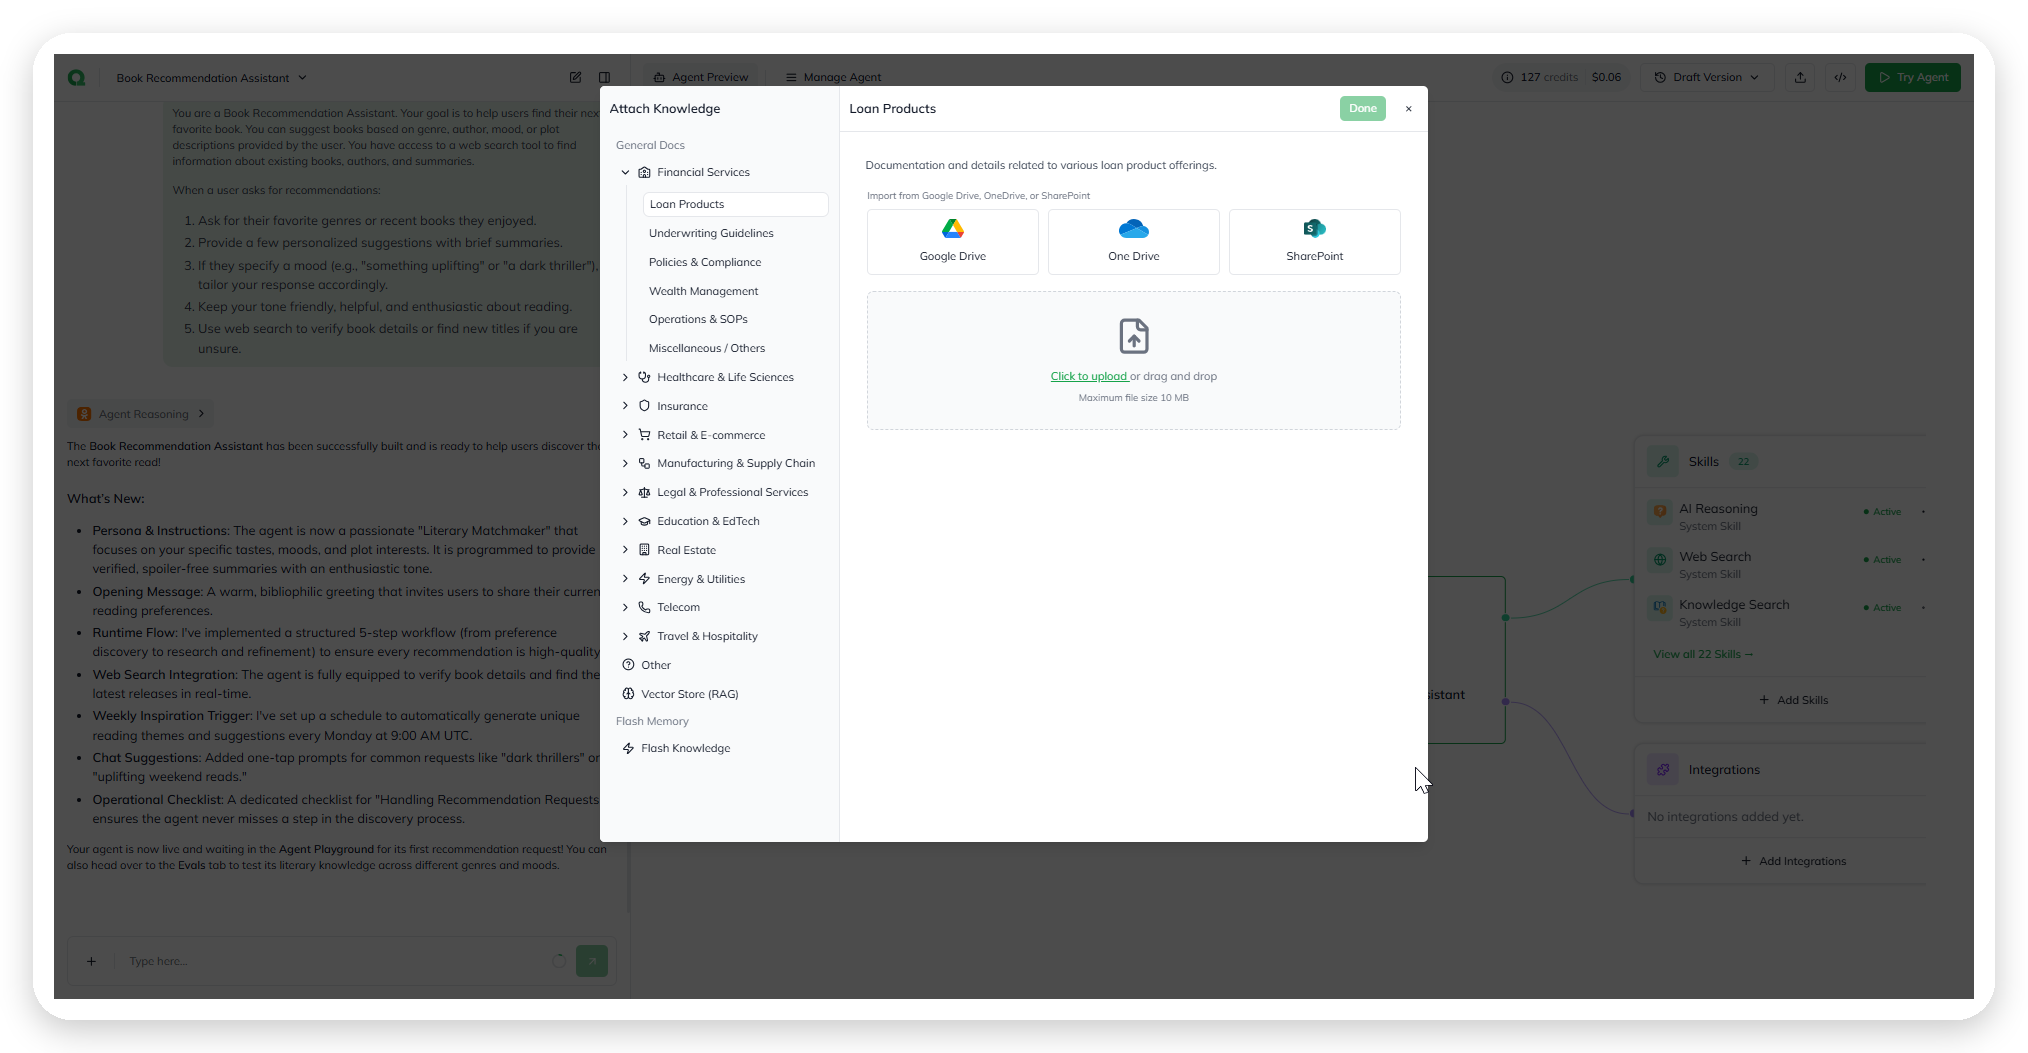
#### Open Attach Knowledge
On the **Knowledge** card, select **+ Add Knowledge**.
{% endstep %}
{% step %}
#### Choose a category
Choose the category that best matches the content, such as **Financial Services** › **Loan Products**.
{% endstep %}
{% step %}
#### Add the content
Import from **Google Drive**, **One Drive**, or **SharePoint**, or select **Click to upload** and choose a file up to 10 MB.
{% endstep %}
{% step %}
#### Done
Select **Done**. **Done** stays unavailable until at least one file is added. The knowledge appears on the **Knowledge** card.
{% endstep %}
{% endstepper %}
Attach Knowledge.
Turn on the **Preprocessing Pipeline** for scanned or table-heavy documents. For larger files, use [Datasets](/console/knowledge/datasets.md), which accepts up to 15 MB per file.
### Build or attach knowledge from the chat
Ask the builder in the chat. It can:
* **Find what exists** — ask in your own words, such as *"Do we have anything on our 2026 fee schedule?"*, then ask it to attach what it found.
* **Create and organize** — create a knowledge base or dataset, and rename one or rewrite its description.
* **Add files** — add the files you attach to the chat to a dataset, and tell you why a file failed to process.
* **Make files searchable** — sync a dataset into a knowledge base. The builder reports the result for each dataset.
* **Connect it to the agent** — attach a knowledge base, or detach it.
* **Add flash knowledge** — put a few small attached files straight into the agent's context on every run, with no dataset and no wait.
Deleting a file from a dataset, or deleting a knowledge base, affects every agent that uses it. The builder asks you to confirm by name first.
### Attach existing knowledge or a governed graph
{% stepper %}
{% step %}
#### Open Use Existing Knowledge
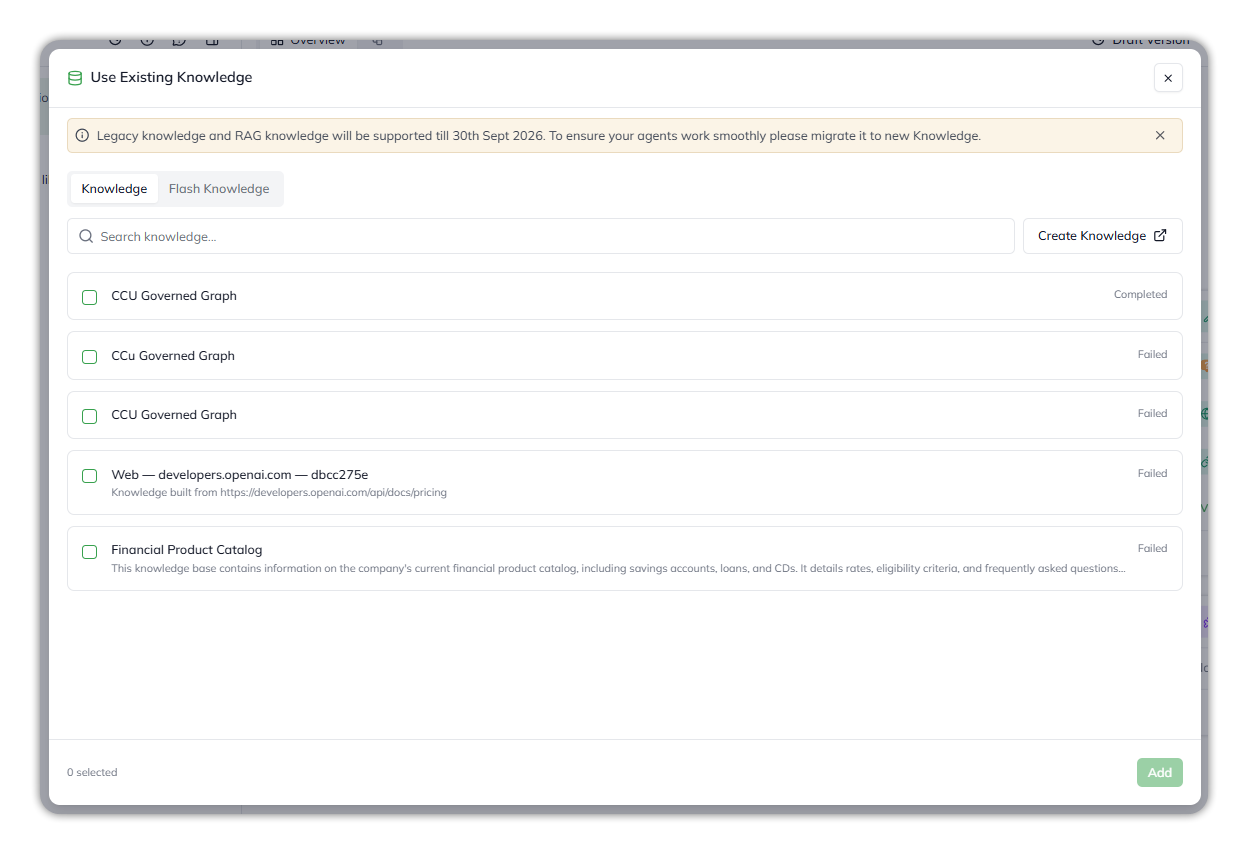
On the **Knowledge** card, select **+ Add Knowledge**. **Use Existing Knowledge** opens on its **Knowledge** tab.
{% endstep %}
{% step %}
#### Select it
Find it by name, using **Search knowledge** if the list is long, and tick it. For a governed graph, pick the entry marked **Completed**. Knowledge already attached isn't listed.
{% endstep %}
{% step %}
#### Add it
Select **Add**. It appears on the **Knowledge** card. A governed graph shows as a **Knowledge Store** marked **Active**.
{% endstep %}
{% endstepper %}
Use Existing Knowledge.
Attaching a governed graph needs the **Attach a govern graph to an agent** capability. Upload the graph in **Control Center** › **Govern** › **Governed Graph** first.
### Detach knowledge
* **A governed graph** — open its node's **⋯** menu on the **Knowledge** card, then **Unlink**.
* **A knowledge base** — ask the builder in the chat to detach it.
Detaching removes it from this agent only; the knowledge base and its files stay available to other agents.
***
## :bolt: Triggers, secrets, and variables
### Add a trigger
{% stepper %}
{% step %}
#### Open Agent Triggers
On the **Triggers** card, select **+ Add Triggers**, or open **Agent Config** › **Triggers**. An agent with no triggers shows **No triggers created** and **Add New Trigger**.
{% endstep %}
{% step %}
#### Fill in the trigger
Choose the **Trigger Source**, and enter a unique **Trigger Name** and a **Description** of when it fires. All three are required.
{% endstep %}
{% step %}
#### Save
Save the trigger. It appears on the **Triggers** card with its type, such as **Schedule**.
{% endstep %}
{% endstepper %}
{% hint style="info" %}
The description is read by a language model at runtime to decide whether an event matches. Anchor it to specific values, and keep one condition per trigger.
{% endhint %}
### Change or remove a trigger
In **Agent Triggers**, select the trigger's row to open its editor. Change the source, name, or description, then select **Update Trigger**, or **Cancel**. The row's **⋮** menu holds its other actions.
### Store a secret
{% stepper %}
{% step %}
#### Open Secrets & Variables
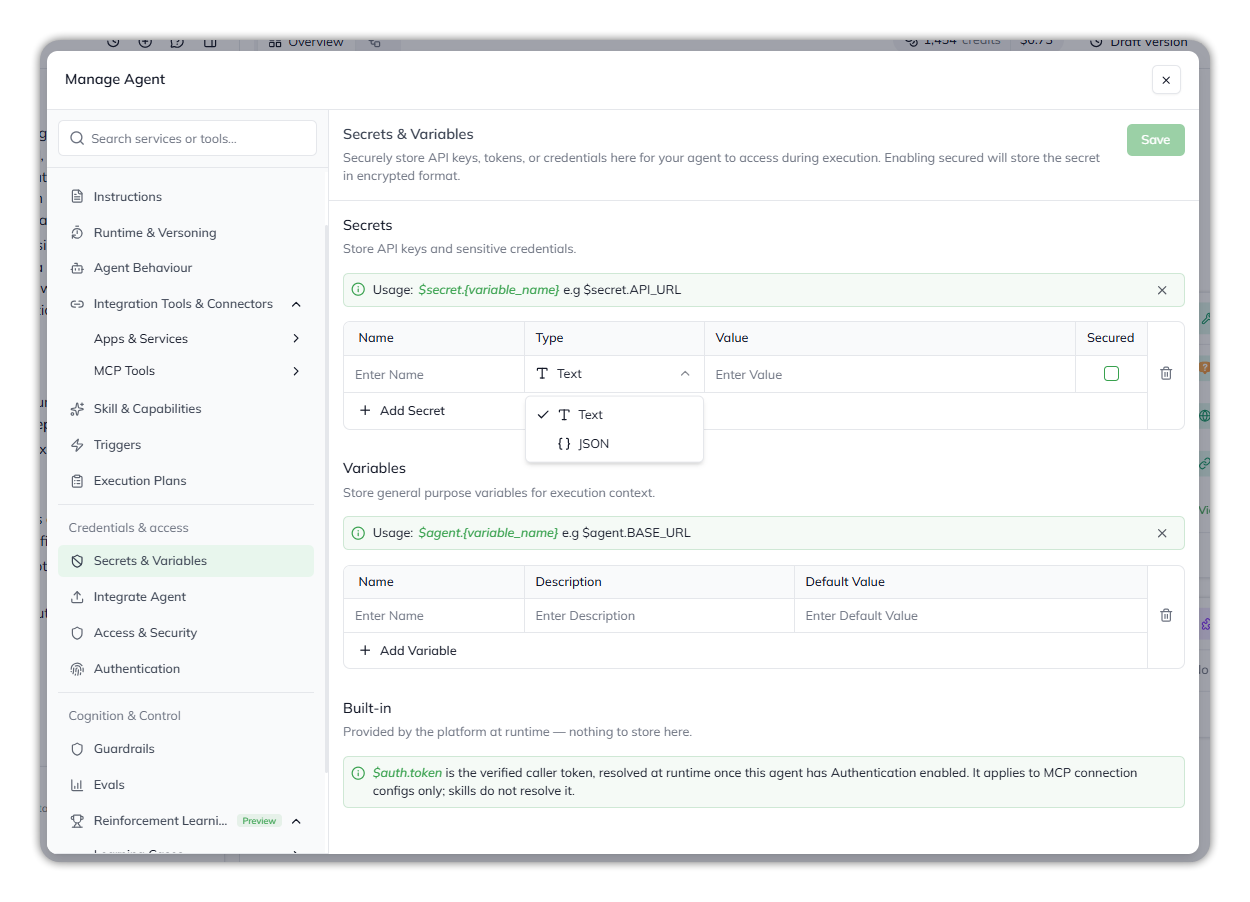
Open **Agent Config** › **Secrets & Variables**, then select **+ Add Secret**.
{% endstep %}
{% step %}
#### Fill in the row
* **Name** — starts with a letter or underscore, and uses only letters, numbers, and underscores.
* **Type** — **Text** (no spaces) or **JSON** (must be valid JSON).
* **Value** — the secret.
* **Secured** — tick it to store the value encrypted. It's off by default.
{% endstep %}
{% step %}
#### Save
Select **Save**. Reference it anywhere as `$secret.{name}`, for example `$secret.STRIPE_SECRET_KEY`.
{% endstep %}
{% endstepper %}
Secrets & Variables.
A secret's name can't be changed once saved: delete the row and add it again. To change a secured value, untick **Secured** (this clears the value), enter the new value, tick **Secured** again, and save.
### Store a variable
In **Secrets & Variables**, select **+ Add Variable**. Enter a **Name**, an optional **Description**, and an optional **Default Value**, then select **Save**. Reference it as `$agent.{name}`, for example `$agent.BASE_URL`.
The **Built-in** section lists values the platform provides, such as `$auth.token`, the verified caller's token. It resolves only in MCP connection configurations.
### Review the agent reusable plans
Open **Agent Config** › **Checklists**. Each row is a reusable execution plan the agent built from successful runs, with its **Name**, **When to use**, number of **Steps**, and **Actions**. Checklists also power the **Flow** tab. See [Execution Plan/Checklist](/console/agent-builder/build/execution-plan-checklist.md).
### See how many credits the agent has used
Read the credits meter in the canvas header, such as **1,683 credits** and **$0.84**. Hover over it for the breakdown.
***
## :flask-vial: Test and improve
### Try the agent
Select **Try Agent** in the canvas header, or the **▷** icon on the agent's row in **My Agents**. The Agent Playground opens in a new tab, where you can chat with the agent. You need the **Trigger Agent** capability, and the agent needs a widget key.
### Build a test dataset
{% stepper %}
{% step %}
#### Open Evals
Open **Agent Config** › **Evals**. On the **Datasets** tab, select **Generate Dataset**.
{% endstep %}
{% step %}
#### Choose where the test cases come from
* **Upload file** — a `.pdf`, `.xlsx`, `.xls`, or `.md` file up to 10 MB that lists test cases or describes scenarios. Up to 500 test cases.
* **Generate with AI** — set the **Number of Test Cases** (1–50, default 10), and optional **Additional Instructions**, such as *"Focus on edge cases related to pricing"*. The cases are written from the agent's instructions.
{% endstep %}
{% step %}
#### Review and generate
Enter a **Dataset name** (up to 120 characters), check the source, and generate. An uploaded document shows **Extracting** until its test cases are ready; you can leave the page meanwhile.
{% endstep %}
{% endstepper %}
Evals, on the Datasets tab.
Each agent can have up to 100 datasets. A dataset's row has **Rename** and **Delete**. Each test case holds a question, an expected answer, and optional documents.
### Run an evaluation
{% stepper %}
{% step %}
#### Start the run
Open a dataset with at least one test case, then select **Run Evaluation**. Qore confirms *Evaluation run started*.
{% endstep %}
{% step %}
#### Follow it
On the **Runs** tab, each run shows its status, progress, and **Passed**, **Failed**, and **Avg score**. Select **Stop** to end a running evaluation; completed results are kept.
{% endstep %}
{% step %}
#### Read the scores
Open the run. Each test case is scored 0–10 by an LLM, with its reasoning. **7 or above passes.** Each result shows the question, the expected answer, the agent's actual answer, and the scorer's reasoning.
{% endstep %}
{% endstepper %}
Evals, on the Runs tab.
### Apply suggested changes
When a run completes with failures or an average score below 7, Qore suggests changes, each in a category: **Instructions**, **Skills**, **Knowledge**, **Guardrails**, or **Other**.
{% stepper %}
{% step %}
#### Open the suggestions
Select **Apply to Agent** on the completed run.
{% endstep %}
{% step %}
#### Choose what to apply
Tick the suggestions you want. Edit a title, category, or description if needed.
{% endstep %}
{% step %}
#### Apply
Select **Apply**. Agent Config closes, and the builder agent makes the changes in the chat panel.
{% endstep %}
{% endstepper %}
Run the evaluation again to check the result. See [Evals](/console/agent-builder/test/evals.md).
***
## :shield-halved: Secure the agent
### Create an access key
{% stepper %}
{% step %}
#### Open Access & Security
Open **Agent Config** › **Access & Security**, under *Credentials & access*, then select **+ Add Key**.
{% endstep %}
{% step %}
#### Name it and choose the type
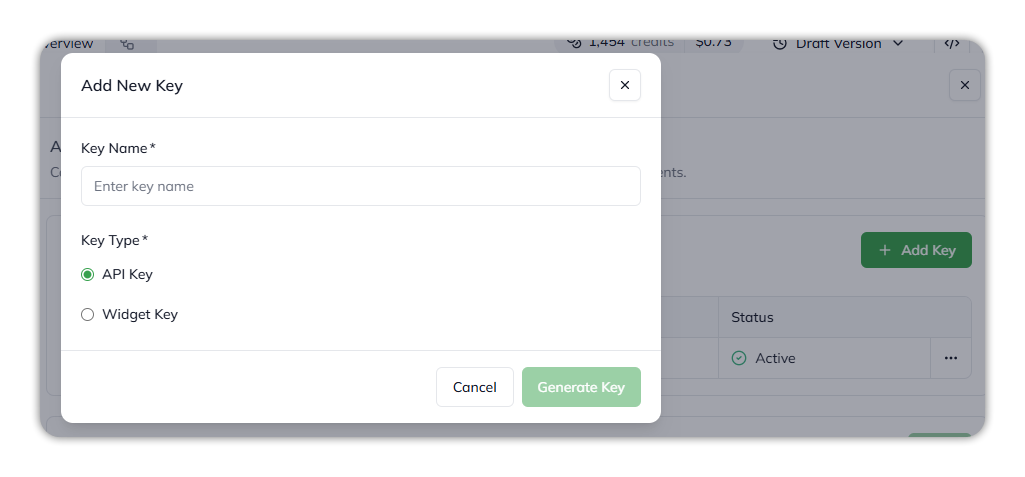
Enter a **Key Name**, such as `Production Widget`, and choose the **Key Type**:
* **Widget Key** — for the embedded chat and the TypeScript SDK. Safe in browser code; works only from the platform and your allowed domains.
* **API Key** — a key and secret pair for server-to-server calls.
{% endstep %}
{% step %}
#### Generate and copy
Select **Generate Key**. Copy the key, and for an API key its **API Secret**, before you close the dialog. They can't be retrieved later.
{% endstep %}
{% endstepper %}
Add a key.
To copy an existing key later, select the copy icon beside its masked value in the **Key** column.
### Rename or deactivate a key
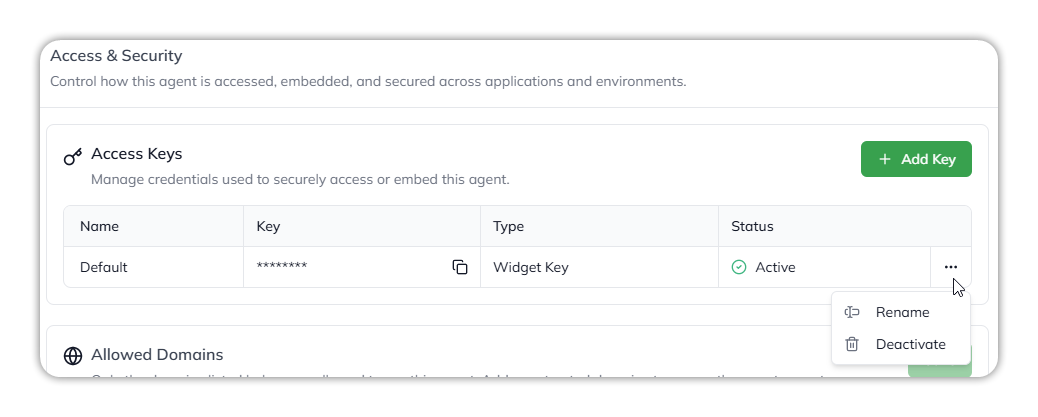
On the key's row, open **⋯**, then **Rename** or **Deactivate**. Deactivating can't be undone. There's no rotate action: add a new key, move your integrations to it, then deactivate the old one.
A key's menu.
### Limit where the widget can run
In **Access & Security**, under **Allowed Domains**, select **+ Add New Domain**, enter the URL or domain in **Enter URL**, and select **Save**. Remove an entry with its trash icon.
* With the list empty, the widget runs nowhere outside the platform.
* The list applies to widget keys only.
* Enter each domain exactly as the browser sends it. A mismatch in protocol, subdomain, or port is refused.
Access & Security.
### Verify who is calling the agent
{% stepper %}
{% step %}
#### Register an app with your identity provider
Register an application in Microsoft Entra ID, or create an OAuth client in your Google Cloud project.
{% endstep %}
{% step %}
#### Turn on Authentication
In **Agent Config** › **Authentication**, turn on **Enable Authentication**, and choose the **Authentication Provider**.
{% endstep %}
{% step %}
#### Enter the provider's details
* **Microsoft Entra ID** — the **Directory (tenant) ID** and **Application (client) ID**, from the app registration's **Overview** page.
* **Google** — the **OAuth client ID**, ending in `.apps.googleusercontent.com`.
{% endstep %}
{% step %}
#### Save
Select **Save**.
{% endstep %}
{% endstepper %}
Authentication with Microsoft Entra ID.
Your app then sends the signed-in user's token with each request. Requests without a token still run; requests with an invalid token are rejected. See [Integrate an agent › Verify who's calling](/task-guides/integrate-an-agent.md#send-the-signed-in-user-token).
### Mask personal data
{% stepper %}
{% step %}
#### Turn on Sensitive Data Masking
Open **Agent Config** › **Guardrails**. Turn on **Sensitive Data Masking**, then select the **gear** in its row.
{% endstep %}
{% step %}
#### Choose a provider
Choose **AWS Comprehend**, **Azure Text Analytics**, **Google Cloud DLP**, **Regex**, or **Off**. The provider decides which entity types you can pick.
{% endstep %}
{% step %}
#### Set the entity rule
* **Deny list** — mask only the entity types you select.
* **Allow list** — pass the selected types through, and mask every other detected type.
Use **Select all**, **Clear**, or **Clear group**, and **Search** to find a type.
{% endstep %}
{% step %}
#### Save
Select **Save**.
{% endstep %}
{% endstepper %}
PII masking.
Masked values are replaced with tokens before the model sees them. Tokenization needs a compatible executor version; otherwise the entity list is read-only. See [PII masking](/console/agent-builder/deploy/guardrails/pii-masking.md).
### Require approval before a skill runs
{% stepper %}
{% step %}
#### Turn on Tool Execution Approval
In **Agent Config** › **Guardrails**, turn on **Tool Execution Approval**, then select the **gear**.
{% endstep %}
{% step %}
#### Choose the skills
On **Edit Tool Permission**, turn on approval for each skill that needs it, or turn on **Enable for all skills** to cover every current and future skill. **Search skills** filters the list.
{% endstep %}
{% step %}
#### Save
Select **Update Tool Permission**, or **Cancel**.
{% endstep %}
{% endstepper %}
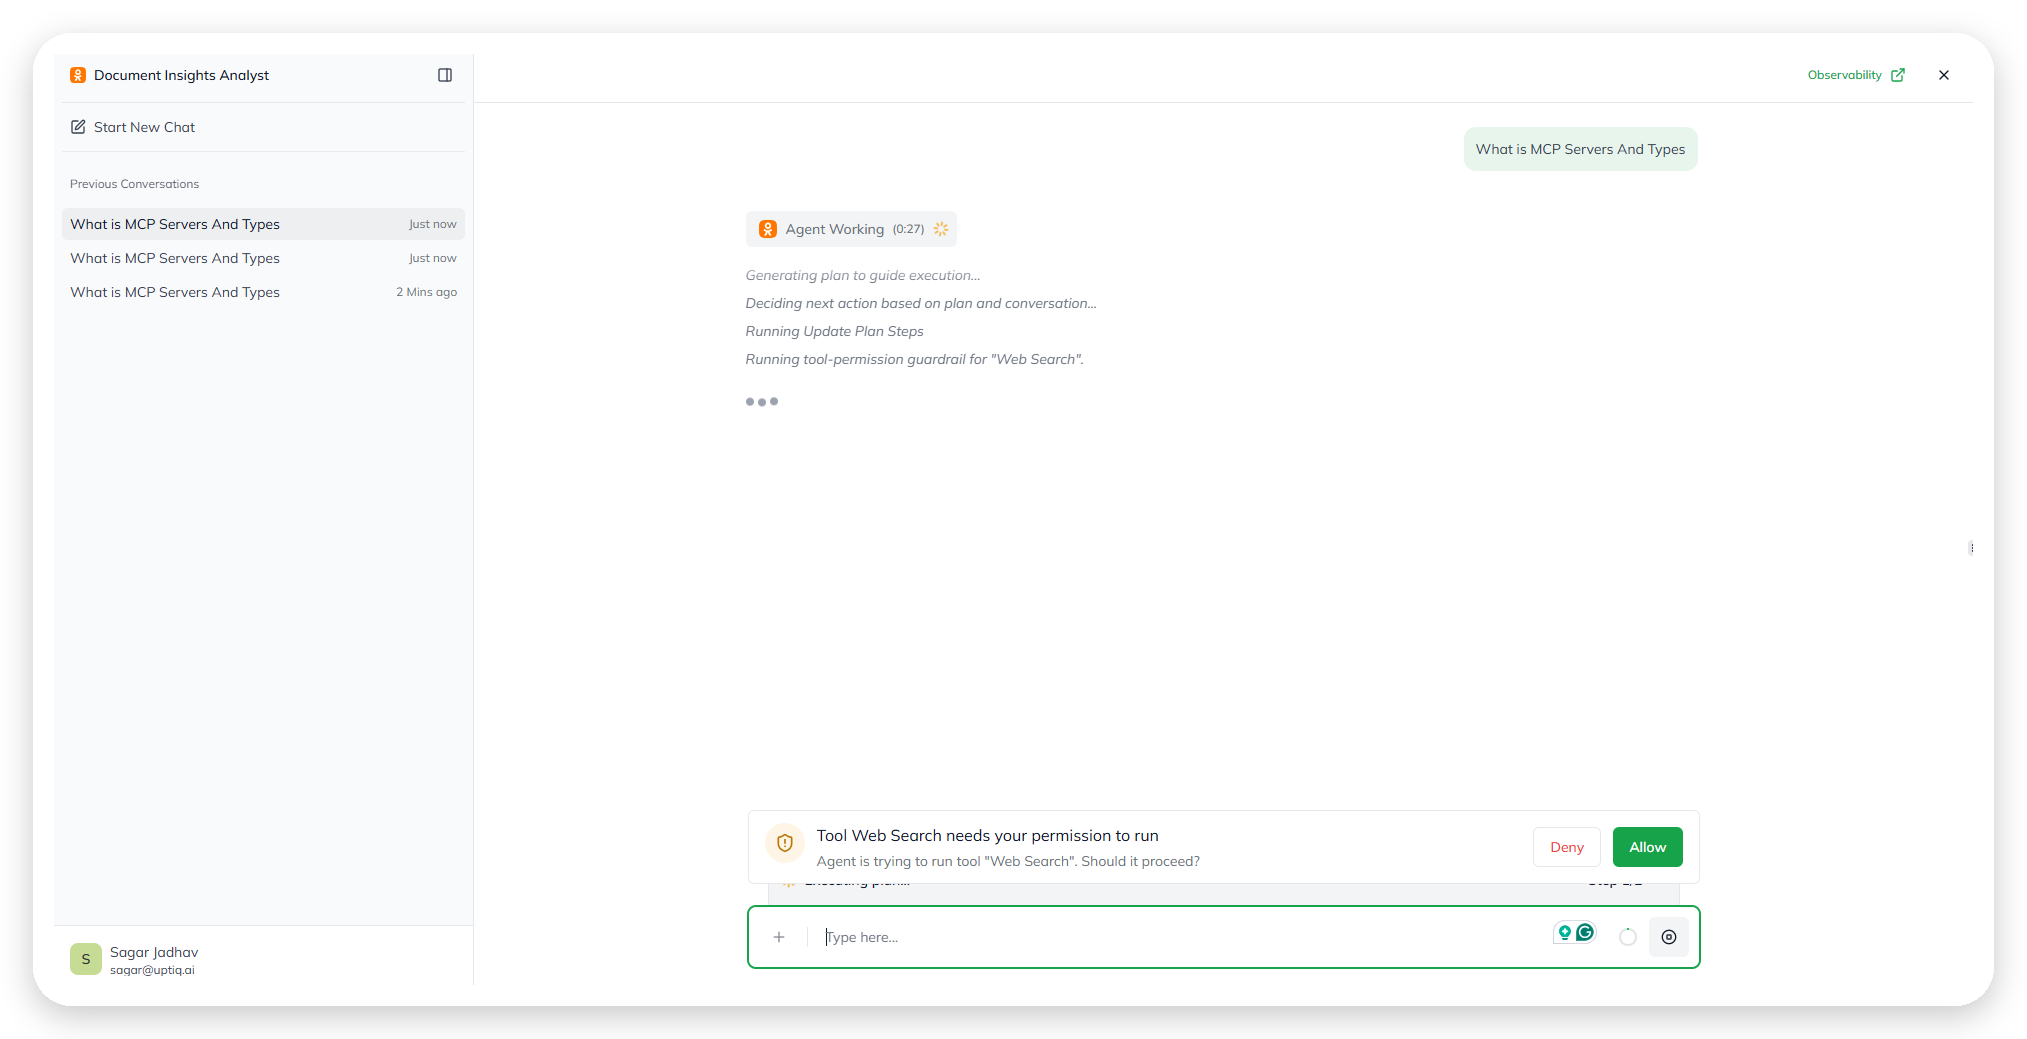
When the agent reaches one of those skills, it pauses and asks the user. **Allow** runs the skill; **Deny** blocks it, and the agent continues without it.
A skill waiting for approval.
### See which models are allowed
In **Agent Config** › **Guardrails**, **Allowed LLM Families** and **Allowed LLM Providers** show as **Always enforced**. Your organization sets them in the [AI Gateway](/control-center/ai-gateway.md); they can't be changed per agent.
Guardrails.
***
## :rocket: Ship and run
### Save or switch versions
Changes save to the draft. To keep the current state as a version you can return to, select **Draft Version** in the canvas header. See [Runtime & Versioning](/console/agent-builder/build/runtime-and-versioning.md#draft-versions-and-executor-versions).
### Download a saved version
On a saved version with no unsaved changes, select **Download Agent Version** (the download icon) in the canvas header. The version's file downloads to your browser.
### Choose the executor version
The executor version is the runtime that runs the agent. Change it in either place:
* **Agent Config** › **Runtime & Versoning** › **Executor Version**, then **Save**.
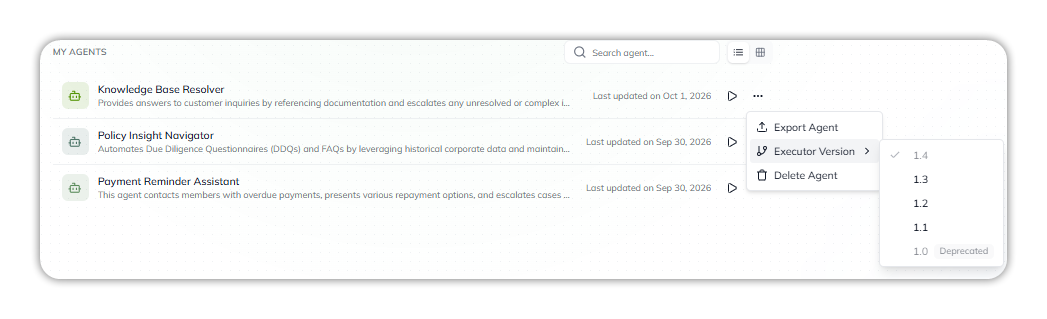
* **My Agents**: select **•••** on the agent's row, then **Executor Version**, and choose a version. The current one is ticked. **1.0** is marked **Deprecated**.
The agent's ••• menu, with Executor Version open.
{% hint style="warning" %}
Switching the executor version can change the agent's behavior and the features available to it. Test the agent after you switch.
{% endhint %}
### Run the agent in my own app
Select **Integrate Agent** (``) in the canvas header. Choose **Embedded Chat** for a chat widget, or **Agent API** to call the agent from your code. For every step, see [Integrate an agent](/task-guides/integrate-an-agent.md).
### Export the agent
{% stepper %}
{% step %}
#### Open Export Agent Package
Select the export icon in the canvas header, or **•••** › **Export Agent** on the agent's row in **My Agents**. Both open the same dialog. You need the **Export Agent** capability.
{% endstep %}
{% step %}
#### Choose what to include
* **Include secrets (API keys, tokens, credentials)** — off by default.
* **Include MCP configuration** — off by default. Off, MCP connections still export, without their credentials; re-enter them with **Initialize** after import.
* **Include integration skills** — off by default.
{% endstep %}
{% step %}
#### Export
Select **Export Package**. Qore emails you a download link when the package is ready. The link expires; export again for a new one.
{% endstep %}
{% endstepper %}
Export Agent Package.
{% hint style="warning" %}
**Include secrets** puts credential values in the package. See [Export Agent](/console/agent-builder/deploy/export-agent.md).
{% endhint %}
***
## :chart-line: Monitor in production
### Inspect the agent runs
Open **Control Center** › **Observe** › **Runs & Traces**. Each row is one run, from the widget, the API, or a trigger, with its **Execution ID** and **Conversation ID**. Select a row to see the skills chosen, their results, guardrail results, and step timing. See [Runs & Traces](/control-center/observe/runs-and-traces.md).
### Score live conversations
Open **Agent Config** › **Online-Eval**. On **Scorers**, choose the quality dimensions to evaluate. On **Runs**, see the evaluation history and results. Scoring runs in the background and never affects the live conversation. See [Online-Eval](/console/agent-builder/monitor/online-eval.md).
### Turn on persona or FAQ memory
Open **Agent Config** › **Reinforcement Learning** (Preview):
* **User Persona** — turn on **Enable User Persona** to remember what each user has asked about, preferred, or corrected. You can delete a stored memory.
* **FAQ** — turn on **Enable FAQ** to use stored FAQs and their answers when a question matches.
* **Learning Cases** — review corrections from production. Each one needs a person's approval before it's used.
Both memories are off on a new agent, and aren't used while **Agent Capability** is **Fast**.
***
## :folder-gear: Manage your agents
**My Agents**, below the prompt on Create New Agent, lists your agents. Each row shows the agent's name, description, and when it was last updated, then **▷** (Try Agent) and the **•••** menu.
### Find one of my agents
* Type part of the name in **Search agent…**.
* Use the list and grid icons to switch how the agents are laid out.
### Delete an agent
Select **•••** on the agent's row in **My Agents**, then **Delete Agent**.
***
## :triangle-exclamation: Common issues
* **The agent ignores attached knowledge.** Check that **Knowledge Search** is active, that the instructions tell the agent to consult its sources, and that new files show **Synced**.
* **The agent doesn't use a skill.** Make the skill description specific, and refine the instructions to say when to use it.
* **A skill fails at runtime.** Check its credentials and endpoint, then inspect the run in **Runs & Traces**.
* **An MCP server's tools all fail as unauthorised.** The server may expect client credentials. Turn on **Authenticate M2M** and reconnect.
* **An MCP connection fails at Next on an OAuth server.** The server may not support dynamic client registration. Enter the **OAuth Client ID** (and secret) from its OAuth app under **Advanced Settings**.
* **The MCP sign-in pop-up didn't open.** Your browser may have blocked it. Select **Connect to Authorize**.
* **An MCP server shows Initialize instead of Connect.** It was imported without its credentials. Select **Initialize** and enter them.
* **An MCP server's API key shows in Connectors.** Catalog keys are saved in the server URL. Edit the connection and enter a `$secret.` reference instead.
* **I don't see the canvas.** You may still be in the planning view. Select **Build Agent**.
* **Agent Behaviour won't save.** A selected model or mode isn't available. Choose one that isn't greyed out or marked **Not Supported**.
* **The chat says it was made in an older version.** Select **Migrate chat** to keep its history, or **Start new conversation**.
* **The Export Agent icon is disabled.** You need the **Export Agent** capability.
* **I lost an API secret.** It's shown only once. Create a new API key, move your integration to it, and deactivate the old one.
***
## :link: Related pages
* [Get Started](/console/agent-builder/get-started.md), [The Canvas](/console/agent-builder/the-canvas.md), and [Build](/console/agent-builder/build.md)
* [Evals](/console/agent-builder/test/evals.md), [Access & Security](/console/agent-builder/deploy/authentication.md), and [Guardrails](/console/agent-builder/deploy/guardrails.md)
* Run the agent in your own app: [Integrate an agent](/task-guides/integrate-an-agent.md)
* Build a multi-step automation: [Create a flow](/task-guides/create-a-flow.md)
***
{% columns %}
{% column width="83.33333333333334%" %}
Maintained by Abhishek Paul AI-assisted, human-approved
{% endcolumn %}
{% endcolumns %}
---
# Agent Instructions
This documentation is published with GitBook. GitBook is the documentation platform designed so that both humans and AI agents can read, navigate, and reason over technical content effectively. Learn more at gitbook.com.
## Querying This Documentation
If you need additional information that is not directly available in this page, you can query the documentation dynamically by asking a question.
Perform an HTTP GET request on the current page URL with the `ask` query parameter, and the optional `goal` query parameter:
```
GET https://docs.uptiq.ai/task-guides/create-an-agent.md?ask=&goal=
```
`ask` is the immediate question: it should be specific, self-contained, and written in natural language.
`goal` is optional and describes the broader end goal you are ultimately trying to accomplish on behalf of the user. GitBook uses it to tailor the answer towards what is most useful for that goal.
The response will contain a direct answer to the question and relevant excerpts and sources from the documentation.
Use this mechanism when the answer is not explicitly present in the current page, you need clarification or additional context, or you want to retrieve related documentation sections.