> For the complete documentation index, see [llms.txt](https://docs.uptiq.ai/llms.txt). Markdown versions of documentation pages are available by appending `.md` to page URLs; this page is available as [Markdown](https://docs.uptiq.ai/task-guides/create-a-design-system.md).
# Create a design system
Every Design Systems task, from describing a brand to fonts, colors, versions, and using the design system in apps and documents.
This guide is organized by task. Find what you want to do in the list below, then follow the steps.
A **design system** stores the visual identity for apps in one project: a visual style, logos, fonts, and colors. Apps can use design systems from their own project only.
| Task | Go to |
| ---------------------------------------------- | ----------------------------------------------------------------------------- |
| Create a design system by describing a brand | [Create from a prompt](#create-a-design-system-from-a-prompt) |
| Start from a ready-made template | [Start from a template](#start-from-a-template) |
| Build one from a brand guide or website | [Use a brand guide or website](#build-one-from-a-brand-guide-or-website) |
| Change a design system by chatting | [Change it](#change-a-design-system-by-chatting) |
| Rename a design system | [Rename it](#rename-a-design-system) |
| Choose the overall look | [Visual style](#choose-a-visual-style) |
| Add logos and a favicon | [Brand logos](#add-brand-logos) |
| Set the fonts | [Typography](#set-the-fonts) |
| Set the brand colors | [Brand colors](#set-the-brand-colors) |
| Set colors for dark mode | [Light and dark](#set-colors-for-light-and-dark-mode) |
| Fine-tune individual colors | [Advanced Customization](#fine-tune-individual-colors) |
| Save my changes, or discard them | [Save or reset](#save-or-discard-changes) |
| Go back to an earlier look | [Restore a version](#go-back-to-an-earlier-version) |
| Use a design system in an app | [Use in an app](#use-a-design-system-in-an-app) |
| Create or change one from the Console Operator | [Use the Operator](#create-or-change-a-design-system-in-the-console-operator) |
| Brand a generated document | [Brand a document](#brand-a-generated-document) |
| Find one of my design systems | [Find a design system](#find-one-of-my-design-systems) |
| Delete a design system | [Delete it](#delete-a-design-system) |
{% hint style="info" %}
Creating and editing design systems needs the **Manage design systems** capability. Viewing them needs **View design systems**.
{% endhint %}
***
## :swatchbook: Start a new design system
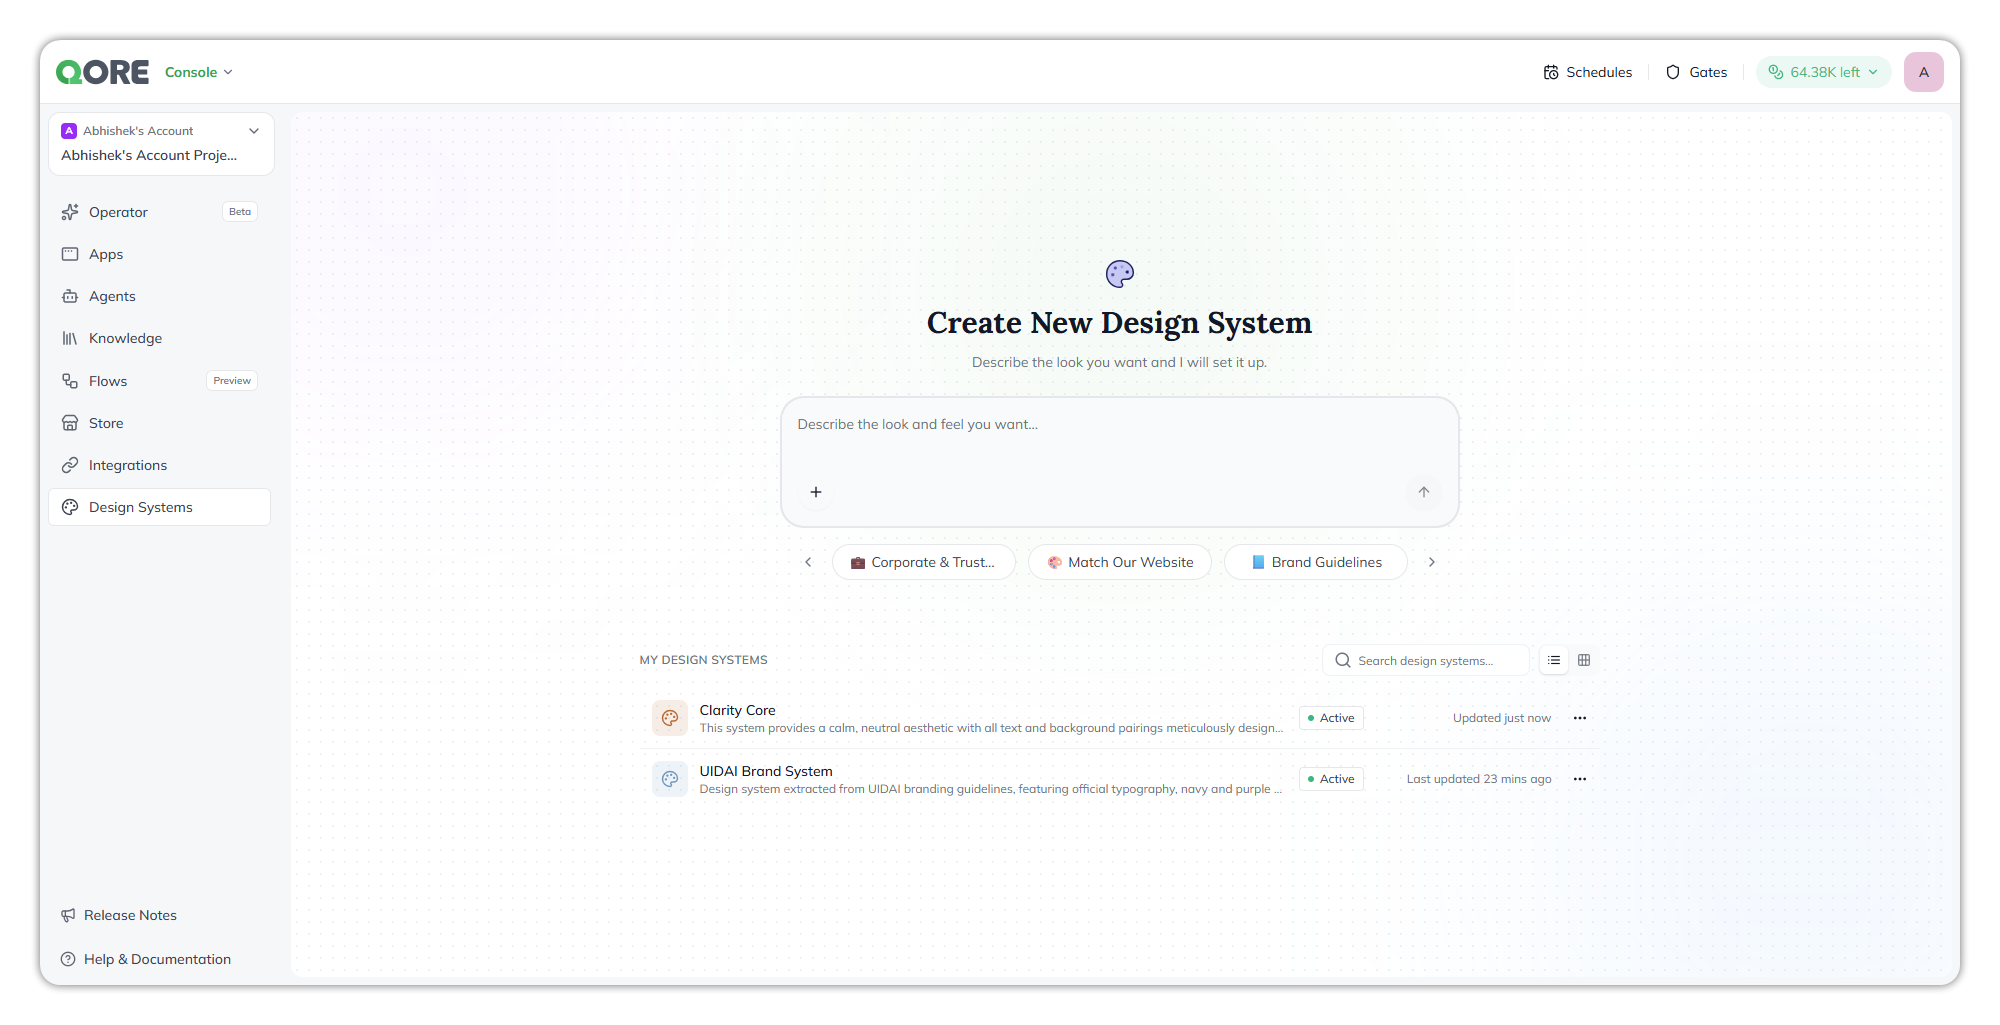
Select **Design Systems** in the Console sidebar. **Create New Design System** sits at the top, and **MY DESIGN SYSTEMS** lists the project's design systems below it.
Design Systems.
### Create a design system from a prompt
{% stepper %}
{% step %}
#### Describe the brand
In **Describe the look and feel you want…**, describe the brand: colors, typography, logo usage, or a public website. For example: *"Build a design system from our brand guidelines — primary and accent colors, typography, and logo usage."*
{% endstep %}
{% step %}
#### Answer the follow-up questions
The agent asks for brand details it needs. You can skip a question.
{% endstep %}
{% step %}
#### Review and save
Review the visual style, colors, fonts, and logos, then select **Save**. The agent names the design system from your description.
{% endstep %}
{% endstepper %}
{% hint style="warning" %}
Compare the generated colors, fonts, and logos with your brand guidance before you build an app with them.
{% endhint %}
### Start from a template
Select a suggestion chip below the prompt, such as **Corporate & Trust**, **Match Our Website**, or **Brand Guidelines**. Then tailor the generated design system to your brand.
### Build one from a brand guide or website
* **A brand guide or logo files** — attach them to your description. The agent takes colors and logos from them.
* **A website** — include its URL in your description.
***
## :pen-ruler: Work in the builder
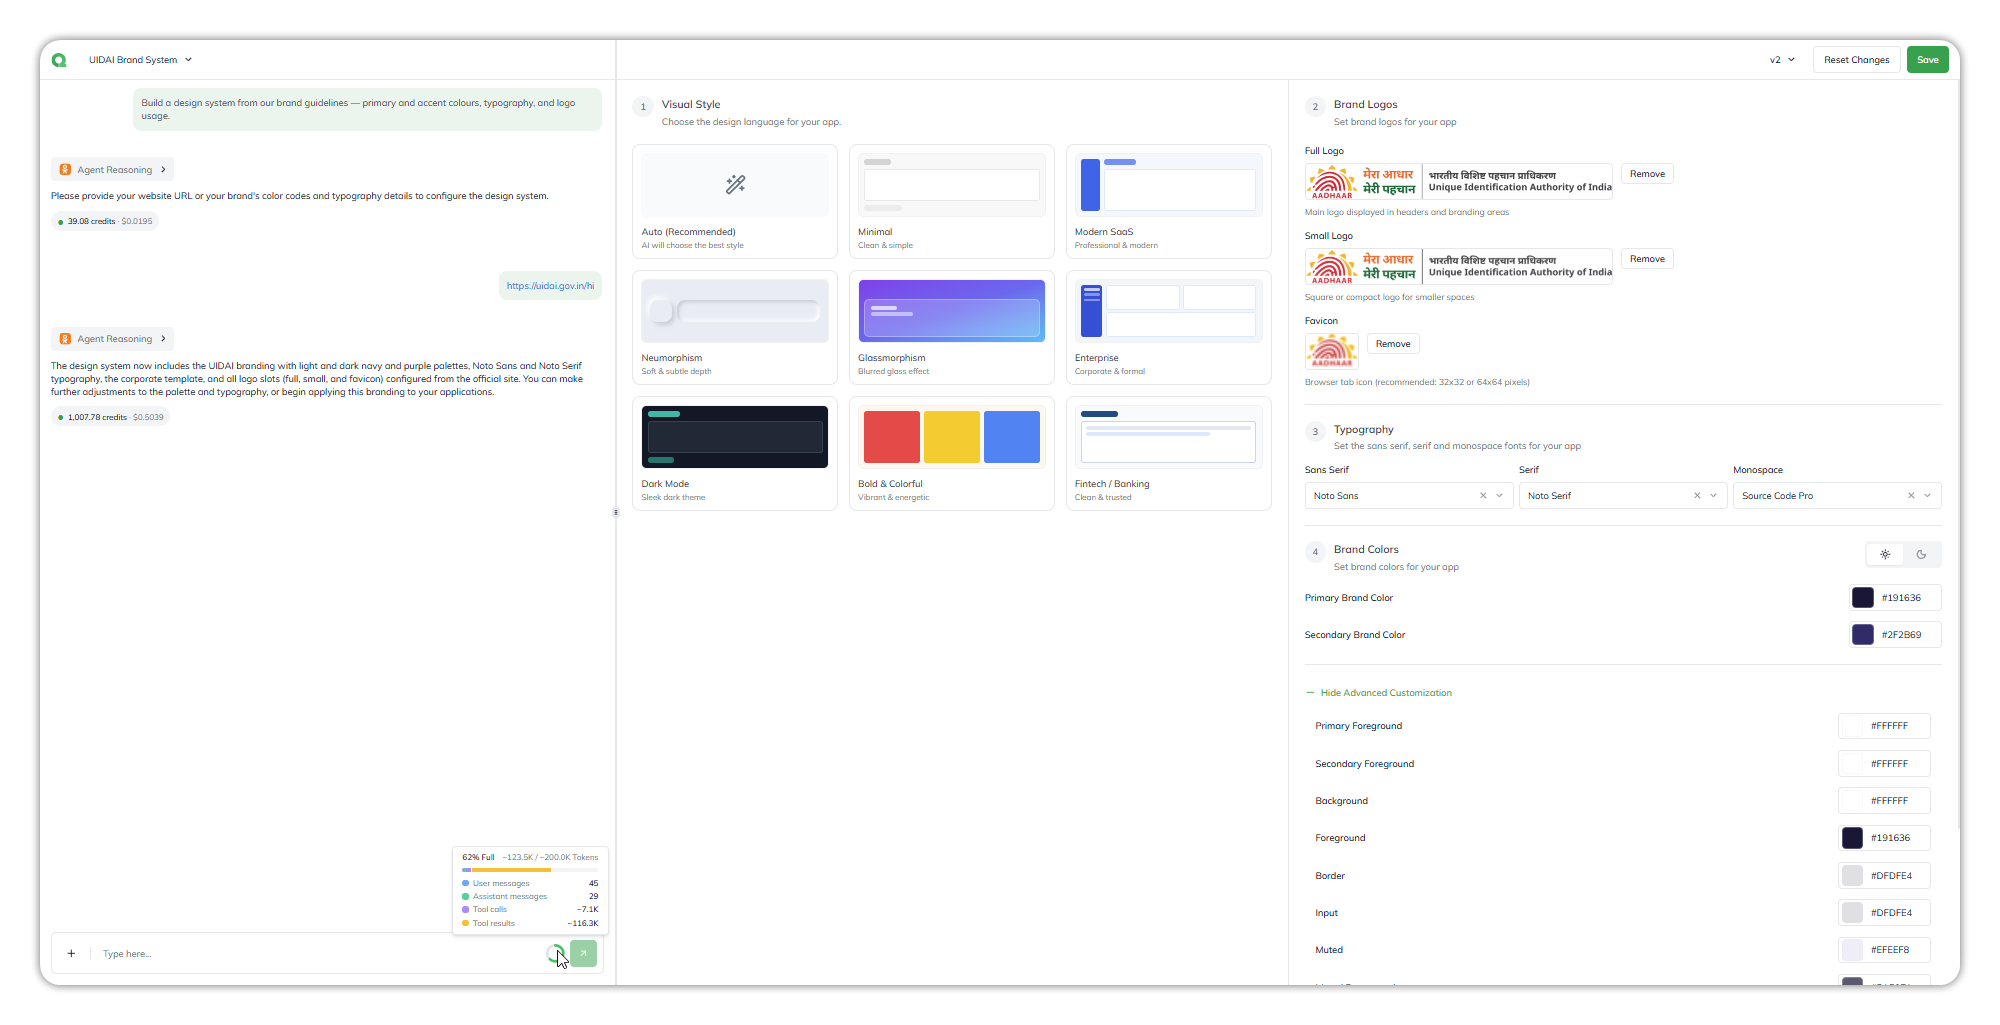
Select a design system in **MY DESIGN SYSTEMS** to open the builder. The agent chat is on the left, and the settings are on the right: **Visual Style**, **Brand Logos**, **Typography**, and **Brand Colors**, with the version menu (**vN ▾**), **Reset Changes**, and **Save** above them.
The builder.
### Change a design system by chatting
Describe the change in the chat, for example to lighten a secondary color or use a serif heading font. When the agent changes one setting, every other setting stays as it was.
Each design system keeps one builder chat. Reopening the design system continues the same conversation.
### Rename a design system
Select the design system's name at the top of the builder, then rename it.
### Choose a visual style
Under **Visual Style**, select one style. **Auto (Recommended)** is the default. The others are **Minimal**, **Modern SaaS**, **Neumorphism**, **Glassmorphism**, **Enterprise**, **Dark Mode**, **Bold & Colorful**, and **Fintech / Banking**.
Changing the visual style doesn't overwrite the brand colors.
### Add brand logos
Under **Brand Logos**, upload or remove each one. All are optional.
* **Full Logo** — your primary logo for headers and branding areas.
* **Small Logo** — a square or compact logo for small spaces.
* **Favicon** — the browser tab icon. Use 32 × 32 or 64 × 64 pixels.
### Set the fonts
Under **Typography**, choose a **Sans serif**, **Serif**, and **Monospace** font from the built-in list. Clear a selection to use the default. Custom font uploads aren't supported.
{% hint style="info" %}
Set fonts before building an app. Existing apps keep the fonts used when they were built.
{% endhint %}
### Set the brand colors
Under **Brand Colors**, set the **Primary Brand Color** (default `#2b7fff`) and **Secondary Brand Color** (default `#f4f4f5` in light mode). Each has a color swatch and an editable hex value.
### Set colors for light and dark mode
Use the sun and moon toggle beside **Brand Colors** to switch the palette you're editing. Set values for both modes when the app supports theme switching.
### Fine-tune individual colors
Expand **Advanced Customization** to set individual colors: **Primary Foreground**, **Secondary Foreground**, **Background**, **Foreground**, **Border**, **Input**, **Muted**, **Muted Foreground**, **Accent**, **Accent Foreground**, **Sidebar**, and **Sidebar Foreground**. Each has a color swatch and an editable hex value.
### Save or discard changes
* **Save** — creates a new version.
* **Reset Changes** — discards unsaved edits.
Changes made by the builder agent also create versions. Renaming a design system or changing its description doesn't.
***
## :code-branch: Versions
### Go back to an earlier version
{% stepper %}
{% step %}
#### Open the version menu
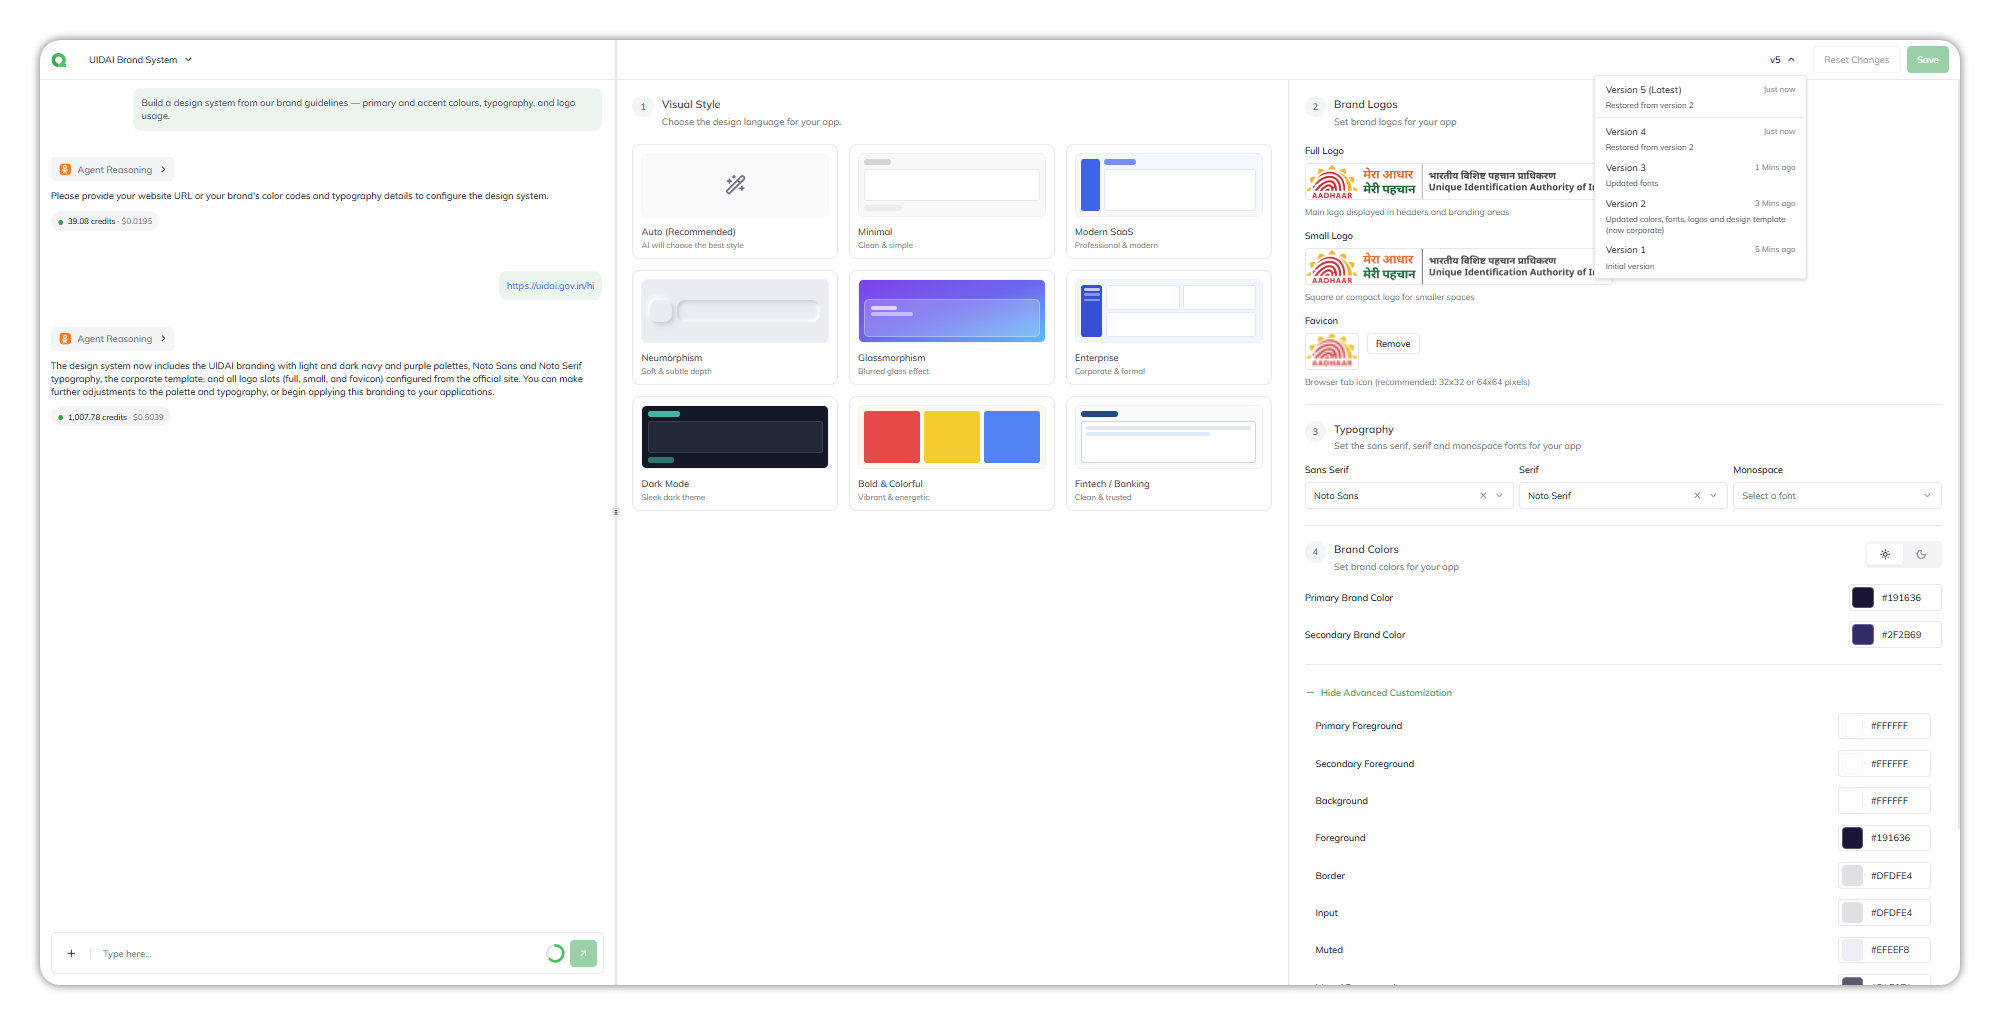
Select **vN ▾**. It lists the versions, newest first, each with its age and what changed, such as *Updated fonts*.
The version menu.
{% endstep %}
{% step %}
#### Select a version
Select the version to restore. You can't restore the version that's already current.
{% endstep %}
{% step %}
#### Restore
Select **Restore**, or **Cancel** to leave things as they are. The restore creates a new version, and the history stays intact.
{% endstep %}
{% endstepper %}
{% hint style="warning" %}
Restoring doesn't restyle existing apps. Apps already built keep their look; only apps built afterwards use the restored version.
{% endhint %}
***
## :paintbrush: Use a design system
### Use a design system in an app
In App Builder, select the palette icon in the prompt box, or **App Config** › **Brand Guidelines** in an existing app. On **Choose from project designs**, pick the design system from **Project design**. See [Create an app › Set the design and branding](/task-guides/create-an-app.md#set-the-design-and-branding).
Changes made inside an app affect that app only. Edit the design system here to affect future app builds.
### Create or change a design system in the Console Operator
Ask the [Console Operator](/task-guides/use-the-console-operator.md) to create, update, or delete a design system. It can look up a brand on the web first.
* **Build an app with one** — the Operator asks which design system to apply. Name it in your request to skip the question. If none fits, it creates and saves a new one during the build.
* **Set a logo** — attach the image to the conversation. The Operator asks whether it's the **Full Logo**, **Small Logo**, or **Favicon**. Logos can be PNG, JPEG, GIF, WebP, or SVG, up to 5 MB.
### Brand a generated document
When you ask the Console Operator for a document, such as a report or PDF, it asks which design system to use. Name one in your request to skip the question. A branded document uses the light palette's primary, secondary, and accent colors; fonts, logos, and layout use document defaults.
***
## :folder-gear: Manage your design systems
### Find one of my design systems
In **MY DESIGN SYSTEMS**, search by name, and switch between list and card views.
### Delete a design system
Select **⋯** on the design system, then delete it. The same menu opens it; edit it in its builder.
***
## :triangle-exclamation: Common issues
* **My app didn't change after I saved the design system.** Existing apps keep their styling. Only apps built afterwards use the change.
* **I can't upload my own font.** Fonts come from the built-in list.
* **The generated colors don't match my brand.** Change them in **Brand Colors**, or ask the agent, then save.
* **A generated document doesn't use my fonts or logo.** Documents use the design system's colors only.
***
## :link: Related pages
* [Design Systems](/console/design-systems.md)
* [Create an app](/task-guides/create-an-app.md) and [Use the Console Operator](/task-guides/use-the-console-operator.md)
***
{% columns %}
{% column width="83.33333333333334%" %}
Maintained by Abhishek Paul AI-assisted, human-approved
{% endcolumn %}
{% endcolumns %}
---
# Agent Instructions
This documentation is published with GitBook. GitBook is the documentation platform designed so that both humans and AI agents can read, navigate, and reason over technical content effectively. Learn more at gitbook.com.
## Querying This Documentation
If you need additional information that is not directly available in this page, you can query the documentation dynamically by asking a question.
Perform an HTTP GET request on the current page URL with the `ask` query parameter, and the optional `goal` query parameter:
```
GET https://docs.uptiq.ai/task-guides/create-a-design-system.md?ask=&goal=
```
`ask` is the immediate question: it should be specific, self-contained, and written in natural language.
`goal` is optional and describes the broader end goal you are ultimately trying to accomplish on behalf of the user. GitBook uses it to tailor the answer towards what is most useful for that goal.
The response will contain a direct answer to the question and relevant excerpts and sources from the documentation.
Use this mechanism when the answer is not explicitly present in the current page, you need clarification or additional context, or you want to retrieve related documentation sections.